Lesson 1: Configuring Recipient Objects
As an administrator who has previously managed a Microsoft Exchange Server 5.5 environment, one of the biggest changes you will notice when administering Exchange Server 2003 is recipient management because Exchange Server 5.5 maintained its own directory independent of Microsoft Windows. Exchange Server 2003 tightly integrates with Active Directory directory service objects (such as domain user accounts). One difference between Exchange Server 5.5 and Exchange Server 2003 is that you use the Active Directory Users And Computers console to manage Exchange mailboxes rather than a standalone Exchange Administrator utility. Another difference is that there is a one-to-one relationship between Active Directory objects and Exchange mailboxes. With Exchange Server 5.5, it was common to create generic mailboxes, such as sales@contoso.com, and associate those mailboxes with a Windows security group. It was also common for more than one mailbox to be associated with a given domain user account. Exchange Server 2003 does not allow you to work in the same one-to-many way as Exchange Server 5.5; however, there are ways to accomplish the same tasks.
After this lesson, you will be able to
-
Identify the Exchange Server 2003 recipient types
-
Manage Exchange mailboxes
-
Manage mail-enabled groups
Estimated lesson time: 120 minutes
Recipient Types
Exchange Server 2003 supports different types of recipients depending on how you need to send e-mail to a recipient and where that recipient is located in relation to your Exchange organization. Recipient objects can be categorized into four different types: user, contact, group, and public folder. The first three types are configured and managed through the Active Directory Users And Computers console, while public folders are created using the Outlook client.
User Recipients
User recipients are the recipient objects that represent employees and contractors who work for your organization, and they are tied to Active Directory user accounts. They can have e-mail addresses as part of the organization, such as @contoso.com, or they can have e-mail addresses external to the organization. These recipient objects are configured through the Active Directory Users And Computers console because they are user accounts in the Active Directory domain. User recipients can be either mailbox-enabled or mail-enabled, depending on your needs.
A mailbox-enabled user is a user account that has a mailbox in the Exchange organization and, as a result, can send and receive e-mail through the Exchange Server 2003 infrastructure. This type of user is typically a corporate employee who logs on to the Active Directory domain with his domain user account and accesses the Exchange Server 2003 server holding his mailbox through the Outlook client (though there are other means by which a mailbox can be accessed, such as with Outlook Web Access [OWA], Internet Message Access Protocol 4 [IMAP4], and Post Office Protocol 3 [POP3]). Mailbox-enabled users are the most common type of recipient object in an Exchange organization.
Mail-enabled users are similar to mailbox-enabled users in that they have domain user accounts in the Active Directory domain. However, in contrast to a mailbox-enabled user, a mail-enabled user does not have a mailbox in the Exchange organization. Instead, a mail-enabled user has only an e-mail address. In certain scenarios, you would want to make a user account mail-enabled rather than mailbox-enabled. One such scenario is if you have a contractor working onsite for your company who needs access to the network (a domain user account) but does not need a corporate e-mail account. In this situation, you could create a user account for the contractor and mail-enable it, using the contractor's personal e-mail address through their Internet service provider (ISP). For example, if there is a user account named Willis in the contoso.com domain, but his personal e-mail address is willis@proseware.com, you would mail-enable the user account and assign the willis@proseware.com address to the account. This allows Willis to appear in the Global Address List (GAL) so he can be easily located by other employees and contractors and added to distribution lists, and yet have his e-mail sent to his personal account.
Another scenario in which you would want to use mail-enabled users rather than mailbox-enabled users is when you have offsite contractors working for you who need to have corporate e-mail addresses but do not need access to the network. For example, a publisher wants customers to be able to send e-mail messages to an author at a corporate e-mail address, but the author doesn't work onsite for the company and never accesses the corporate network. For instance, Lucerne Publishing employs freelance writers for various contract assignments for its print and online magazines. The company wants readers to be able to send e-mail to each writer at e-mail addresses in the @lucernepublishing.com domain. The freelance writers all have personal e-mail accounts, and none have Active Directory user accounts for Lucerne. To solve the problem of needing to have mail accounts for users that do not have user accounts, the Exchange administrator at Lucerne would create mail-enabled user accounts for each writer, disable the account (since it won't be used to access the network), and then forward the @lucernepublishing.com e-mail address to the personal address of the writer. Essentially, this configuration allows the writer to have an e-mail address in the @lucernepublishing.com domain that would be displayed publicly, yet e-mail addressed to the account would be redirected to the writer's personal account, such as one with hotmail.com.
Contact Recipients
A contact recipient is similar to a mail-enabled user in that the e-mail address points to a mailbox that is not a part of the Exchange organization. However, contacts do not have user accounts in the Active Directory domain like mail-enabled users do. You would typically use contact recipients when users in your organization need to send mail to a particular address outside the organization on a regular basis, and you want to provide the convenience of making the address available in the GAL or available for use in other Exchange Server address lists and distribution lists. Contact recipients are similar to contacts stored in a user's individual Contacts folder. The difference is that with Exchange Server 2003, you can make contacts available to the entire organization.
A common scenario for using contact recipients is when two companies merge but have separate Active Directory forests and Exchange organizations. In this situation, it is necessary for employees in both organizations to communicate with each other on a regular basis. For instance, if contoso.com and adatum.com merged, you could configure all of the users in adatum.com as contact recipients in the GAL of contoso.com and vice versa. This allows users in both Exchange organizations to communicate quickly and efficiently.
If you are migrating from Exchange Server 5.5 to Exchange Server 2003, contact recipients map directly to custom recipients in Exchange Server 5.5.
Group Recipients
Group recipients closely resemble mail-enabled users in that they can have e-mail addresses that are a part of the Exchange organization, but they do not have mailboxes that store e-mail. Where group recipients differ is that when an e-mail message is sent to an address associated with the group, everyone in the group receives the message. From a functionality standpoint, this is the same as a distribution list in Exchange Server 5.5.
Because of the integration with Active Directory, Exchange Server 2003 supports mail-enabling both of the group types that Active Directory supports: security groups and distribution groups. Security groups, as the name implies, are used for assigning permissions to resources. These are the domain local, global, and universal groups you use to manage access to Active Directory resources. Distribution groups have no relation to security or accessing resources and thus cannot be assigned permissions. However, distribution groups are useful for grouping users into a list related to some common purpose. For example, you might have a distribution group that represents all your company's sales employees nationwide, a scenario where you typically would have a number of security groups that contain all these users. Say you are administering wideworldimporters.com and you have offices in 20 U.S. cities, and each location is a separate Active Directory site. You might have security groups for each location in order to assign permissions. You can mail-enable each security group, and e-mail bostonsales@wideworldimporters.com and dallassales@wideworldimporters.com, and so on. If you want to send e-mail to all sales groups in a single message, your options are to create another security group that contains all the other groups (which would be unnecessary if you do not need to assign security permissions to that national sales group) or to create a distribution group that exists for e-mail purposes only, which is the better choice.
Another situation in which you would use distribution groups involves inter-departmental groups or projects that require sending e-mail to groups of people who don't fit neatly into one or two security groups. By creating distribution groups, you can easily group the users as desired without having to consider network resource security issues.
Public Folder Recipients
Public folder recipients are different from other recipient objects in that they are not individual users or groups of users but rather a mail-enabled folder in an Exchange organization. Users can be granted access to the public folder through standard security permissions (individual or group) and can access the public folder through the Outlook client by navigating through the public folder hierarchy. Managing public folders is the focus of Chapter 8, "Public Folders."
Public folder recipients are used for a number of purposes, including discussion forums, newsgroup postings, and creating a repository for customer feedback e-mail. For example, you are the administrator for Contoso. Ltd., a company that has just launched a new product line. As part of the launch, marketing wants to be able to receive customer feedback. While you can set up a distribution group, which will result in incoming messages being sent to everyone in the group, a more ideal solution is to mail-enable a public folder. This will result in all customer e-mail sent to feedback@contoso.com being posted to the folder, a single location where anyone who has been granted permission to the folder can view the messages. This is especially useful when people such as executive managers want to monitor feedback but do not want to receive every customer e-mail in their personal mailboxes.
Creating Recipient Objects
When you install Exchange Server 2003, by default all Active Directory user accounts have mailboxes created in the Exchange organization. However, if you have an existing user that doesn't have a mailbox, you can still mailbox-enable the user after the fact. The Exchange Task Wizard is used to mailbox-enable and to mail-enable users and groups.
When you install Exchange Server 2003, Setup extends the Active Directory Users And Computers management console to support Exchange Server functionality. One way it does this is by adding another step to the process of creating a user account. This step prompts you to create a mailbox for the user, as shown in Figure 7-1.
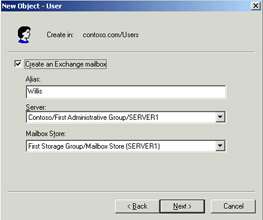
Figure 7-1: Creating a mailbox
By default, the check box to create the mailbox is selected. If you want the user to be mail-enabled instead, simply clear the box and finish the user creation process as usual. If you do want to create the mailbox, leave the box selected and verify that the default settings for Server and Mailbox Store are correct. For Server, you can select any Exchange server in your Exchange organization from the drop-down list. Exchange Server 2003, Enterprise Edition, supports creating multiple storage groups (which hold mailbox stores) on a server, which is why you have the option to select an alternate mailbox store. (Storage groups are discussed in Lesson 2 of this chapter.) Once you make your selections, finish creating the user account as usual.
Mail-enabling an existing user account, group, or contact is accomplished using a procedure similar to mailbox-enabling an account. Right-click the target user, group, or contact in the Active Directory Users And Computers console and select Exchange Tasks from the shortcut menu. The Exchange Task Wizard starts. Depending on what you have previously configured for the object, you'll have a number of task choices, such as those shown in Figure 7-2.
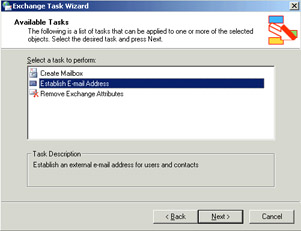
Figure 7-2: The Available Tasks page of the Exchange Task Wizard
To mail-enable an object, select Establish E-Mail Address from the task list, and then click Next to continue. The next page of the wizard is the Establish E-Mail Address page, shown in Figure 7-3, which displays the current mail properties of the object.
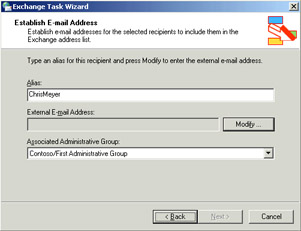
Figure 7-3: The mail properties of the selected object
If you click Modify, you will be prompted to choose the type of e-mail address you want to create in the New E-Mail Address page, shown in Figure 7-4.
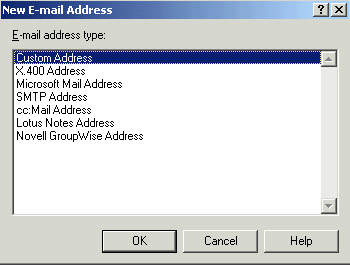
Figure 7-4: Choosing an e-mail address type
Your selection here will determine which configuration page will appear next. Figure 7-5 shows an example of configuring a Simple Mail Transfer Protocol (SMTP) address.
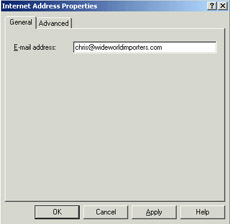
Figure 7-5: Configuring an SMTP address for a mail-enabled object
After you configure an address, the object will appear in the GAL for the Exchange organization.
Managing Mailboxes
Once you've created an Exchange organization of mailbox-enabled users, there are a number of administrative tasks you might undertake as you manage the organization. Some of the common Exchange tasks related to mailbox management are
-
Deleting a mailbox
-
Reconnecting a mailbox in Active Directory
-
Hiding mailboxes from the GAL
-
Modifying e-mail addresses
-
Configuring storage limits
-
Configuring permissions on mailboxes
-
Configuring delivery restrictions
-
Forwarding mailboxes to other e-mail addresses
-
Moving mailboxes to other storage groups or servers
Deleting a Mailbox
There are times when you'll need to delete a mailbox from an Exchange organization, usually in conjunction with removing a user account (such as for an employee who no longer works for the company). It is less common that you will need to remove the mailbox but keep the user account. Exchange Server 2003 allows you to do either.
Deleting a mailbox while removing the user account is accomplished using the same procedure you use to delete a user account. Use the Active Directory Users And Computers console to select the users you need to delete, and then delete them. You will be prompted that the Active Directory object has additional associated objects (in this case an Exchange mailbox) and asked to confirm whether you want to delete them.
Alternatively, you can remove only the mailbox from an existing user account without deleting the account itself. To do this, use the Exchange Task Wizard in Exchange System Manager. To reach the wizard in Exchange System Manager, navigate to the Mailboxes folder in the mailbox store of the server that contains the account, right-click the mailbox, point to Exchange Tasks, and then click Delete Mailbox. This is shown in Figure 7-6.
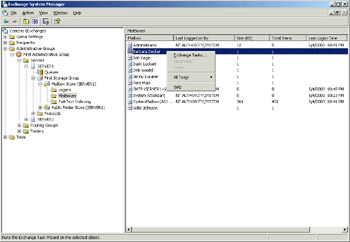
Figure 7-6: Deleting a mailbox by using the Exchange Task Wizard
Deleted Mailbox Retention The Deleted Mailbox Retention period is a feature of Exchange Server 2003 that is enabled by default. When you delete a mailbox, Exchange Server 2003 will mark it for deletion, but the mailbox will not be permanently deleted for 30 days. The retention period is a configurable length of time and is set at the mailbox store level, as shown in Figure 7-7. Access the mailbox store properties by right-clicking the desired mailbox store (note the navigation path in Figure 7-6) and clicking Properties from the shortcut menu.
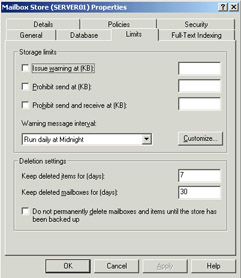
Figure 7-7: Configuring the Deleted Mailbox Retention period
At any time prior to the expiration of the retention period, recovering the mailbox and making it "live" again is a simple process of reconnecting it, which is discussed in the next section of this chapter.
| Tip | Deleted Mailbox Retention and Deleted Item Retention (discussed later in this lesson) are not the same, and you should not confuse the two. Deleted Mailbox Retention refers specifically to mailboxes that have been deleted, whereas Deleted Item Retention refers to individual items within a mailbox that have been deleted. Deleted Item Retention is generally used more on a day-to-day basis than Deleted Mailbox Retention. By setting a Deleted Item Retention period, users are able to recover items in their Outlook client that they have deleted from their Deleted Items folder. It's a "second chance," if you will, because it allows users to retrieve items that seem to be permanently deleted from their mailbox. Deleted Mailbox Retention, on the other hand, primarily benefits administrators by allowing recovery of a user mailbox that has been deleted without having to restore an entire mailbox store from backup. |
The Deleted Mailbox Retention period can be overridden by using the purge option in Exchange System Manager. You can purge a mailbox marked for deletion by right-clicking it in the Mailboxes folder of the mailbox store and then clicking Purge from the shortcut menu. This option is useful if you know you no longer need a mailbox and are trying to free up space.
| Important | Once you purge deleted mailboxes, the only way to recover them is from backup. This is also true of mailboxes whose retention period has expired. |
Reconnecting a Mailbox in Active Directory
Reconnecting a mailbox is the process of associating a mailbox marked for deletion with a live user account. There are a few situations when you will need to perform this task. One such situation is if you accidentally delete a user account and their mailbox from Active Directory. Another situation is if an employee leaves the company and you need to assign the mailbox to another user account (such as the employee's replacement). The task of reconnecting a mailbox marked for deletion is accomplished using Exchange System Manager. If you are reconnecting a mailbox to a user account that was accidentally deleted, make sure you have restored or recreated the user account first.
| Note | If you perform this task in a lab environment, you may find the option for Reconnect unavailable (dimmed). This happens when the Exchange Cleanup Agent hasn't run and updated Active Directory to reflect the deletion. You can force the Exchange Cleanup Agent to run immediately by right-clicking Mailboxes in your mailbox store and selecting Run Cleanup Agent from the shortcut menu. After you refresh, you should see the mailbox you deleted marked with a red X. |
-
Open Exchange System Manager and navigate to the Mailboxes folder in the mailbox store on your Exchange server. When you click the Mailboxes folder, you will see all the mailboxes in that mailbox store listed in the contents pane of the console window.
Important If you create mailbox-enabled user accounts for your lab in the Active Directory Users And Computers console, you might be puzzled if the mailboxes for the user accounts do not appear here. Once you create a mailbox-enabled user, you must initialize the mailbox by sending a message to it before it will appear and be available to manage through the Mailboxes folder.
-
Right-click the mailbox that has been deleted and that you want to reconnect, and then select Reconnect from the shortcut menu. You will be prompted to select a new user for the mailbox, as shown in Figure 7-8.
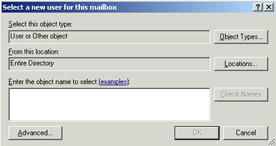
Figure 7-8: Reconnecting a user account to a mailbox -
You can either type in a name or search for a name in Active Directory using this dialog box. Once you have selected the desired user account, click OK to complete the task. Exchange will notify you that the task completed successfully, and you will see that the red X on the mailbox in Exchange System Manager disappears.
Hiding Mailboxes and Addresses from the GAL
As an Exchange administrator, you will create mailboxes that are designed for a specific purpose but that are not intended to be used by internal employees, such as a mailbox to receive notifications from your antivirus software. Or, if an employee leaves the company, but her mailbox needs to remain active for a period of time after her departure in order to receive any important messages. In either of these situations, it is unlikely that you would want to have the e-mail address appear in the GAL. First, you don't want internal users to mistakenly send messages to those addresses. Second, the GAL can become cluttered with these addresses and make it less efficient for users to work with.
To deal with this issue, Exchange Server 2003 allows you to hide recipient objects from the GAL on an as-needed basis. To hide an object from the GAL, open the Active Directory Users And Computers console and navigate to the desired recipient object. Right-click it, and then click Properties. Click the Exchange Advanced tab, shown in Figure 7-9.
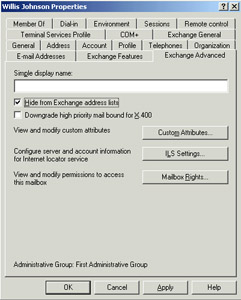
Figure 7-9: Hiding a recipient from the GAL
To hide a mailbox from the GAL, select the option to Hide From Exchange Address Lists. This will prevent the object from appearing in the GAL and other Exchange address lists but will not prevent those objects from receiving e-mail sent to them.
It is often tempting to delete mailboxes for users who leave a company. However, usually you will find that it is necessary to maintain an employee's e-mail account for a period of time, particularly when the employee worked directly with customers and clients. By hiding the mailbox rather than deleting it, you ensure that the mailbox will still receive messages and can be accessed as necessary but won't appear in Exchange address lists. In addition, you will save yourself some work when management requests to review the former employee's mailbox a couple of months after he left, and the Deleted Mailbox Retention period has expired. A good practice is to hide the mailbox for 30 to 90 days before deleting it, unless you're specifically advised to keep it longer.
Modifying E-Mail Addresses
Occasionally, you will need to change the e-mail address for a user or otherwise add an alias for a user, for example, when an employee gets married and changes her last name. In this situation, you want to create an alias so the user can gradually migrate to the new address. For example, if the employee Nicole Caron changes her name to Nicole Holliday, and her e-mail address is ncaron@contoso.com, you can simply change her e-mail address to nholliday@contoso.com and she will receive e-mail at her new address. However, anyone who tries to send e-mail to her at her previous address will receive a non-delivery report (NDR). Therefore, the best option is to create a second SMTP address for Nicole and set nholliday@contoso.com as the default. This approach will make the new address live and make it the default reply address but still allow her to receive e-mail sent to ncaron@contoso.com with no additional configuration or action necessary.
To create an alias, perform the following steps:
-
Open the Active Directory Users And Computers console and edit the properties of the target user account.
-
Find and click the E-Mail Addresses tab. You will see the currently configured email addresses for the user.
-
Click New to open the New E-Mail Address dialog box, shown in Figure 7-10, which lists the types of new e-mail addresses that you can configure.
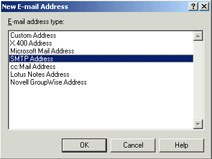
Figure 7-10: Configuring e-mail address types -
Select SMTP Address and click OK. Then type the new e-mail address and click OK.
-
As shown in Figure 7-11, there are now two SMTP addresses listed for the user. The address shown in bold is the primary address, which means it will be the address that is used when e-mail is sent using that interface (in this case SMTP). The address in regular type is an alias (known as a secondary address), which means the user will receive e-mail sent to that address but it will not be the default address that recipients will see when e-mail is sent.
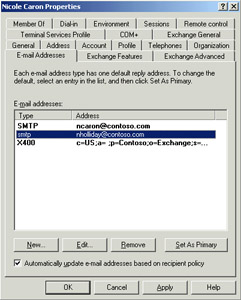
Figure 7-11: Configured e-mail addresses for a recipient object
If necessary, you can have more than one secondary address, but only one address of each type can be primary at any given time. For example, you may have three SMTP addresses and two X.400 addresses, but only one SMTP address and one X.400 address can be primary. To set the primary address, highlight the address you want to make primary and click Set As Primary. You will see the address become boldface and the previous primary address change from bold to regular type.
Configuring Storage Limits
An aspect of administering Exchange Server 2003 that tends to result in tension between users and the administrator is storage limits. With the general corporate emphasis on productivity and the amount of e-mail the average user receives daily, more often than not mailboxes become full of unnecessary items because users find it difficult to set aside time to manage their mailboxes (or they haven't been trained how to do so). In a large organization, this can result in dramatically increased backup and restore times. In small to medium-sized companies, mailbox management could be the difference between being able to run Exchange Server 2003, Standard Edition (which supports a maximum mailbox store size of 16 gigabytes [GB]) and having to use the more expensive (albeit more featured) Exchange Server 2003, Enterprise Edition.
There is flexibility in configuring storage limits in Exchange Server 2003. You can apply the same restrictions to the entire mailbox store or to specific mailbox-enabled users. Likewise, you can override the global settings configured at the store level for individuals that need to have different limits. This is useful if you have a particular mailbox-enabled user that regularly receives e-mail with file attachments and you don't want the same limitations imposed as on standard mailboxes. There are three ways that you can configure storage limits:
-
Individual mailbox
-
Individual mailbox store
-
Mailbox store policy
Configuring Storage Limits for Individual Mailboxes You configure storage limits for individual mailboxes using the properties of the user account in the Active Directory Users And Computers console.
-
From the Active Directory Users And Computer console, right-click the user account that you want to set storage limits on, and then click Properties.
-
Click the Exchange General tab, and then click Storage Limits to open the Storage Limits dialog box, shown in Figure 7-12.
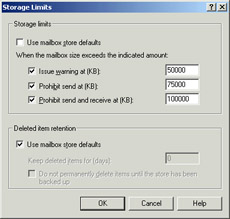
Figure 7-12: Overriding the default storage limits -
To override the mailbox store settings, clear the box for the Use Mailbox Store Defaults option. Select the check boxes for the settings you wish to configure and enter the values as desired. You can configure the following storage limit settings:
-
Issue Warning At (KB): When a user's mailbox reaches this threshold, the user receives an automated message from the system administrator warning that they are over their storage limit. Included in the e-mail are details regarding their storage limit and their current mailbox size. The frequency of the automated messages is configurable in Exchange System Manager and by default runs each night at midnight.
-
Prohibit Send At (KB): Some users become complacent about the warning messages, particularly if they usually keep their mailbox size close to their storage limit. You can configure a threshold that, once crossed, forces the user to clean up their mailbox before they can send any more e-mail.
-
Prohibit Send And Receive At (KB): Once this threshold is passed, the mailbox will be unable to send or receive e-mail until the size of the mailbox is reduced below the threshold. This setting should be used with caution, particularly when the mailbox belongs to a user that communicates with customers or clients. However, it can be useful to configure a limit so that a mailbox cannot receive any more e-mail, for example, to prevent a malicious person from flooding an unmonitored mailbox with large file attachments and causing the mailbox store size to increase until it fills the available disk space. If you employ this setting, you should configure it significantly higher than the warning in order to reduce the risk of preventing legitimate e-mail from arriving.
-
Deleted Item Retention: Deleted Item Retention refers to the period of time an item is kept after it has been deleted from the Deleted Items folder in a mailbox. By default, Exchange Server 2003 is configured to keep deleted items for seven days. Within that time frame, an item that has been emptied from the Deleted Items folder can be recovered by the user in the Outlook client by clicking the Tools menu and selecting Recover Deleted Items. You can choose to override the mailbox store's setting for Deleted Item Retention, though usually there is no need to as a common global setting works best. However, you might want to configure it to a larger setting than normal, for example, if you have a user that habitually deletes items and then later decides they want the items back, and you want to save yourself time restoring from backups.
Exam Tip In previous versions of Exchange Server, the default Deleted Item Retention period was zero days, meaning once items were removed from the Deleted Items folder, they were gone. Administrators were required to manually configure a Deleted Item Retention period for one to exist. Only Exchange Server 2003 has a Deleted Item Retention configured by default.
-
Configuring Storage Limits for Individual Mailbox Stores Configuring storage limits for individual mailbox stores is done through Exchange System Manager, by navigating to the mailbox store you want to configure and editing its properties, and then selecting the Limits tab. The configuration dialog box, shown in Figure 7-13, has some elements similar to those in Figure 7-12 but also some important differences.
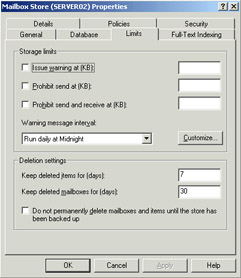
Figure 7-13: Configuring storage limits at the mailbox store level
Figure 7-13 shows the default settings for an Exchange Server 2003 installation. Note that in addition to configuring the storage limits for every mailbox in the mailbox store, you can also configure the Deletion settings for the mailbox store. Here you decide how long deleted mailboxes are kept before being purged and how long deleted items within a mailbox are kept before being purged. Configuring these settings makes Exchange administration easier in recovering from unintended deletions, whether of user mailboxes or when users want to restore deleted e-mail.
This dialog box is also where you configure the schedule that Exchange Server 2003 uses to send out warning messages to mailboxes that have crossed their storage limit thresholds. By default, warnings are sent daily at midnight. By clicking the drop-down list, you can select from a number of predefined schedules or create a custom schedule to match your needs (such as if you want to send out warnings multiple times per day or at a time not provided as an option in the predefined list).
Configuring Storage Limits with Mailbox Store Policies Configuring storage limits at the mailbox store level simplifies Exchange administration in that you do not have to configure limits for every individual mailbox. But what if you have a large Exchange organization with 50 mailbox stores worldwide, and you need to make the same storage limit changes to all of them? Fortunately, you do not have to configure each individual mailbox store. Exchange Server 2003 allows you to simplify the administration of multiple mailbox stores by using policies.
Mailbox store policies allow you to configure a single policy and then assign it to all the mailbox stores that exist within the administrative group. You can also copy the policy to other administrative groups rather than duplicate the administrative effort of configuring storage limit settings. To create a mailbox store policy, perform the following steps:
-
Open Exchange System Manager. By default, there is no container for system policies in an administrative group, so if you haven't previously created a policy, you probably don't have a policy folder. To create one, right-click the administrative group container that contains your server and select New, and then click System Policy Container.
-
Next, right-click the System Policies folder and select New, and then click Mailbox Store Policy. This will open the dialog box shown in Figure 7-14, which prompts you to choose which property pages you want to have available in the policy. You might wonder why you wouldn't have every property page available. However, since you create policies for specific purposes, it makes sense to select only the pages that you need for your policy. With the flexibility of policies, it is recommended that you create a policy for a specific purpose rather than trying to account for everything in one policy. This is especially true in large organizations, where you may need multiple policies to manage different needs. Select the Limits page and click OK.
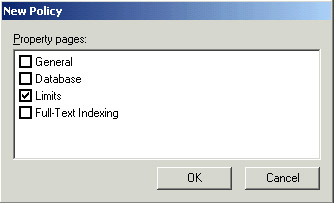
Figure 7-14: Choosing which pages display for a policy -
The new policy is opened and ready for configuration. The General tab prompts you to name the policy. Give it a descriptive name, such as Storage Limits.
-
When you click the Limits (Policy) tab, you will notice that the page is the same as the dialog box for the individual mailbox store, shown in Figure 7-13. The settings are not the same if you have configured individual mailbox store storage limits, but all the options are the same. After you configure your policy and click OK, you are returned to Exchange System Manager, and you can see your new policy in the System Policies container.
-
Right-click the policy and select Add Mailbox Store. (Even though you've created a new mailbox store policy, at this point it doesn't apply to anything. You have to assign the policy to the desired mailbox stores.)
-
The Select The Items To Place Under The Control Of This Policy dialog box, shown in Figure 7-15, appears next and prompts you to enter a mailbox store name that you want to apply the policy to. If you know the name of the mailbox store, you can type it in, but in a large Exchange organization, you may not want to type in every mailbox store name. A quick way to view all of the available mailbox stores for the policy is to click Advanced, which opens the dialog box shown in Figure 7-16.
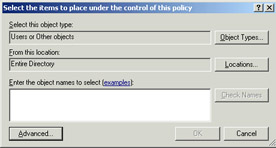
Figure 7-15: Assigning a mailbox store policy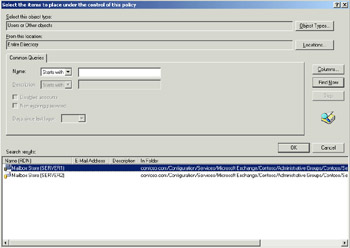
Figure 7-16: Searching Active Directory for mailbox stores -
The easiest way to search is to not enter anything but simply to click Find Now. This will return all the mailbox stores in your administrative group, similar to what is shown in Figure 7-16. Select the mailbox stores you want the policy to apply to, and click OK. Exchange Server 2003 will confirm that you want to add the mailbox store to the policy.
-
Once you've finished adding the mailbox stores to the policy, you'll see them in the contents pane of the Storage Limits policy container. Double-clicking a mailbox store will allow you to see the effects of the policy. For example, notice in Figure 7-17 that because a mailbox store policy that configures storage limits has been applied to Server2, all the options on the Limits page for the individual mailbox store are unavailable. When a policy applies, you cannot override the policy with local settings. Clicking on the Policies tab shows you what policies are in effect on this mailbox store, as shown in Figure 7-18.
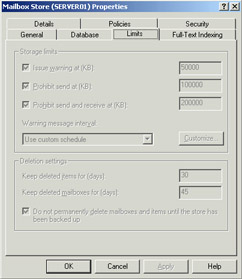
Figure 7-17: Policy effects on local settings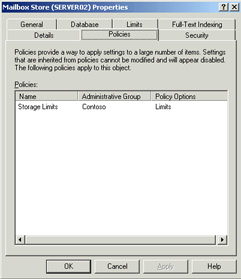
Figure 7-18: The Policies tab -
The final step after configuring the policy is to apply the policy, which hasn't yet been done even though you selected the mailbox stores that the policy should apply to. To apply the policy, right-click it in Exchange System Manager and select Apply Now. This will cause your policy settings to be applied as you have configured them. Manually applying the policy prevents unintended changes from taking effect immediately.
Once you have created a policy, you do not have to re-create it under every administrative group that you want to apply the same settings to. Using Exchange System Manager, you can simply right-click and drag the policy from the System Policies container in one administrative group to the System Policies container in another administrative group, and then choose Copy from the shortcut menu. Apply the policy in the destination administrative group, and you are finished.
Storage limits are often a touchy subject in real-world environments and can be a source of tension between users and Exchange administrators. Storage limits are best put in place when the Exchange Server 2003 organization is deployed because trying to implement limits later, after users are accustomed to not having limits, is likely to be met with great resistance and corporate politicking.
Education and communication are the keys to making a smooth transition to storage limits and helping users to understand how to keep their mailboxes below their storage limits and why it is important to do so. When trying to reduce their mailbox size, users often get frustrated because they may delete many items and even remove the items from the Deleted Items folder, but they may not see much of a change in the mailbox size. Show users how to view the folder sizes through Outlook, and teach them that often the problem is not the number of e-mail messages but a small number of very large file attachments. Helping users to help themselves will reduce their frustration level and also reduce the amount of stress on you.
Configuring Mailbox Permissions
While a mailbox is typically assigned only to the specific person using it, there are times when there is a legitimate business need to grant other people permissions to the mailbox. For example, if a manager is out of town and without access to the network and needs her assistant to send a proposal on her behalf to an external user. Or, if an account manager is working on a deal just prior to going on vacation, and the sales director needs to monitor the account manager's mailbox in his absence in case a message comes in related to the proposed deal.
Mailbox permissions fall into two categories: being able to send e-mail on behalf of someone and being able to access a mailbox in order to view, edit, or create items. Granting Send On Behalf permissions can be done by the administrator in the user's properties in the Active Directory Users And Computers console or by the user himself in the Outlook client. Both methods accomplish the same thing, and when viewing the properties in either location, you see the same settings. To grant Send On Behalf permissions using the Active Directory Users And Computers console, open the console and perform the following steps:
-
Edit the user's properties and click the Exchange General tab.
-
Click Delivery Options, which displays the dialog box shown in Figure 7-19.
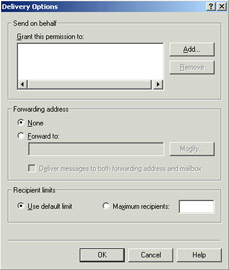
Figure 7-19: Granting Send On Behalf permissions -
When you click Add, you are presented with the standard Active Directory object selection dialog box, like that shown in Figure 7-15. Type in the name of the user you want to grant Send On Behalf permission to, and click OK. You will see that user's name in the Grant This Permission To field.
Granting mailbox rights can also be performed by the administrator in the Active Directory Users And Computers console or by the user himself through the Outlook client. However, rights granted through the Active Directory Users And Computers console do not have the same level of granularity that rights granted through Outlook have. Through Outlook, mailbox rights can be granted to a specific folder. For example, if an assistant needs to set appointments in her manager's calendar, you do not have to give her permissions that would let her view the manager's Inbox. Through the Active Directory Users And Computers console, the rights you can apply relate only to being able to view or modify permissions or to grant full mailbox access to a user account.
To grant mailbox rights using the Active Directory Users And Computers console, open the console and perform the following steps:
-
Edit the user's properties and click the Exchange Advanced tab.
-
Click Mailbox Rights, which displays the dialog box shown in Figure 7-20.
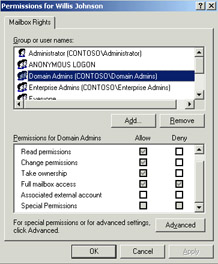
Figure 7-20: Granting mailbox rights -
You can modify rights or add additional users and grant them rights. Permission check boxes that are unavailable are inherited permissions that cannot be modified here.
Granting permissions in Outlook is a straightforward process, as follows:
-
Right-click the folder you want to grant permission to, such as your calendar, and click Properties.
-
Click the Permissions tab, which displays a dialog box similar to that shown in Figure 7-21.
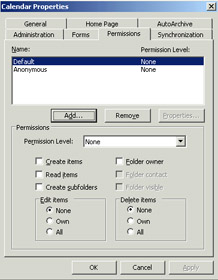
Figure 7-21: Granting permissions to a user folder in Outlook -
When you click Add, you are presented with the GAL, from which you can select all of the users who you want to have permission to this folder. Once you select them and click OK, you will see them appear in the permissions list.
-
Users are given the permission level equal to what is initially set for default, and you then configure the permissions on an individual basis. This is another instance when it can make sense to utilize group permissions rather than multiple individuals.
Exam Tip If a user grants permissions to a folder in Outlook, there are two ways that folder can be opened. The first way is by clicking File, selecting Open, and then selecting Other User's Folder. The second way is to add the mailbox to the profile from the Tools menu and selecting E-Mail Accounts. If the user needs to add the other user's mailbox to their profile in order to view a folder, such as a calendar, it is required that they have full permission at the mailbox level and then the designated permissions at the folder level. If the user is granted permissions only at the folder level, they will be able to add the mailbox to their profile but they won't be able to navigate to the folder.
Configuring Delivery Restrictions
More often than not, you will configure delivery restriction settings at the virtual server level rather than at the mailbox level, but there are times when it is appropriate to specify delivery restrictions for a specific mailbox or group of mailboxes that are different from the settings at the server level. Delivery restrictions can apply to the size of messages sent from the mailbox, the size of messages sent to the mailbox, and from whom the mailbox is allowed to receive messages. To configure delivery restrictions for a mailbox, edit the user's properties in the Active Directory Users And Computers console and click the Exchange General tab, and then click Delivery Restrictions. Figure 7-22 shows the configuration options available.

Figure 7-22: Configuring delivery restrictions for a mailbox
You might need to configure a specific delivery restriction on a mailbox if you have a customer feedback mailbox, and you know it should be receiving only text messages. You could prevent messages greater than 50 kilobytes (KB) from being delivered to that mailbox, which would prevent the flooding of the mailbox by a malicious user with messages containing large attachments. Or you might need to set a delivery restriction if you have a mailbox configured to send out automatic responses to messages it receives. You could configure a restriction of the sent message size to prevent the mailbox from being used inappropriately to send other types of messages.
Forwarding Mailboxes to Other E-Mail Addresses
While you can grant permissions to a mailbox for another user, sometimes it makes more sense to forward a mailbox rather than have a user monitor two separate mailboxes. For instance, if an employee leaves the company and his mailbox needs to remain active for a period of time, you can grant another user rights to that mailbox. However, a simpler method is to forward the mailbox to the designated user. Then all messages that come in to the mailbox are automatically forwarded to the designated mailbox, so that user gets both her messages and the forwarded messages in one location (you can tell them apart by looking at whom the e-mail is addressed to). Another example of when you would want to forward a mailbox is when a manager needs an assistant to keep track of her e-mail while she is out of town and without access to the network. The assistant can be granted permissions to the manager's Inbox, but then the assistant will have access to all past messages, too, which is undesirable. Instead, you can forward the mailbox to the assistant while also having the messages delivered to the manager's mailbox, which accomplishes the goal of allowing the assistant to monitor the manager's e-mail without being able to see past e-mails. When the manager returns, you simply turn off the forwarding of the mailbox.
To configure mailbox forwarding, perform the following steps:
-
Open the Active Directory Users And Computers console and edit the properties of the user account.
-
Next, click the Exchange General tab, and then click Delivery Options.
-
Under Forwarding Address, click Forward To, and then click Modify and enter the name of the user who should receive the messages (or browse Active Directory). Click OK.
-
The check box for Deliver Messages To Both Forwarding Address And Mailbox determines the behavior of the forwarding. If you select it, both mailboxes will receive new messages as they arrive. If you do not select it, only the forwarding mailbox will receive new messages.
Moving Mailboxes to Other Servers and Mailbox Stores
As your organization grows and changes, employees will change divisions or locations. Depending on the size and complexity of your Exchange organization, an employee move can result in a situation where he needs to have his mailbox in a different mailbox store or even on a different server. Exchange Server 2003 makes it easy to accommodate mailbox moves, and there are a couple of different ways to accomplish the task.
Moving Mailboxes with the Exchange Task Wizard If you need to move only a few mailboxes within the same organization, you can use the Exchange Task Wizard and choose the Move Mailbox option, which will open the Move Mailbox page, shown in Figure 7-23.
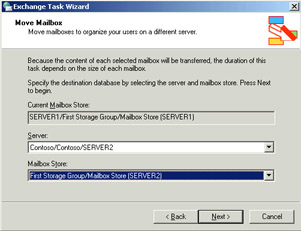
Figure 7-23: Using the Exchange Task Wizard to move a mailbox
In Figure 7-23, you see the current location of the mailbox. The Server and Mailbox Store drop-down lists provide the available options of where to move the mailbox. In Figure 7-23, the mailbox is being moved from the first mailbox store on Server1 to the first mailbox store on Server2. Once you click Next on this page, you are prompted to determine how to handle corrupted messages found during the move, as shown in Figure 7-24.
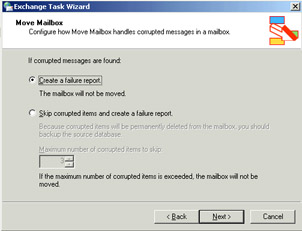
Figure 7-24: Determining how to handle corrupted messages
The default is simply to cancel the mailbox move and generate a report. You may decide that the move should continue anyway and skip the corrupted messages. When you click Next on this page, you are able to determine when the move will take place and when the task should terminate if it hasn't completed. This is a standard task scheduler page. You can schedule the move to occur at any time, such as overnight or at a later date, or take the default choice to run immediately. If you leave the default setting, the process will begin immediately when you click Next, and you can monitor the progress. If you schedule the move, the task will be entered into the Task Scheduler to run as scheduled.
| Note | You can also use Exchange System Manager to start the Exchange Task Wizard. From the mailbox store, in the Mailboxes container, right-click the mailbox and choose Exchange Tasks. This starts the same wizard that is accessed through the Active Directory Users And Computers console. |
| Exam Tip | There are limitations when moving mailboxes with the Exchange Task Wizard. You cannot move mailboxes between administrative groups unless your Exchange organization is in Native mode. You also cannot move mailboxes between Exchange organizations. However, you can do either using the Microsoft Exchange Mailbox Merge Wizard, even if your organization is still in Mixed mode. |
Moving Mailboxes with the Microsoft Exchange Mailbox Merge Wizard The Exchange Task Wizard is useful for moving a small number of mailboxes within the same organization, but it isn't designed to move mailboxes in bulk or to move mailboxes across Exchange organizations. For these tasks, use the Microsoft Exchange Mailbox Merge Wizard.
The Microsoft Exchange Mailbox Merge Wizard is not installed by default with Exchange Server 2003. You must copy Exmerge.exe and Exmerge.ini from the installation CD to the \Exchsrvr\Bin folder on your Exchange server. Once you do this, start Exmerge.exe. When you start the wizard and pass the Welcome page, you are given the choice of a one-step or a two-step merge process, as shown in Figure 7-25.
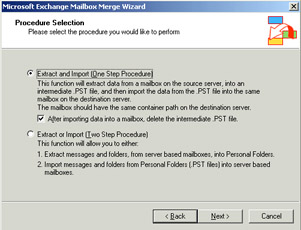
Figure 7-25: The Microsoft Exchange Mailbox Merge Wizard
There are some considerations when using the Mailbox Merge Wizard. The process exports mailbox data out to personal storage files (.pst files), then imports them into the same mailboxes on another server. In the process, the Single Instance Storage feature of Exchange, where a message is stored once and referenced by pointers to as many mailboxes as contain the message, is lost. Each migrated mailbox will have a copy of every message it contained, which can increase the size of the mailbox store considerably.
-
Select the Extract And Import (One-Step Procedure) option, and click Next to continue.
-
Next, you are prompted to select a Source Server, as shown in Figure 7-26.
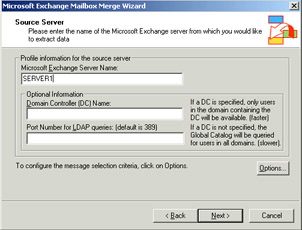
Figure 7-26: Selecting the source server -
You can control the behavior of the mailbox merge procedure by clicking Options after entering the source server name. You will be presented with multiple pages that allow you to configure different aspects of the merge.
-
The options you can configure are as follows:
-
Data—The Data page allows you to control how much data you migrate. The default setting, User Messages And Folders, shown in Figure 7-27, migrates only user messages and folders. If you want to migrate additional items, such as the user's dumpster items (items held by the Deleted Item Retention period) or folder permissions, you can select the appropriate options.
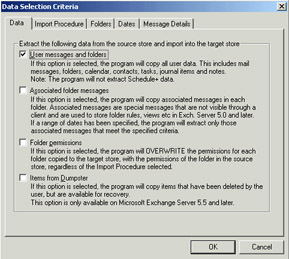
Figure 7-27: The Data Page -
Import Procedure—The Import Procedure page, shown in Figure 7-28, allows you to define how the data should be written to the destination mailbox store. You can copy the data to the target store (which could create duplicate items), merge the data, replace existing data, or archive the data (deletes it from the source store after copying).
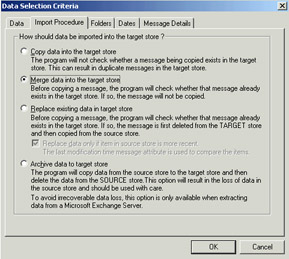
Figure 7-28: The Import Procedure Page -
Folders—The Folders page, shown in Figure 7-29, allows you to configure what folders are processed in the migration. By default, all folders in a mailbox are migrated, though you can choose to limit the migration to specific folders or to exclude certain folders.
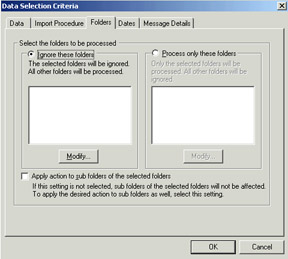
Figure 7-29: The Folders Page -
Dates—On the Dates page, shown in Figure 7-30, you can select messages between specific dates and times to be migrated. This is useful if you have users who have years worth of e-mail, tasks, and calendar items saved, and you wish to keep only items dating back to a certain date. The default is to migrate everything, regardless of date.

Figure 7-30: The Dates Page -
Message Details—The Message Details page, shown in Figure 7-31, allows you to extract items based on message subjects or attachment names. This is especially useful if you are working with a very large mailbox, and you want to extract only specific types of messages.
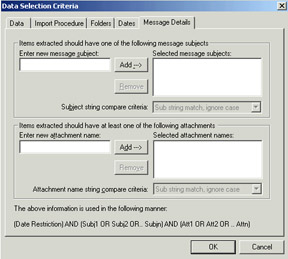
Figure 7-31: The Message Details Page
-
-
After configuring your options, click OK, and then click Next to continue the wizard. This brings you to the Destination Server page, shown in Figure 7-32.
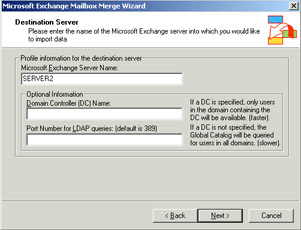
Figure 7-32: Selecting the destination server for the migrated mailboxes -
Type the name of the destination server for the migration, and then click Next to continue the wizard. The Mailbox Selection page, shown in Figure 7-33, opens, and you can choose the mailboxes you want to migrate. Select the mailboxes you want to migrate, and then click Next.
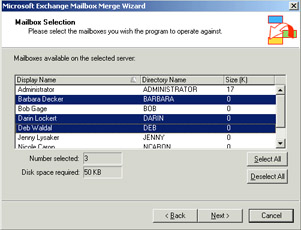
Figure 7-33: Selecting the specific mailboxes to be migrated -
Next, you are prompted to choose the default locale for the target mailboxes. If your destination is in the same country, such as the United States, then you probably have only a single locale in your Exchange organization. If you are moving the mailboxes to a server in a different locale, select the one that is appropriate from the drop-down list, and then click Next.
-
Next, choose a folder on the Exchange server to store the temporary .pst files used during the migration process. When you select a folder, you will see the amount of disk space required and how much space the drive containing the selected folder contains, as shown in Figure 7-34.
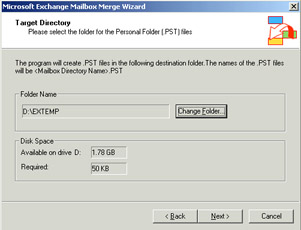
Figure 7-34: Selecting a folder to store the temporary .pst files used in the migration -
Before the migration process begins, you will have the option to save the settings for use at a later date. This is useful if you want to run the migration later as part of a batch and not have to redefine all the settings. After you decide whether to save your settings, click Next to start the migration. A Process Status window will display, showing you vital statistics about the migration, including the elapsed time and how many successes and failures have occurred. When the operation completes, you can click Finish to exit. If there were any errors, an ExMerge.log file will be created in your \Exchsrvr\Bin folder. You can view it to see what went wrong in the process.
Managing Mail-Enabled Groups
As discussed earlier in this chapter, mail-enabled groups are typically Active Directory security and distribution groups that have been assigned an e-mail address, and when mail is sent to the group address, it is routed automatically to each member of the group. Mail-enabling an existing group is done through the Exchange Task Wizard by choosing the Create An E-Mail Address task from the list. Mail-enabling a new group as you create it adds one extra step, as Exchange extends the New Object creation wizard to prompt you with the option to create an e-mail address and assign the object to an administrative group.
Before mail-enabling Active Directory groups, you should have a clear understanding of the effects of group scope on the Exchange Server messaging capability of these groups. There are three scopes for groups: domain local, global, and universal.
-
Domain local group Membership of this group is not published to the global catalog server. This means that Exchange Server users cannot view full membership of a mail-enabled domain local group when their user accounts are located in domains other than the domain in which the group exists.
-
Global group Membership of this group is not published to the global catalog server. This means that Exchange Server users cannot view full membership of a mail-enabled global group when their user accounts are located in domains other than the domain in which the group exists.
-
Universal group Membership of this group is published to all global catalog servers in a forest. This means that Exchange Server users in any domain can view full membership of mail-enabled universal groups. If you have multiple domains in your environment, it is recommended that you mail-enable only universal groups and not domain local or global groups.
Expansion Servers
An expansion server is a server that is used to resolve or expand the membership of a mail-enabled group whenever a message is sent to that group. Because of the limited scopes of a domain local group or a global group, Exchange users in one domain are not able to view the membership of groups defined in another domain. Exchange is unable to deliver messages sent by users in one domain to groups defined in another domain. To resolve group membership, you must use an expansion server when mail-enabling domain local groups or global groups in environments that have multiple domains. The expansion server that you choose must exist in the same domain as the mail-enabled group. Expansion servers are identified on a group-by-group basis by editing the properties of the group in the Active Directory Users And Computers console and then clicking the Exchange Advanced tab. The default setting is to use any server in the organization, but you can click the drop-down list and choose a specific server.
Query-Based Distribution Groups
A query-based distribution group is a new type of distribution group introduced in Exchange Server 2003. A query-based distribution group provides essentially the same functionality as a standard distribution group; however, instead of specifying static user memberships, a query-based distribution group enables you to use a Lightweight Directory Access Protocol (LDAP) query to specify membership in the distribution group dynamically (for example, all employees in an accounting department or all employees in a particular office building). Therefore, adding a user account in the accounting department would result in their automatic membership in a query-based distribution list for the accounting department. The use of query-based distribution groups can considerably lower the administrative overhead in maintaining certain distribution groups, especially those that have memberships that undergo frequent changes.
Query-based distribution groups are not without disadvantages though. They place more of a performance load on server resources. Every time an e-mail message is sent to a query-based distribution group, an LDAP query is executed against Active Directory to determine the membership of the query-based distribution group. In addition, a query-based distribution group can only be created in an organization that is running Exchange Server 2003 or later and that has been switched to Native mode.
To create a query-based distribution group, perform the following steps:
-
Start the Active Directory Users And Computers console, then right-click the Users container and select New, and then click Query-Based Distribution Group.
-
The New Object wizard starts, and the first page prompts you for the name of the group and an alias for it (by default the alias will be the same as the name). Complete the two fields, and then click Next to continue.
-
The next step is to build the LDAP query by filtering the types of addresses you want to include in the query. You can also specify what Active Directory container the query should begin at (all subcontainers will be included), shown in Figure 735. Select the address types, and then click Next to continue.
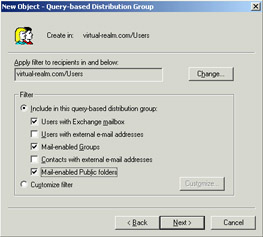
Figure 7-35: Selecting the address types that the LDAP query should filter for -
The wizard will prompt you to confirm your selections and then will create the group when you click Finish.
You can preview the results of the query-based distribution group by editing the properties of the group in Active Directory Users And Computers and going to the Preview tab. The preview will show you the contents of the group, as well as the syntax of the LDAP query that is being run. If the results are not what you intended, you can simply click the General tab and modify the query, then preview it again to see if the changes corrected the problem.
Limiting Access to Mail-Enabled Groups
In certain situations, you might want to limit access to your mail-enabled groups to only members of the group. For example, if you have a mail-enabled group that is intended for a particular purpose, such as receiving customer feedback from external customers, you might want to limit the amount of unwanted internal messages sent to this group. Similarly, you might want to prevent users from sending messages to a mail-enabled group if it contains sensitive information, as in the case of a mail-enabled group that is reserved for management.
There are two ways to limit access to a mail-enabled group: hiding the mail-enabled group and restricting access to the mail-enabled group.
-
Hiding a mail-enabled group When you hide a mail-enabled group, it will not appear in Exchange address lists, so users will not be able to look up the mail-enabled group and send e-mail to it. However, users can still use the SMTP address of the mail-enabled group to send messages to it. To hide a mail-enabled group from Exchange address lists, edit its properties in the Active Directory Users And Computers console and click the Exchange Advanced tab. Select the option to Hide Group From Exchange Address Lists. This solution prevents users who legitimately need to use the mail-enabled group from being able to browse to it in Exchange address lists.
-
Restricting access to a mail-enabled group By configuring a mail-enabled group to specifically identify the users who can send messages to the group or who can receive messages sent to the group, you can effectively limit who uses the mail-enabled group to only those users that have been granted permission. This is a more effective solution than simply hiding a group because it allows the group to be displayed for the people who legitimately use it but prevents users who shouldn't use the group from being able to send to it. Configuring message restrictions is done from the Exchange General page of the group's properties. By default, everyone can send to the group, but you can also set it to allow only authenticated users or to allow only a specific list of users.
Note Groups exist to provide a convenient way to send e-mail to a number of users simultaneously, but they do not preclude users from simply selecting all of the individual members they wish to send to. Therefore, while restricting group access can limit the convenience factor of sending e-mail, it cannot prevent a determined user from selecting every individual user in the GAL to get around the restriction.
Practice: Configuring Recipient Objects
In this practice, you will create four mailbox-enabled users, two mail-enabled groups, configure properties for the objects, and move a mailbox from one server to another.
Exercise 1: Create Recipient Objects
-
Using the Active Directory Users And Computers console, create mailbox-enabled accounts for the following users, placing them in the mailbox store on Server01:
-
Chris Preston
-
Kim Akers
-
Alan Shen
-
Willis Johnson
-
-
Create the following mail-enabled distribution groups in Active Directory Users And Computers, placing them in the mailbox store on Server02:
-
Engineering
-
Marketing
-
-
Add Chris Preston and Kim Akers to the Engineering group, and add Alan Shen and Willis Johnson to the Marketing group.
-
Open Outlook and send an e-mail to each user you created in order to initialize his or her mailbox.
-
Verify the presence of the mailboxes in Exchange System Manager by opening the Mailboxes folder in the mailbox store containing the mailboxes.
Exercise 2: Delete and Reconnect a Mailbox
-
In the Active Directory Users And Computers console, right-click Chris Preston and select Exchange Tasks to start the Exchange Task Wizard.
-
From the list of tasks, choose Delete Mailbox and follow the wizard to delete Chris's mailbox.
-
Open Exchange System Manager and navigate to the Mailboxes folder in the mailbox store that holds the mailboxes.
-
If Chris Preston's mailbox does not have a red X on it, right-click the Mailboxes folder and select Run Cleanup Agent, and then refresh the view.
-
Right-click the mailbox for Chris Preston and choose Reconnect. Follow the prompts to reconnect the mailbox to Chris Preston's user account.
Exercise 3: Forward a Mailbox
Alan Shen has left his position at Contoso, Ltd. Before he left, he was working on a marketing proposal with multiple clients. Willis Johnson will be taking over those accounts, and he needs to ensure that if anyone sends an e-mail to Alan's mailbox, it goes to him instead.
-
Open the Active Directory Users And Computers console and edit the properties of Alan Shen's user account.
-
Click on the Exchange General tab, and then click Delivery Options.
-
Under Forwarding Address, select Forward To: and click Modify to add an address.
-
Type in Willis Johnson, and then click Check Names. Active Directory should identify the user account and underline it. Click OK.
-
Leave the check box cleared to Deliver Messages Both To Forwarding Address And Mailbox. Since Alan no longer works for Contoso, there's no need for his mailbox to receive the new messages.
-
Click OK to exit the properties of Alan Shen's account.
-
From Outlook, send an e-mail from yourself to Alan Shen.
-
Open Willis Johnson's Inbox by clicking File, then clicking Open, and then selecting Other User's Folder. Note that the e-mail you sent to Alan Shen is in Willis Johnson's Inbox. Open Alan Shen's Inbox and confirm that the message was not delivered there.
Exercise 4: Move a Mailbox
To reduce the load on Server01, you decide to move some users to Server02.
-
Open Exchange System Manager and navigate to the Mailboxes folder in the mailbox store on Server01.
-
Select both Willis Johnson and Kim Akers, then right-click and choose Exchange Tasks.
-
From the task list, choose Move Mailbox.
-
Select Server02 from the drop-down list for the server, and note that the mailbox store changes to the store on Server02.
-
Complete the wizard, monitoring the progress of the mailbox moves.
-
Verify by clicking the Mailboxes folder on Server02 that its mailbox store now contains the two mailboxes (you may have to refresh the view manually).
Exercise 5: Restrict Access to a Mail-Enabled Group
-
In the Active Directory Users And Computers console, edit the properties of the Engineering group.
-
Click on the Exchange General tab.
-
Under Message Restrictions, select Accept Messages: From Everyone Except: and add Alan Shen.
-
Create Outlook mail profiles for Alan Shen, Willis Johnson, and Kim Akers.
-
Log on to Outlook as Kim Akers and send an e-mail to the Engineering distribution group. Since Kim is a member of the Engineering group, she will receive the message sent to the group address in her Inbox.
-
Close Outlook, change profiles to Willis Johnson, and then log on to Outlook as him. Send an e-mail to the Engineering distribution group. Close Outlook and then reopen it using Kim's profile. Note that she received the e-mail sent from Willis.
-
Close Outlook and then reopen it using Alan Shen's profile. Send an e-mail to the Engineering distribution group. Note that Alan will almost immediately receive a non-delivery report from System Administrator, and the error will inform him that he does not have permission to send to that address.
Lesson Review
The following questions are intended to reinforce key information presented in this lesson. If you are unable to answer a question, review the lesson materials and then try the question again. You can find answers to the questions in the "Questions and Answers" section at the end of this chapter.
-
You are the Exchange Server administrator for Contoso, Ltd. You have just finished creating a new mailbox-enabled user for a new employee named Jenny who will start work next week, but shortly after you are done, you realize that you put the mailbox on the wrong server. You open Exchange System Manager and navigate to the Mailboxes folder on the server that currently holds her mailbox but find that the mailbox is not listed, even after refreshing the view. You check the mailbox store on the other server and it is not there either. Why might this be happening?
-
You are an Exchange Server administrator responsible for 25 servers running Exchange Server 2003, Standard Edition, and approximately 10,000 mailboxes contained within a single administrative group. Several of your servers are close to the 16 GB mailbox store limit, and rather than incur the expense of upgrading to Exchange Server 2003, Enterprise Edition, management has approved implementing storage limits on mailboxes across the board. What is the most efficient approach to configuring storage limits for this environment?
-
The CEO of your company calls you and informs you that she is going out of town for two weeks and needs to have her assistant check her e-mail while she is gone. However, she doesn't want the assistant to be able to access e-mail that is already in the mailbox because it contains confidential information. What is the best way to set it up so the assistant can check the CEO's e-mail while she is out of town?
-
You configure the assistant's address as the forwarding address for the CEO's mailbox, and when the CEO leaves town, e-mail addressed to her goes to the assistant, as planned. However, when the CEO returns from her trip, she is dismayed to find that she has not received any e-mail since she left. What happened?
-
You are the Exchange Server administrator for Contoso, Ltd. You have been asked to create a distribution group for a new interdepartmental task force that is being created for special projects. The members of the group are likely to change frequently depending on the project. What type of group should you create so that ongoing administration is as easy as possible?
-
A security group
-
A distribution group
-
A query-based distribution group
-
A universal group
-
Lesson Summary
-
Recipient objects in Exchange Server 2003 can be mailbox-enabled users, mail-enabled groups, mail-enabled contacts, and mail-enabled public folders.
-
The Exchange Task Wizard, accessible from both Exchange System Manager and Active Directory Users And Computers, is used for many common tasks such as creating and deleting mailboxes and e-mail addresses, and moving mailboxes.
-
Mailboxes must be initialized before they will appear in the Mailboxes folder of a mailbox store.
-
Query-based distribution groups are used to define group membership dynamically by using an LDAP query each time the group is sent an e-mail message.
-
Exchange extends the Active Directory Users And Computers console to include Exchange-specific pages. These pages allow you to configure many settings on an individual user basis, such as storage limits, message restrictions, forwarding addresses, and mailbox rights.
-
System policies can be used to quickly and easily configure settings, such as storage limits, for a large number of mailbox stores and users.
EAN: 2147483647
Pages: 221