Lesson 3: Restoring Exchange Server 2003
If a disaster occurs, you may need to restore one or more databases from backup. You need to know how to do this, but you also need to know how to ensure that you do not make the situation worse. Sometimes a damaged database can contain retrievable information, and you should protect that information from being overwritten by a restored database that turns out to be unreadable. This lesson covers the principles behind restoring data and how you can verify your backups before you use them in a restore operation.
After this lesson, you will be able to
-
Identify guidelines for restoring stores from online backups
-
Explain the methods for restoring an offline backup
-
Recover mailboxes and messages
-
Explain how to recover public folders
-
Restore clusters
-
Restore Active Directory by using the Windows Server 2003 Backup utility
-
Restore an Exchange Server 2003 server
-
Configure a recovery server
-
Explain how to perform a test restore on a recovery server
Estimated lesson time: 120 minutes
Recovering Databases
If a server running Exchange Server 2003 is still functional after a disaster, you can use the Windows Server 2003 Backup utility to restore the stores that you want to recover. To recover one or more stores, first make sure that the Exchange store is running. In addition, make sure that the Exchange store or stores that you want to restore are dismounted. You need only dismount the specific Exchange store or stores that you want to restore. This allows users to continue to access all of the other Exchange stores in the storage group.
Exchange contains a built-in mechanism that uses signature values to prevent you from accidentally replaying log files from a different storage group against the Exchange store you are restoring. Each storage group has a log file signature value, and each log file in the sequence has the signature stamped on it. The corresponding .edb file stores this signature value in its header information.
Using the Windows Server 2003 Backup Utility to Restore Stores
Before performing a restore from an online backup, you should make a copy of all existing database files, even if these files are damaged. Until your backup set is fully restored and verified, you cannot assume that your store has been successfully restored. If the attempted recovery fails, it might still be possible to repair the existing store from its copy, although you will probably lose at least some data during the repair process. When you have created copies of the database files that you want to restore, you should then attempt a recovery from your online backup.
| Tip | When you are restoring from a backup set, your current database files are overwritten as soon as the process begins. Rename the database files that you are restoring before you begin the restore process. Also, ensure that your database drive is at least half empty. Otherwise, you will not be able to restore from backup because you will not have enough space for the restore. |
The Microsoft Exchange Information Store (IS) service manages the restore operation. After you dismount the store or stores, the restore process will perform the following operations:
-
Replace the existing database files with the restored database files.
-
Copy the log files that are on the backup media into a temporary log directory.
-
Create the Restore.env file for each restore operation in progress in the same directory as the log files that are restored from backup media.
-
Check the log file signature of all temporary log files to verify that the restored log files correspond with the storage group that manages the database being restored. Replay and apply the restored log files to the database.
-
Replay and apply the active storage groups' log files to the database.
-
Delete the log files from the temporary log directory.
Restoring Multiple Stores
You can restore multiple stores to multiple storage groups at the same time by running multiple instances of the Windows Server 2003 Backup utility. However, because each storage group is a backup set and log files are shared, it is best to perform one restore per storage group at a time. You can restore multiple stores in a storage group simultaneously; but you should not replay the log files simultaneously.
For example, if you have a single backup set that contains six databases, you can restore all six in a single operation, and a single shared Restore.env file will control hard recovery. If, on the other hand, you have six backup sets that you are restoring in parallel from six separate instances of your backup application, then you need to define separate temporary folders for each restore, and you should manually run hard recovery against each restore one at a time, so they don't all try to do hard recovery simultaneously.
To restore multiple backup sets in parallel from the same storage group, you need to do the following:
-
Restore each backup set from backup media to its own temporary log directory.
-
Ensure that the Last Backup Set check box is not selected.
-
Use the Last Backup Set option to trigger hard recovery.
-
Run the eseutil utility with the /cc switch in each temporary directory that contains restored transaction log files.
Restoring an Offline Backup
You have two methods of restoring an offline backup of Exchange databases: a point-in-time restoration or a roll-forward restoration. To perform either of these restorations, you need to ensure that the databases in the storage group that will be restored are dismounted and consistent.
A point-in-time restoration is when the database is restored but no log files are replayed into the database. All the data that was created after the backup is lost. You use point-in-time restoration to restore from an offline backup when circular logging is enabled on your Exchange server. Because circular logging reuses log files, not all of the log files required to update your database are available, and you would only be able to restore up to when the backup was made.
A roll-forward restoration is when the database is restored and the log files that were created after the backup are played into the database. If all the log files are available, all the data that was created after the backup can be restored. For roll-forward restorations, all the log files that were created after the time that the backup was taken must exist (including the current transaction log file). You delete the checkpoint file and shut down all the other databases in the storage group. Roll-forward automatically replays your log files into the restore database to make it current.
Recovering Mailboxes
As part of your disaster recovery process, you may need to recover a deleted mailbox or a message that a user has deleted in a mailbox. You should plan for this risk by enabling the deletion setting on the mailbox store to retain mailboxes and deleted items for a specified number of days.
When the mailbox retention option is enabled, the default retention period is set to 30 days. If a mailbox is deleted, and if restoration is requested within the 30-day retention period, then you can recover and reconnect that mailbox without restoring the entire database.
If the retention period has expired and you need to recover a mailbox, you need to use a recovery server. In this case, you need to perform the following tasks:
-
Install the recovery server in a different Active Directory forest from the forest in which the original server is located.
-
Install Exchange Server 2003 on the recovery server by using the same organization name that was used in the original organization.
-
Recover the database to an administrative group in which the legacyExchangeDN values match the legacyExchangeDN values in the administrative group from which the database was originally located.
-
Name the restore storage group and the restore logical database so that their names match the original storage group and logical database names.
-
Create a .pst file and move all data that you need to recover into the .pst file.
-
Open the .pst file on the production server and move the data back to the appropriate location.
Recovering Messages
Exchange Server 2003 performs both backup and restore tasks at the physical page level rather than at the mailbox level. Because of this, you cannot easily restore individual messages in a mailbox from a backup. If you want to allow users to retrieve messages from the Deleted Items folder in Outlook or Outlook Web Access (OWA), then you can do so by enabling the Keep Deleted Items For (Days) option for individual users in Active Directory, as shown in Figure 12-5. Alternatively, you can create a new mailbox policy using Exchange System Manager and set a retention policy, as shown in Figure 12-6. To restore an individual message, a user selects the Deleted Items folder and uses the Recover Deleted Items option from the Tools menu in Outlook, or from the Options menu in OWA.
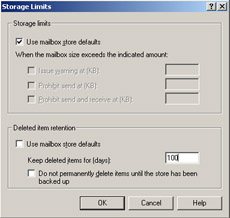
Figure 12-5: Setting a mailbox retention period for an individual user

Figure 12-6: Setting a mailbox retention policy
If you choose not to configure Exchange to allow users to retrieve messages from the Deleted Items folder, then you need to restore the entire mailbox to a recovery server, extract the message from the mailbox into a .pst file, and have the user import the message from the .pst file into his or her mailbox.
Restoring Public Folders
The difficulty with restoring public folders is that if you restore the public folder store, then not only will you restore the public folder that you are trying to recover, but you will also replace all the other existing public folders with the information contained in the backup set. This difficulty is reduced if you create a replica of the folder on another server, which allows you to replicate a copy of the public folder to the server where it was lost. If, however, you have only one server or have a dedicated public folder server, you need to use a recovery server to restore the public folder from your backup media.
The procedure for recovering a public folder is very similar to recovering an individual mailbox. To recover a public folder from backup media, you need to perform the following operations:
-
Configure a recovery server to restore the public folder store.
-
Use Windows Server 2003 Backup to restore the public folder store.
-
Log on to the recovery Exchange server, open Outlook, and then copy the public folder to a .pst file.
-
Log on to the production server, load the .pst file into your profile, and copy the folder back to the public folder tree of the production server.
Caution Do not copy the restored public folder store into the production system. On the recovery server, new system folders are typically created in the public folder store. If you copy the public folder store on to the production server, then these folders will conflict with existing system folders.
Using Exmerge.exe To Restore Mailboxes
After you restore a database to the Recovery Storage Group, you can use the Exmerge.exe utility to move the recovered mailbox data to the regular storage group. You can use this method to recover an entire database or just a single mailbox. Mailboxes in the Recovery Storage Group are disconnected and are not accessible to users with mail clients.
To use a Recovery Storage Group, you must meet the following requirements:
-
You must be logged in with an account (such as Backup Operators) that has Receive As and Send As permissions on all the Exchange mailboxes.
Tip To grant these permissions, you can create a security group (called, for example, mailboxrecovery), add your logon account to this group, and then grant the group full permissions on the database object in Exchange System Manager.
-
You must create a Recovery Storage Group on your Exchange server.
-
You must verify that the original database and mailbox still exist in Active Directory.
To use a Recovery Storage Group to restore mailbox data, you must complete the following steps:
-
Set up the Recovery Storage Group:
-
Use the context menu of the server object to set up the Recovery Storage Group.
-
Specify the transaction log and system path locations.
-
Add the database to be recovered to the Recovery Storage Group by using the context menu of the Recovery Storage Group.
-
-
Restore the mailbox database to the Recovery Storage Group:
-
Use your backup and restore application and select the database and log files that you want to restore.
-
Define your temporary file directory and indicate if this is the last backup to be restored in the set.
-
Mount the store after the restore is complete.
-
-
Merge the mailbox data from the restored database to the original database:
-
Start the Microsoft Exchange Mailbox Merge Wizard (Exmerge.exe) from the command prompt.
-
Follow the instructions in the wizard to specify the export method and the source and destination server (when the Recovery Storage Group is on the same server as the database you are working with, this is a single server).
-
Select only the databases that are in the Recovery Storage Group to be restored.
-
Select individual or multiple mailboxes that you want to restore.
-
If necessary, specify the appropriate locale.
-
Specify a temporary folder.
-
Follow the remaining instructions to finish the wizard and move the mailbox data.
-
The wizard will copy data from mailboxes in the recovery database and merge it with data in the corresponding mailboxes in the original database.
Restoring Clusters
The disaster recovery processes for restoring Exchange Server 2003 clusters are similar to the processes for restoring data on standalone Exchange Server 2003 servers. You will encounter one of the following scenarios when you restore an Exchange cluster:
-
Recovering a single server node in a cluster
-
Recovering a lost cluster quorum
-
Recovering the shared disk resource where Exchange databases reside
Recovering a Single Server Node When a single node in a cluster fails, the Exchange resources running on the node are moved to another available node in the cluster. Exchange databases remain intact on shared storage and can be accessed by the Exchange virtual server from another node in the cluster. This security feature provides reliability when disaster occurs on a single cluster node. When resources are moved to an available node in the cluster, perform the following procedure to remove the non-functioning node and replace it with a new node:
-
Use Cluster Administrator to evict the lost server node from the cluster.
-
Build a new server node for the cluster by installing Windows 2003 on the new computer and provide a new computer name.
-
Rejoin the server node to the cluster.
-
Install Exchange on the server node and move resources back to the node.
Recovering a Lost Cluster Quorum You can recover from a cluster quorum failure if you have backed up the cluster quorum resource. If, for instance, the cluster quorum resource is lost on a shared disk along with the Exchange databases, then you need to restore the cluster quorum resource from backup.
To restore the quorum from backup, perform the following procedure:
-
If the signature of the quorum disk has changed since you made the backup, then use the Windows Server 2003 Resource Kit dumpconfig utility to restore the signature.
-
Stop the Cluster Service on all cluster nodes.
-
Use Windows Server 2003 Backup to restore the system state data, which contains the contents of the cluster quorum disk.
-
Do not restart the computer when prompted; instead run the Clusrest.exe Resource Kit tool to restore the content of the Systemroot\Cluster\Cluster_backup directory to the cluster quorum disk.
-
Restart the computer.
Recovering the Database Shared Disk Resource If the shared drive that Exchange uses for its databases is lost, you need to restore your Exchange databases from backup. To restore Exchange Server 2003 databases from backup, perform the following procedure:
-
Select the Do Not Mount At Startup check box for databases owned by the Exchange virtual servers on the cluster.
-
Perform the steps described in the exercise "Restore a Mailbox Store From Backup" in this lesson.
Tip On a cluster server, you must verify that the shares where Exchange databases reside are available to, and can be accessed by, the cluster node that owns the disk resource.
-
Use Exchange System Manager to verify that databases are mounted.
-
Use Event Viewer to check the Event log.
-
Clear the Do Not Mount At Startup check box for each database that is successfully restored.
Backing Up and Restoring System State Data
Because Exchange Server 2003 relies on Active Directory, you may need to restore Active Directory information during some disaster scenarios. You can use Windows Server 2003 Backup to back up and restore Active Directory on domain controllers. You can perform a backup operation while the domain controller is online. You can perform a restore operation only when the domain controller is booted into Directory Services Restore mode by pressing the F8 key when the server is booting. Backing up Active Directory requires that you back up your Windows Server 2003 system state data.
The procedures for backing up and restoring system state data are described in exercises in this lesson.
Restoring Entire Servers
A full server recovery involves restoring both Exchange Server 2003 and Windows 2003. When you perform a full server recovery, you must reinstall Exchange Server 2003 in Disaster Recovery mode before recovering any Exchange Server 2003 data. You must reinstall Exchange Server 2003 while the Exchange server object for that server still exists in Active Directory. Running Setup in Disaster Recovery mode does not modify or re-create any Active Directory objects for the server being recovered. If you run Setup in any mode other than Disaster Recovery mode, the setup will fail because a duplicate server name will be detected.
| Important | When you recover an Exchange server, always use the /DisasterRecovery switch. If you run Setup without using this switch, then Setup runs in Reinstall mode and automatically mounts the mailbox stores and public stores after the setup process completes. Mounting mailbox stores and public folder stores before restoring your Exchange databases can cause problems, including the potential loss of e-mail messages. |
You can prepare to recover a server running Exchange Server 2003 by meeting the following requirements:
-
Replace any failed hardware.
-
Have the Windows 2003 and Exchange Server 2003 installation CDs available, including any applicable service packs or software updates.
-
Have full backups of the system drive available.
-
Have backups of all Exchange Server 2003 databases available. Verify that all member server objects exist in Active Directory.
-
If the server running Exchange Server 2003 that you are restoring is a member server in the local domain, make sure that Active Directory still contains a server object for that server.
-
Have a backup of your domain controller available if it is the only domain controller in your domain.
-
Have a recent Windows 2003 system state backup set available.
Performing a Trial Restore
You can verify that data has been backed up successfully by restoring that data to another computer during a trial restore. It might not be feasible to verify backups on every server, particularly in a large installation. However, you can test the integrity of the system and identify any potential problems by performing a restore and verification process on selected servers or backup devices.
You can train new administrators by asking them to perform trial restores. This is a safe way to ensure that they know how to perform a restore, and it can be done outside the stressful situation of having to recover from a real disaster. It also saves you from having to perform what can become a repetitive and tedious task.
Practice: Recovering from a Disaster Using Restore
In this practice, you recover a mailbox store, recover a deleted message, and back up and restore system state data. The practice also includes an exercise in restoring a complete server. This last exercise is too lengthy to describe mouse-click by mouse-click. Nevertheless, if you have completed all the other exercises in this chapter, you should be able to attempt it.
Exercise 1: Restore a Mailbox Store from Backup
In this exercise, you restore a mailbox store from its backup. In order to complete the exercise, you must have already performed a full online backup of My Storage Group.
-
Open Exchange System Manager.
-
Navigate to Administrative Groups\First Administrative Group\Servers\Server01 \My Storage Group, and then click on My Storage Group.
-
In the details pane, right-click Default Mailbox Store, click Dismount Store, and then click Yes to continue.
-
From the Start menu, click Run, type C:\Program Files\Exchsrvr\My Storage Group, and then click OK.
-
In C:\Program Files\Exchsrvr\Default Storage Group, select all the files, right-click them, and then click Copy.
-
Open Windows Explorer. Create a new folder C:\Temporary Logs, open Temporary Logs and create a new folder named Backup, open Backup, and then paste the copied files into C:\Temporary Logs\Backup.
-
Close C:\Temporary Logs\Backup.
-
From the Start menu, click All Programs, point to Accessories, point to System Tools, and then click Backup.
-
In the Backup Or Restore Wizard, on the Welcome To The Backup Or Restore Wizard page, click Next.
-
On the Backup Or Restore page, select Restore Files And Settings, and then click Next.
-
On the What To Restore page, in the Items To Restore box, expand File, expand Mybackup.bkf, select the Server01\Microsoft Information Store\My Storage Group check box, and then click Next.
-
In the Restore Database Server dialog box, in the Temporary Location For Log And Patch Files box, type C:\Temporary Logs, select the Last Restore Set (Log File Replay Will Start After This Restore Completes) check box, and select the Mount Database After Restore check box. The wizard page should look similar to Figure 12-7. Click Next.
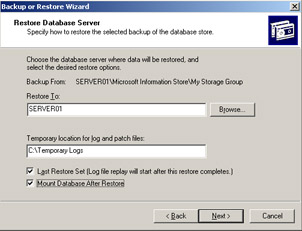
Figure 12-7: Setting the restore parameters -
On the Completing The Backup Or Restore Wizard page, click Finish.
-
If the Check Backup File Location box appears, check that it contains the correct location of your backup file, and then click OK.
-
When the restore is complete, click Report in the Restore Progress dialog box.
-
Verify that no errors are listed in the backup log, and then close the log.
-
In the Restore Progress dialog box, click Close.
Exercise 2: Use OWA To Recover Deleted Messages
In this exercise, you delete messages from your mailbox and then use OWA to recover them. You need to have at least one item in your Deleted Items folder. To recover deleted messages, perform the following steps:
-
Open Internet Explorer and connect to http://Server01/exchange.
-
In the Folders list, click Deleted Items.
-
In Deleted Items, on the toolbar, click Empty Deleted Items, and then click OK to close the warning box. The Deleted Items folder should now be empty.
-
In Deleted Items, on the toolbar, click Recover Deleted Items, as shown in Figure 12-8.
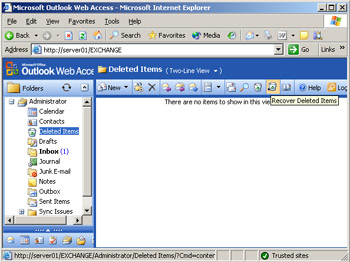
Figure 12-8: Recovering deleted messages -
In the Recover Deleted Items window, select the message or messages that you want to recover, and then click Recover.
-
In the Recover Deleted Items window, click Close.
-
In the Deleted Items folder, verify that any messages that you recovered are listed. Move the items to your Inbox.
-
Close OWA.
Exercise 3: Back Up System State Data
In some disaster recovery scenarios, you need to restore system state data from a backup. To back up system state data, perform the following steps:
-
On Server01, close all applications.
-
From the Start menu, click All Programs, System Tools, and then click Backup.
-
In the Backup Or Restore Wizard, on the Welcome To The Backup Or Restore Wizard page, click Next.
-
On the Backup Or Restore page, select Back Up Files And Settings, and then click Next.
-
On the What To Back Up page, select Let Me Choose What To Back Up, and then click Next.
-
In the Items To Back Up box, expand My Computer, select the System State check box, and then click Next.
-
Type D:\Mybackup in the Choose A Place To Save Your Backup box, type SystemState in the Type A Name For This Backup box, and then click Next.
-
The backup can take a considerable time. Click Report to ensure that no errors occurred. Close the backup log and the Backup Progress dialog box.
Exercise 4: Restore System State Data
If you have backed up system state data, then you can restore Active Directory information on a domain controller. To restore the system state on a domain controller, perform the following steps:
-
Restart Server01 and press F8 when prompted to boot into Directory Services Restore mode.
-
Log on with the same administrator account and password that you used as credentials when promoting the server to a domain controller.
-
You are warned that your computer is starting in Safe mode. Click OK to close the warning box.
-
From the Start menu, click All Programs, point to Accessories, point to System Tools, and then click Backup.
-
In the Backup Or Restore Wizard, on the Welcome To The Backup Or Restore Wizard page, click Next.
-
On the Backup Or Restore page, select Restore Files And Settings, and then click Next.
-
On the What To Restore page, in the contents pane, double-click SystemState.bkf.
-
In the Items To Restore pane, select the check box next to System State. Double-click System State and ensure that SYSVOL appears in the contents pane, as shown in Figure 12-9. Click Next.
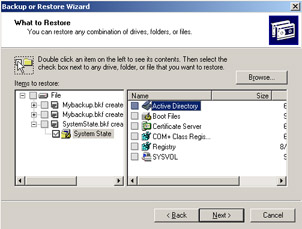
Figure 12-9: Specifying a System State restore -
On the Completing The Backup And Restore Wizard page, click Advanced.
-
On the Where To Restore page, ensure that Original Location is specified, and then click Next.
-
Click OK to close the warning box.
-
On the How To Restore page, ensure that Leave Existing Files (Recommended) is selected, and then click Next.
-
On the Advanced Restore Options page, ensure that Restore Junction Points, But Not The Folders And File Data They Reference is selected, as shown in Figure 12-10. This ensures that sysvol junction points are re-created. Click Next.
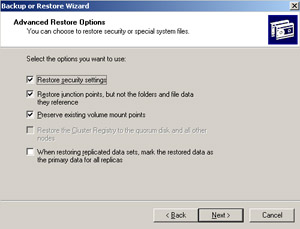
Figure 12-10: Specifying the advanced restore options -
Click Finish.
-
When the restore has finished, click Report in the Restore Progress dialog box.
-
Ensure that no errors are reported, and close the backup log.
-
Click Close to close the Restore Progress box.
-
Click Yes to restart Server01.
Exercise 5: Restore an Exchange Server 2003 Member Server
In this exercise, you restore an entire Exchange Server 2003 member server. As stated previously, this exercise is too complex to describe mouse-click by mouse-click. Nevertheless, if you have performed all the exercises in this and previous chapters, you should be able to attempt this one. To restore an Exchange Server 2003 member server, perform the following steps:
-
If you can still access the hard disks of the damaged server, copy the Exchange Server 2003 database files from that server to a folder on a network share or to a removable storage device.
-
Replace any damaged hardware. If possible, ensure that all replacement hardware in the server you are rebuilding is identical to the hardware that existed in the server that experienced the disaster.
-
Install Windows 2003 on the server that you are rebuilding.
-
Restore the Windows backup set that was performed on the damaged server to the server you are rebuilding. Restoring the Windows backup set restores the Windows 2003 system files, including the registry database and Internet Information Services (IIS) metabase files. This process also provides the server that you are rebuilding with its original NetBIOS name and returns it to the correct domain. If you do not perform this step, you cannot properly run Setup in Disaster Recovery mode.
-
Install any Windows 2003 service packs and software updates that were running on the damaged server to the server you are rebuilding.
-
Install any applications (other than Exchange Server 2003) that run on the server.
Tip Install the applications to the same locations and with the same configurations as the applications that were installed on the damaged server.
-
Restore any additional data backups that were performed on the damaged server.
-
Run Exchange Server 2003 Setup in Disaster Recovery mode. This process installs Exchange applications and any necessary Exchange files to the server you are rebuilding. This process also uses the configuration information that is stored on the Exchange Server object in Active Directory to reclaim the configuration of the original server. The configuration information that is reclaimed includes the Exchange storage group names, mailbox store names, public folder store names, and virtual server configuration settings. When you run Exchange in Disaster Recovery mode, ensure that all the components that existed on the damaged server are selected.
-
If not already selected, select Disaster Recovery for each component that was installed on the damaged server.
-
Install Exchange Server 2003 to the same drive and directory that it was installed to on the damaged server. At a minimum, you should ensure that all the drive letters on which databases and log files were kept are available.
-
Install any Exchange Server 2003 hotfixes that were running on the damaged server.
-
Install in Disaster Recovery mode any Exchange Server 2003 service packs that were running previously on the damaged server to the server. Installing Exchange Server 2003 service packs in Disaster Recovery mode prevents the Exchange databases from being mounted at the end of the service pack installation process, which enables you to proceed directly to restoring the Exchange databases from backup.
-
If the drives that contain the Exchange database files and log files were also lost in the disaster, restore the Exchange Server 2003 databases that existed on the damaged server.
-
If you were able to archive the log files from the damaged server as recommended in step 1 of this procedure, copy these files to the correct location on the recovery server. If you do not copy the most recent log files to the proper locations on the server that you are rebuilding, you will lose changes that were made to Exchange databases up to the time the disaster occurred.
-
If the server that experienced the disaster included any Exchange full-text indexes, repair full-text indexing by re-creating full-text indexes on the server you are rebuilding.
Lesson Review
The following questions are intended to reinforce key information presented in this lesson. If you are unable to answer a question, review the lesson materials and then try the question again. You can find answers to the questions in the "Questions and Answers" section at the end of this chapter.
-
You want to restore three storage groups, each of which contains five databases. How many restore operations do you need to perform?
-
Your Exchange Server 2003 organization has a dedicated public folder server. You want to restore a single public folder store from backup. What difficulty do you face, and how do you accomplish your goal?
-
You have backed up system state data on a domain controller. What must you do to restore this data?
-
What happens to the Exchange Server 2003 resources running on a single node in a cluster if that node fails?
Lesson Summary
-
To recover a damaged Exchange Server 2003 storage group, dismount the storage group and restore it from backup. If transaction log files are available, the databases can be rolled forward to the point of failure.
-
If you need to restore a deleted mailbox within its retention period, then you can recover and reconnect the mailbox without restoring the entire database. If the retention period has expired, then you need to use a recovery server to recover the mailbox.
-
You can allow users to retrieve messages from the Deleted Items folder in Outlook or OWA.
-
If you need to restore Active Directory data in a domain controller, for example, when it is the only domain controller in the domain, then you should back up system state data. You can restore this data by booting the server up in Directory Services Restore mode.
EAN: 2147483647
Pages: 221