Creating Dependencies Between Projects
Most projects do not exist in a vacuum. Tasks or phases in one project might depend on tasks in other projects. You can show such dependencies by linking tasks between projects.
Reasons that you might need to create dependencies between projects include the following:
-
The completion of one task in a project might enable the start of a task in another project. For example, another project manager might need to complete an environmental impact statement before you can start to construct a building. Even if these two tasks are managed in separate project plans (perhaps because separate departments of a development company are completing them), one project has a logical dependency on the other.
-
A person or a piece of equipment might be assigned to a task in one project, and you need to delay the start of a task in another project until that resource completes the first task. The two tasks might have nothing in common other than needing that resource.
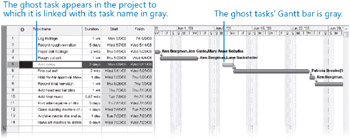
Task relationships between project plans look similar to links between tasks within a project plan, except that external predecessor and successor tasks have gray task names and Gantt bars. Such tasks are sometimes referred to as ghost tasks because they are not linked to tasks within the project plan, only to tasks in other project plans.
In this exercise, you link tasks in two project plans, and you see the results in the two project plans as well as in a consolidated project plan.
1. On the Standard toolbar, click Open. ![]()
The Open dialog box appears.
2. Navigate to the Chapter 19 Consolidating folder, and double-click the Wingtip Toys Commercial 19 file.
3. Click Open resource pool to see assignment across all sharer files, and then click OK.
4. On the Standard toolbar, click Open.
5. Navigate to the Chapter 19 Consolidating folder, and double-click the Parnell Aerospace Promo 19 file.
6. In the Task Name column, click the name of task 8, Add dialog.
7. On the Standard toolbar, click Scroll to Task. ![]()
To the right of the task’s Gantt bar, one of the resources assigned to this task is named Fabrikam Inc. Sound Studio. You want to use this studio for work on the Wingtip Toys project after this task is completed. Next, you will link task 8 to a task in the Wingtip Toys Commercial 19 project plan.
8. On the Window menu, click Wingtip Toys Commercial 19.
9. On the View menu, click Gantt Chart.
10. Click the name of task 5, Fine cut edit.
11. On the Standard toolbar, click Scroll to Task. ![]()
Project scrolls the Gantt Chart view to display task 5.
12. On the Standard toolbar, click the Task Information button. ![]()
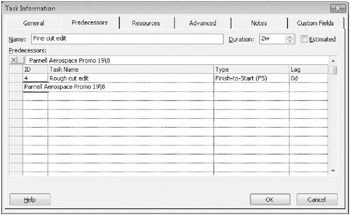
The Task Information dialog box appears. In the next two steps, you will enter the file name and task ID of the predecessor task in this format: File Name\Task ID.
13. Click the Predecessors tab.
14. In the ID column, click the next empty cell below task 4 and type Parnell Aerospace Promo 19\.

15. Press the ![]() key, and then click OK to close the Task Information dialog box.
key, and then click OK to close the Task Information dialog box.
Project inserts the ghost task named Add dialog in the project. The ghost task represents task 8 from the Parnell project.

| Tip | If you point to the ghost task’s Gantt bar, Project displays a ScreenTip that contains details about the ghost task, including the full path to the external project plan where the external predecessor task (the ghost task) resides. |
Next, you’ll look at the ghost task in the Parnell project.
16. On the Window menu, click Parnell Aerospace Promo 19.
Here you can see that ghost task 9, Fine cut edit, is a successor for task 8, Add dialog. Because task 9 is a successor task with no other links to this project, it has no effect on other tasks here.
The link between these two project plans will remain until you break it. Deleting a task in the source plan or the ghost task in the destination plan deletes the corresponding task or ghost task in the other plan.
17. Close and save changes to all open files.
To conclude this exercise, you will display the link between these two projects in the consolidated project plan.
18. On the Standard toolbar, click Open.
19. Navigate to the Chapter 19 Consolidating folder, and double-click the Consolidated Projects 19 file.
20. Click Open resource pool to see assignment across all sharer files, and then click OK.
21. In the Parnell project, click the name of task 8, Add dialog.
22. On the Standard toolbar, click Scroll to Task.
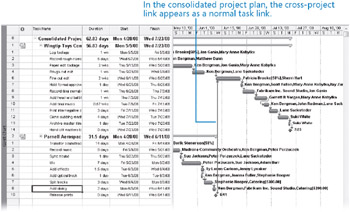
You can see the link line between the task Add dialog in one inserted project and the task Fine cut edit in the other inserted project.

Because you are looking at a consolidated project plan that shows the tasks from both project plans, the cross-project link does not appear as a ghost task.
The following are a few additional tips and suggestions for working with consolidated projects and cross-project links:
-
If you do not want to see cross-project links, on the Tools menu, click Options. On the View tab, clear the Show External Successors or Show External Predecessors check box.
-
When viewing a consolidated project, you can quickly create cross-project links by clicking the Link Tasks button on the Standard toolbar. Dragging the mouse between two task bars will do the same thing.
-
Each time you open a project plan with cross-project links, Project will prompt you to update the cross-project links. You can suppress this prompt if you would rather not be reminded, or you can tell Project to automatically accept updated data from the linked project plan. On the Tools menu, click Options, and then click the View tab. Under Cross Project Linking Options For <File Name>, select the options you want.
Close all open files.
EAN: 2147483647
Pages: 247