New Vista Tablet PC Features
| In the "old days," working on a document usually meant pulling out a blank sheet of paper, taking up a pen (or some other writing instrument), and then writing out your thoughts in longhand. Nowadays, of course, this pen-and-paper approach has been almost entirely superseded by electronic document editing. However, there are still plenty of situations in which people still write things out in longhand:
Unfortunately, for all but the most trivial notes, writing on paper is inefficient because, in most cases, you eventually have to put the writing into electronic form, either by entering the text by hand or by scanning the document. What the world has needed for a long time is a way to bridge the gap between purely digital and purely analog writing. We've needed a way to combine the convenience of the electronic format with the simplicity of pen-based writing. After several aborted attempts (think: the Apple Newton), that bridge was built in recent years: the Tablet PC. At first glance, many Tablet PCs look just like a small notebook computer, and it certainly can be used just like any notebook. However, a Tablet PC boasts three hardware innovations that make it unique:
Note Some Tablet PCs come with a screen that's sensitive to finger touches. Windows Vista supports these screens. The first Tablet PCs came with their own unique operating system, Windows XP Tablet PC Edition. With Windows Vista, the Tablet PCspecific features are now built into the regular operating system, although they are activated only when Vista is installed on a Tablet PC (and you're running any Vista edition except Home Basic). Before moving on to the new Tablet PC, I should note that Vista comes with a couple of tools that were also part of the XP version: Windows Journal and Sticky Notes. These programs are identical to the XP versions. Changing the Screen OrientationThe first Tablet PC feature to mention is one that you've already seen. The new Mobility Center comes with a Screen Orientation section that tells you the current screen orientation (see Figure 7.2, earlier in this chapter). There are four settings in all:
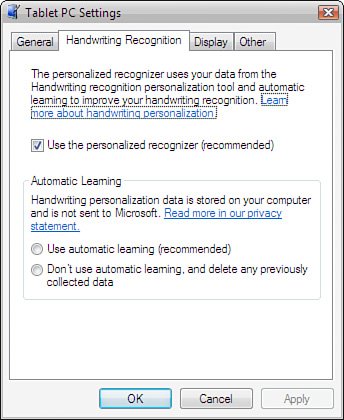
Tablet PC SettingsBefore you start inking with Vista, you'll probably want to configure a few settings, and Vista offers quite a few more than XP. Your starting point is the Control Panel's Mobile PC windowspecifically, the renamed Tablet PC Settings icon (formerly Tablet and Pen Settings). In the Tablet PC Settings dialog box that appears, the General tab is basically the same as the old Settings tab, and the Display tab is identical to its predecessor. However, there is a new Handwriting Recognition tab, shown in Figure 7.12, that has two sections:
Figure 7.12. Use the Handwriting tab to activate new Vista features for improving handwriting recognition. Caution It's understandable that some people have privacy concerns about the Automatic Learning feature because it is sure to collect proprietary and sensitive data typed into email messages. However, Microsoft notes that the information stays on your computer and is stored in a proprietary format that can't be read in a text editor or word processor. It seems likely that someone will hack this new format, however, so if you do not want sensitive data stored via Automatic Learning, you should turn off this feature. Tablet PC Input PanelAs with XP Tablet PC Edition, Windows Vista comes with a tool called the Tablet PC Input Panel that you use to enter text and other symbols with the digital pen instead of the keyboard. You have two ways to display the Input Panel:
Figure 7.13 shows the Input Panel. Figure 7.13. Use the Writing Pad to hand-write words or short phrases. Tip You can also add an icon for the Input Panel to the Vista taskbar. Right-click the taskbar, and then click Toolbars, Tablet PC Input Panel. The layout of the Input Panel is slightly different than in the XP version, with the icons for the writing pad, character pad, and onscreen Keyboard, and the Options button along the top. The minikeyboard that appears with the writing pad and character pad is slightly different as well, with the notable difference being the addition of the Web key full time. (In XP Tablet PC Edition, it appeared only when you were entering a web address.) This makes sense because users often need to write URLs in email messages and other correspondence. The Vista Input Panel also comes with quite a few more options than its predecessor. Click Tools and then click Options in the menu that appears. Here's a list of some of the more significant new settings:
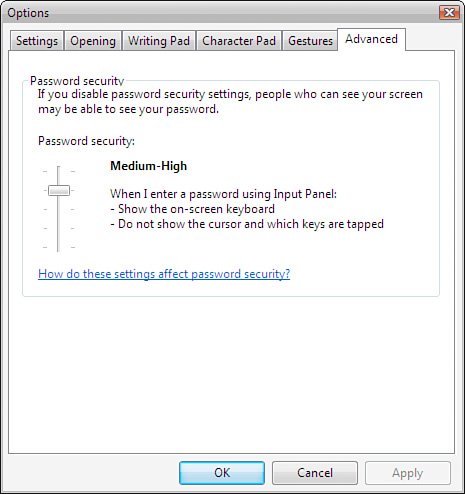
Figure 7.14. The Input Panel Options dialog box offers many new features, including security settings that protect password entries. Using Pen FlicksThe Input Panel onscreen keyboard has keys that you can tap with your pen to navigate a document and enter program shortcut keys. However, if you just want to scroll through a document or navigate web pages, having the keyboard onscreen is a hassle because it takes up so much room. An alternative is to tap-and-drag the vertical or horizontal scroll box, or tap the program's built-in navigation features (such as the Back and Forward buttons in Internet Explorer). Vista gives you a third choice for navigating a document: pen flicks. These are gestures that you can use in any application to scroll up and down in a document, or to navigate backward or forward in Internet Explorer or Windows Explorer:
Tip For a pen flick to work, you need to follow these techniques:
You can also set up pen flicks for other program features:
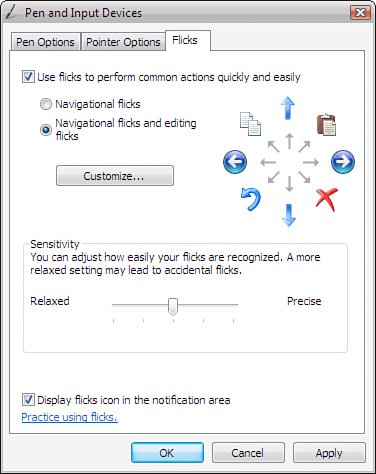
To activate flicks, open the Control Panel Pen and Input Devices icon, and then display the Flicks tab (see Figure 7.15). Activate the Use Flicks to Perform Common Actions Quickly and Easily check box, and then select the flicks you want to use:
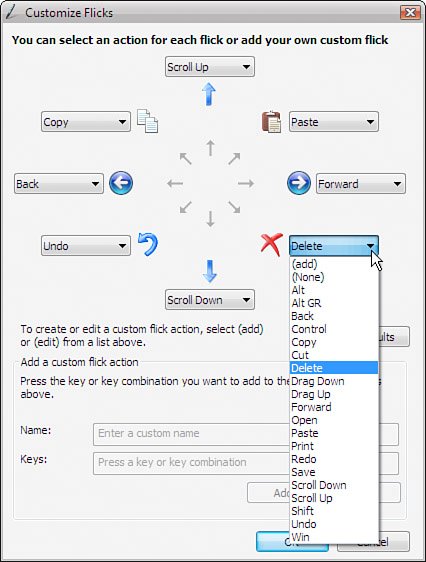
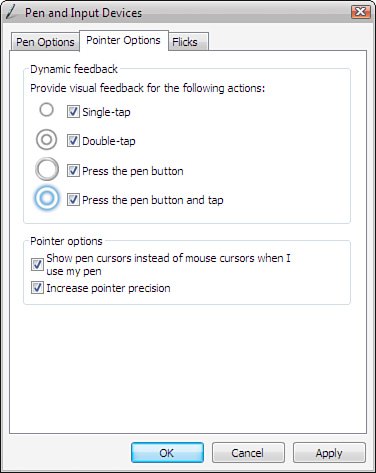
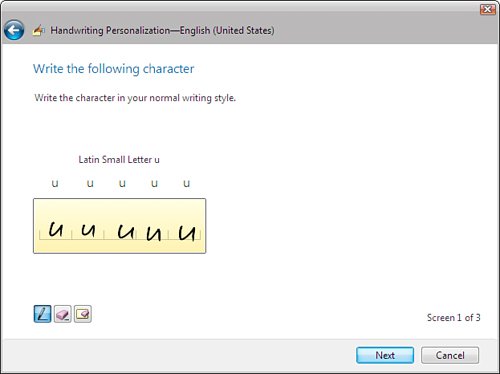
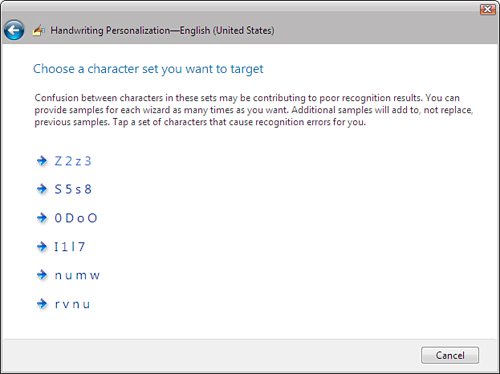
Figure 7.15. Use the Flicks tab to activate and configure pen flicks. If you activate the Navigational Flicks and Editing Flicks option, the Customize button becomes enabled. Click this button to display the Customize Flicks dialog box shown in Figure 7.16. You use this dialog box to apply one of Vista's built-in actions (such as Cut, Open, Print, or Redo) to a flick. Alternatively, click (add) to create a custom action by specifying a key or key combination to apply to the flick. Figure 7.16. Use the Customize Flicks dialog box to apply different actions or key combinations to a flick gesture. Tip If you forget which flick does which action, you can easily find out by clicking the Pen Flicks icon in the taskbar's notification area. This displays a Pen Flick Gestures fly-out that shows your current flick settings. Pointer OptionsWhile we're in the Pen and Input Devices dialog box, I should also point out the new Pointer Options tab, shown in Figure 7.17. By default, Vista provides you with visual feedback when you single-tap and double-tap the pen, and when you press the pen button. I find that this visual feedback helps when I'm using the pen for mouselike actions. If you don't, you can turn them off by deactivating the check boxes. Figure 7.17. Use the new Pointer Options tab to toggle Vista's visual feedback for pen actions such as tapping and double-tapping. Personalizing Handwriting RecognitionWhen you use a Tablet PC's digital pen as an input device, there will often be times when you don't want to convert the writing into typed text. A quick sticky note or journal item might be all you need for a given situation. However, in plenty of situations you need your handwriting converted into typed text. Certainly, when you're using the Input Panel, you always want the handwriting converted to text. However, the convenience and usefulness of handwritten text is directly related to how well the handwriting recognizer does its job. If it misinterprets too many characters, you'll spend too much time either correcting the errors or scratching out chunks of text and starting again. Rather than just throwing up their hands and saying "That's life with a Tablet PC," Microsoft's developers are doing something to ensure that you get the most out of the handwriting recognizer. Windows Vista comes with a new tool called Handwriting Personalization (select Start, All Programs, Tablet PC, Personalize Handwriting Recognition), shown in Figure 7.18. Figure 7.18. Use the new Handwriting Personalization tool to improve the Tablet PC's capability to recognize your handwriting.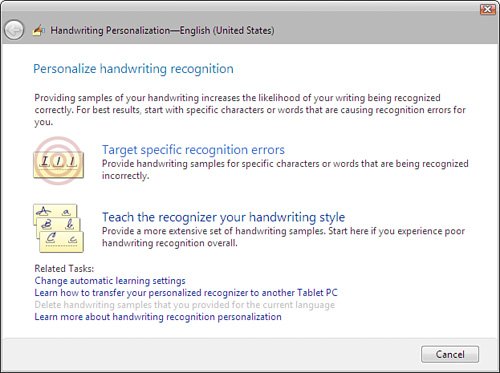 This feature gives you two methods that improve the Tablet PC's capability to recognize your handwriting:
If you select Target Specific Recognition Errors, you next get a choice of two wizards:
If you select Teach the Recognizer Your Handwriting Style, you next get a choice of two wizards:
When you're done, click Update and Exit to apply your handwriting samples to the recognizer. Note that this takes a few minutes, depending on the number of samples you provided. The Snipping ToolWindows Vista includes a new feature called the Snipping Tool that enables you to use your pen to capture ("snip") part of the screen and save it as an image or HTML file. Start the Snipping Tool by selecting Start, All Programs, Accessories, Snipping Tool. Vista washes out the screen to indicate that you're in snipping mode and displays the Snipping Tool window. You then use your pen to draw a freehand circle (or box) around the screen area you want to capture. The snipped area then appears in the Snipping Tool window, as shown in Figure 7.21. From here, you save the snip as an HTML file or a GIF, JPEG, or PNG graphics file. Figure 7.21. Use the new Snipping Tool to use your pen to capture part of the screen.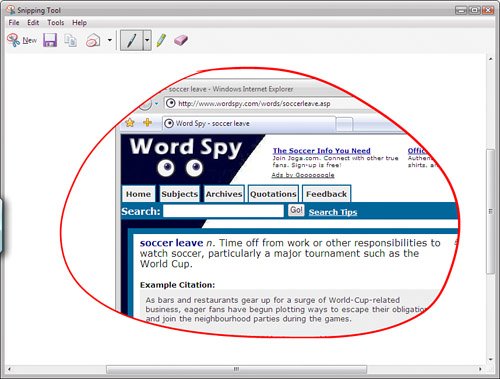 |
EAN: 2147483647
Pages: 122