Steps for Installing a New IDE Hard Drive
|
|
I’d feel remiss if I didn’t explain the process of removing a damaged hard drive and installing a replacement just in case. For this, you’ll need the following:
-
The replacement hard drive
-
A screwdriver (This is usually a Phillips screwdriver, but check your existing hard drive installation to see what’s required.)
-
A working data ribbon cable
-
A boot or Startup disk with CD-ROM support and a full (not upgrade) version of your operating system (For those of you using Windows XP, you need the Windows XP install CD.)
-
Installation documentation for your new drive
-
Drive-management software for the new drive (if included)
Tip Keep your new hard drive in its anti-static bag prior to its actual installation.
Before you start the actual installation, check your new drive to be sure it’s the exact one you thought you purchased; check the serial number and capacity, both of which should be listed on the metal identifying plate on the drive itself. If the new drive shows any signs of damage (denting, watermarks, and so on), contact the place where you purchased it for a replacement.
It’s also important to jumper the drive for the way you want to use it. Jumpers, first mentioned in Chapter 2, “How Your Hardware, Operating System, and Applications Work Together,” are two parallel rows of pins that are jumpered using a squarish-shaped piece of plastic called a shunt that is pressed over the two pins on two separate rows of pins, creating a bridge or jumper to configure the drive for its proper use.
How you jumper a drive depends on how it will be used and corresponds to markings on the back of the drive (where the two rows of pins are located, along with the ribbon cable and power connection), as you can see in Figure 17.3.
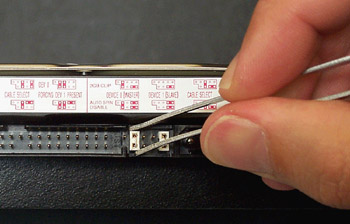
Figure 17.3: How a hard drive is jumpered
Photo courtesy of Emily Sherrill Weadock
These markings typically designate Master, Slave, Single, or Cable Select:
-
Jumpered as Master (M)—The M setting is used when the hard drive will be the first of two IDE drives attached to a single IDE channel on the motherboard, with the Master drive being the only one of the two directly connected to the IDE channel on the motherboard. Note that some drives require no jumper on the M setting when there is just one drive attached to the cable. This was done so that PC builders did not have to set a jumper if the PC had only one drive. If you add another drive to that cable, the Master will have to be jumpered.
-
Jumpered as Slave (S)—The S setting is used when the hard drive will be the second of two IDE drives attached to a single IDE channel (cable) on the motherboard. The second drive is connected directly to the first (master) drive, which in turn is plugged into the IDE channel.
-
Jumpered as Single—Use this when a drive is the only one connected by ribbon cable to the IDE channel controller on the motherboard.
-
Jumpered as Cable Select—Often this is how a new drive is jumpered to start, but use this only if drive instructions specify you should do so for your situation.
There’s a wealth of helpful information about your hard drive on your drive manufacturer’s web site. For example, I easily located a jumper diagram when visiting the Support section at Western Digital’s site (www.wdc.com), as shown in Figure 17.4.
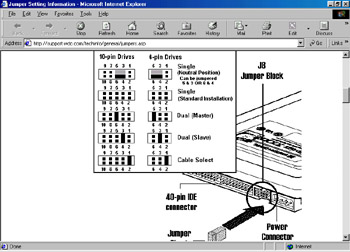
Figure 17.4: A jumper diagram for a Western Digital Caviar drive from Western Digital’s web site
Once the drive is properly checked and the correct jumper set for the way you intend to use the drive, you can proceed with the hard drive installation by following these steps:
-
Shut down the PC, disconnect power, and remove the cover.
-
Don your anti-static wrist strap.
-
Locate the hard drive in its drive bay that you intend to replace, note its current orientation (how and where it sits), and find its corresponding screws (on either side of the drive frame within in the case) that mount it into place. Remove these screws (usually four) and set them aside.
-
At the back of the drive, note the exact installation of the data ribbon cable where the blue or red wire is located because you want to duplicate it later when you install the new drive. Then carefully remove both the data ribbon cable and the power supply connector from the drive.
-
Carefully slide the old drive out of its bay and set it aside.
Tip If you have lingering questions about how the new hard drive should be jumpered and you’re installing the new drive as a replacement for the old one and not changing anything else, check the jumper setting on the old drive. While the exact jumpers may vary, see whether it’s set for Master, Slave, Single, or Cable Select and duplicate those settings.
-
Remove the new drive from its anti-static bag and slide it into the recently vacated drive bay.
-
Using the screws you removed to take out the old drive, screw the new drive (through the drive bay) into place. Be sure the mounting is level (not wildly tilted) and secure (doesn’t wobble).
-
Attach the drive ribbon cable to the back of the drive (see Figure 17.5) so that the color-coded edge of the ribbon cable is oriented to pin 1 on the hard drive. Pin 1 is almost always to the right side of the drive as you look at it from the rear perspective. Be sure the seating is firm. If the drive is the master or the first of two drives using the same ribbon cable to attach to the same IDE channel controller on the motherboard, make sure the cable connection to the second drive is secure as well.
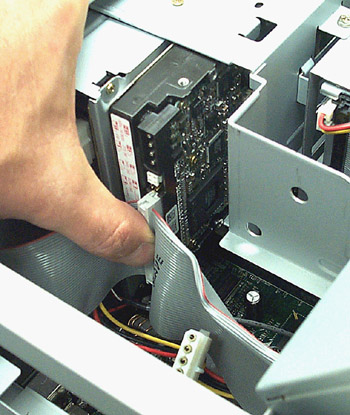
Figure 17.5: Attaching the data ribbon cable to the back of the drivePhoto courtesy of Emily Sherrill Weadock
-
Insert the power supply connector into the power connection (it is keyed) at the back of the hard drive. Again, make sure this is firmly seated; this is one of the tougher connections to get right the first time.
-
At this point, you can replace the PC cover (or do what I do and leave it off until I know the drive is seen and working). Then, reconnect power to the PC.
What you do next depends on your particular situation. Assuming your drive is brand new and hasn’t been partitioned and formatted yet, do that using the instructions found in Chapter 16 for partitioning and formatting with one caveat: The drive-management software that came with your new drive (or the drive software you downloaded from the manufacturer’s web site) may take care of this when you run its Setup utility. Some software does it all except for installing the operating system, while other programs need you to partition, then format, and once that’s done, you can run Setup to configure the drive the rest of the way. Read your drive documentation or check the manufacturer’s web site for more information related to your specific drive.
The drive Setup software checks your BIOS to make sure it works with the capacity of the new drive and, if not, applies something like drive-overlay software so that it can. As I’ve mentioned before, drive-overlay software can get messy later if you have a problem with the drive or your system, so I avoid using it by first seeing if a drive can be recognized by the BIOS on its own and, if not, trying to obtain the right BIOS upgrade.
If you plan for the new hard drive to be your primary hard drive, the operating system must be installed after formatting (Chapter 16 provides instructions for that). Once this is accomplished, install your applications, restore a previously stored drive image or backup, or use a program like DriveCopy to copy the contents of an existing hard drive to the replacement drive.
If the drive was previously partitioned and formatted for use on another PC and simply transferred to this system, it’s possible that the drive will be detected and made available to you just like it was always there. For example, while I was writing this morning, I stopped to take a moment to remove a second hard drive from one PC and install it as a second hard drive in another PC. Under Windows XP, the drive was ready and available the instant I turned the PC on after the physical installation.
It’s hard to believe, but we’re about to move into the last topic of this book, “Knowing When to Call Professionals,” in which you’ll learn about warranties and tips for best success when contacting the pros for assistance.
|
|
EAN: 2147483647
Pages: 140
- ERP System Acquisition: A Process Model and Results From an Austrian Survey
- The Effects of an Enterprise Resource Planning System (ERP) Implementation on Job Characteristics – A Study using the Hackman and Oldham Job Characteristics Model
- Context Management of ERP Processes in Virtual Communities
- Data Mining for Business Process Reengineering
- Healthcare Information: From Administrative to Practice Databases