Customizing the Start Menu for Easier Program and Document Launching
The whole purpose of the Start menu is, as its name implies, to start things, particularly programs and documents. Yes, you can also launch these objects via shortcut icons on the desktop, but that’s not always a great alternative, since the desktop is covered most of the time by windows. So, if you want to get something going in Windows XP, most often you’re going to have to do it via the Start menu. The good news is that Windows XP’s new Start menu is wonderfully flexible and is geared, in fact, to launching objects with as few mouse clicks or keystrokes as possible. To get to that state, however, you have to work with a few relatively murky options and settings, which you’ll learn about in the next few sections.
Getting More Favorite Programs on the Start Menu
The Start menu is divided vertically into two columns, as shown in Figure 10-1:
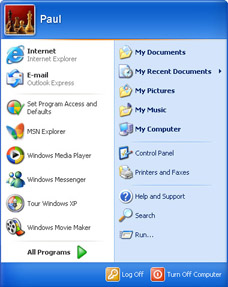
Figure 10-1: The Start menu consists of several discrete sections, each intended to improve your efficiency.
-
Frequent programs This is the left side of the Start menu, which appears by default with a white background. This side includes the permanent Internet and E-mail icons at the top, and below them are shortcut icons for the six programs that you’ve used most frequently.
-
Built-in icons This is the right side of the Start menu, which appears by default with a light blue background. It contains icons for various built-in Windows XP features.
The list of frequent programs is one of the best new features in Windows XP, because it ensures that the programs you use most often are always just a couple of mouse clicks away. If there’s a downside to this feature, it’s that it displays a maximum of only six icons, so many frequently used programs get left off the list. However, if you have enough room, you can tell Windows XP to display up to 30 icons in this area. Here’s how:
-
Launch Control Panel’s Taskbar And Start Menu icon. The Taskbar And Start Menu Properties dialog box appears.
-
Select the Start Menu tab.
Tip A quick way to go directly to the Start Menu tab is to right-click either the Start button or an empty section of the Start menu, and then select Properties.
-
Make sure the Start Menu option is selected and then click the Customize button to its right. The Customize Start Menu dialog box appears, as shown in Figure 10-2.
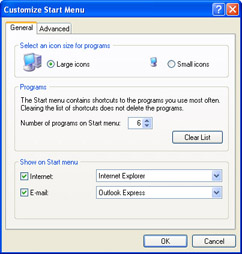
Figure 10-2: Use the Customize Start Menu dialog box to set the maximum number of shortcut icons that appear in the Start menu’s list of frequent programs. -
Use the Number Of Programs On Start Menu spin box to specify the number of frequent programs you want to display.
-
If you want to start over with a fresh list of frequent programs, click the Clear List button.
Tip If you need to get rid of only one or two icons from the Start menu’s frequent programs list, display the Start menu, right-click an icon you want to delete, and then select Remove From This List.
-
If you don’t think you have enough screen space to display all the icons, select the Small Icons option. This significantly reduces the amount of space each icon takes up on the Start menu.
-
Click OK.
Insider Secret To prevent a program from appearing on the Start menu’s frequent programs list, open the Registry Editor and display the following key:
HKCR\Applications\program.exe
Here, program.exe is the name of the program’s executable file. (If the key doesn’t exist, create it.) Create a string value called NoStartPage and set its value to the null string (""). You can also do this via Tweak UI: Open the Taskbar, XP Start Menu branch and clear the check boxes for the programs that you don’t want to appear on the Start menu.
Changing the Default Internet and E-mail Programs
Above the Start menu’s frequent programs list is the pinned programs list, which, in addition to some items you may have intentionally added, contains two items that (by default) appear permanently on the Start menu:
-
Internet By default, this item launches the Microsoft Internet Explorer Web browser.
-
E-mail By default, this item launches the Microsoft Outlook Express e-mail client.
Note If your computer’s manufacturer or reseller preinstalled Windows XP, you may notice that the manufacturer or reseller altered the default Internet and E-mail programs to support other software packaged with your computer. However, you should be able to further modify the defaults to reflect your own preferences.
If you have multiple Web browsers or e-mail clients installed on your computer, you can customize these items to launch your preferred Web browser or e-mail program. Here are the steps to follow:
-
Display the Customize Start Menu dialog box, as described in the previous section.
-
If you want the Internet item to appear on the Start menu, leave the Internet check box selected; otherwise, clear it and continue with step 4.
-
If the Internet check box is selected, use the list to its right to choose the Web browser you want associated with the Internet item.
-
If you want the E-mail item to appear on the Start menu, leave the E mail check box selected; otherwise, clear it and continue with step 6.
-
If the E-mail check box is selected, use the list to its right to choose the e-mail client you want associated with the E-mail item.
-
Click OK.
Note, too, that it’s also possible to change the text and the icon used for the Internet item on the Start menu. You do this by first displaying the following key in the Registry Editor:
HKLM\SOFTWARE\Clients\StartMenuInternet\client\
Here, client is the name of the executable file of the program associated with the icon (such as Iexplore.exe for Internet Explorer). The (Default) setting controls the icon text, and the (Default) setting of the DefaultIcon subkey controls the icon.
Customizing the text and icon for the E-mail item is similar. You’ll find the necessary settings here:
HKLM\SOFTWARE\Clients\Mail\client\
Here, client is the name of the program associated with the icon (such as Outlook Express). The (Default) setting controls the icon text, and the (Default) setting of the DefaultIcon subkey controls the icon. Note that you may have to create this subkey.
Pinning a Favorite Program Permanently to the Start Menu
The Start menu’s list of frequent programs is such a timesaving feature that it can be frustrating if a program drops off the list. Another aggravation is that the icons often change position because Windows XP displays the programs in order of popularity. Once you display the Start menu, this constant shifting of icons can result in a slight hesitation while you look for the icon you want. (This is particularly true if you’ve expanded the number of icons that can be displayed.) Contrast both of these problems with the blissfully static nature of the pinned programs list’s Internet and E-mail icons, which (by default) are always where you need them, when you need them.
You can get the same effect with other shortcuts by adding—or pinning— them to the pinned programs list. To do this, first open the Start menu and, looking in either the frequent programs listing or the All Programs list, find the shortcut you want to work with. Then you have two choices:
-
Right-click the shortcut and then select Pin To Start Menu.
-
Drag the shortcut to the pinned programs list.
You can also use this technique to pin shortcuts residing on the desktop to the pinned programs list. If you decide later on that you no longer want a shortcut pinned to the Start menu’s pinned programs list, right-click the shortcut and then select Unpin From Start Menu.
| Insider Secret | When you display the Start menu, you can select a pinned item quickly by pressing the first letter of the item’s name. If you add several shortcuts to the pinned programs list, however, you might end up with more than one item that begins with the same letter. To avoid conflicts, rename each of these items so that they begin with a number. For example, renaming “Backup” to “1 Backup” means there is no confusion if the program “Backgammon” is also pinned, and you can select this item by pressing 1 when the Start menu is displayed. |
Streamlining the Start Menu by Converting Links to Menus
The right side of the Start menu contains a number of built-in Windows XP features, which are set up as links. That is, you click an item, and a window or a program runs in response. That’s fine for items such as Search or Run, but it’s not very efficient for an item such as Control Panel, where you’re usually looking to launch a specific Control Panel icon. It seems wasteful to have to open the Control Panel window, launch the icon, and then close Control Panel.
A better approach is to convert a link into a menu of items that would normally be displayed in a separate window. For example, the Control Panel item could display a menu of its icons. One of the nicer new features in Windows XP is that it’s easy to convert many of the Start menu links into menus. If you choose to convert one or more of the Start menu links to menus, here are the steps:
-
Display the Customize Start Menu dialog box as described earlier (see Figure 10-2).
-
Select the Advanced tab.
-
In the Start Menu Items section of the dialog box, find the following items and, for the links you want to convert to menus, select the Display As A Menu option:
-
Control Panel
-
My Computer
-
My Documents
-
My Music
-
My Pictures
-
-
In the Start Menu Items section of the dialog box, select the Favorites Menu check box to add a menu of your Internet Explorer favorites to the Start menu.
-
In the Start Menu Items section of the dialog box, find the Network Connections item and select the Display As Connect To Menu option. This gives you a menu of network connections, and you can launch any connection by selecting it from the menu.
-
In the Start Menu Items section of the dialog box, find the System Administrative Tools item and select the Display On The All Programs Menu And The Start Menu option. This gives you an Administrative Tools menu that offers shortcuts to features such as the Computer Management snap-in, the Performance monitor, and the Local Security Policy editor.
-
Make sure the List My Most Recently Opened Documents check box is selected. This adds the My Recent Documents menu to the Start menu, which displays the last 15 documents that you worked with.
-
Click OK to return to the Taskbar And Start Menu Properties dialog box.
-
Click OK.
Adding, Moving, and Removing Other Start Menu Icons
Besides the main Start menu, the icons on the All Programs menu and submenus can be customized to suit the way you work. Using the techniques we discuss in this section you can perform the following Start menu productivity boosts:
-
Move important features closer to the beginning of the All Programs menu hierarchy.
-
Remove features you don’t use.
-
Add new commands for features not currently available on the All Programs menu (such as the Registry Editor).
Windows XP offers three methods for adding and removing Start menu shortcuts, and we explain each of them in the next three sections.
Adding Shortcuts via the Start Button
The quickest way to add a shortcut is to drag an executable file from Windows Explorer and then do either of the following:
-
Drop it on the Start button. This pins the shortcut to the bottom of the pinned programs list on the Start menu.
-
Hover over the Start button. After a second or two, the main Start menu appears. Now hover over All Programs until the menu appears, and then drop the file’s icon where you want the shortcut to appear.
Working with the Start Menu Folder
The All Programs shortcuts are stored in two places within %SystemDrive%\Documents and Settings\:
-
The user\Start Menu\Programs subfolder, where user is the name of the current user. Shortcuts in this subfolder appear only when this user is logged on to Windows XP.
-
The All Users\Start Menu\Programs subfolder. Shortcuts in this folder appear to all users.
Tip A quick way to get to the current user’s Start Menu folder is to right-click the Start button and then select Explore.
By working with the Programs subfolder in Windows Explorer, you get the most control over not only where your Start menu shortcuts appear, but also the names of those shortcuts. Here’s a summary of the techniques you can use:
-
Within the Programs folder and its subfolders, you can drag existing shortcuts from one folder to another.
-
To create a new shortcut, drag the executable file’s name to the folder you want to use. (Remember that if you want to create a shortcut for a document or other non-executable file, right-drag the file’s name and then select Create Shortcuts Here when you drop the file.)
-
You can create your own folders within the Programs folder hierarchy and they’ll appear as submenus within the All Programs menu.
-
You can rename a shortcut the same way you rename any file.
-
You can delete a shortcut the same way you delete any file.
Working with All Programs Menu Shortcuts Directly
Many of the chores listed in the previous section are more easily performed by working directly within the All Programs menu itself. That is, you open the All Programs menu, find the shortcut you want to work with, and then use any of these techniques:
-
Drag the shortcut to another section of its current menu.
-
Drag the shortcut to another menu or to the Recycle Bin.
-
Right-click the shortcut and then select a command (such as Delete) from the shortcut menu.
EAN: 2147483647
Pages: 126