Managing Your Hardware with Device Manager
Windows XP stores all its hardware data in the registry, but it provides the Device Manager to give you a graphical view of the devices on your system. To display the Device Manager, first use either of the following techniques:
-
Launch Control Panel’s System icon.
-
Right-click My Computer and select Properties on the shortcut menu.
In the System Properties dialog box that appears, select the Hardware tab and then click Device Manager.
| Tip | A quick way to go directly to the Device Manager snap-in is to select Start, Run, enter devmgmt.msc, and click OK. Note, too, that you can select the System Properties dialog box quickly by pressing + Pause/Break. |
Device Manager’s default display is a treelike outline that lists various hardware types. To see the specific devices, click the plus sign (+) to the left of a device type. For example, opening the DVD/CD-ROM Drives branch displays all the DVD and CD-ROM drives attached to your computer, as shown in Figure 9-4.
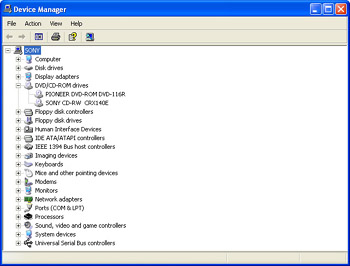
Figure 9-4: Device Manager organizes your computer’s hardware in a treelike hierarchy organized by hardware type.
Controlling the Device Display
Devices Manager’s default view is by hardware type (Devices By Type), but it also offers several other views, all of which are available on Device Manager’s View menu:
-
Devices By Connection This view displays devices according to what they are connected to within your computer. For example, to see which devices are connected to the PCI bus, on most systems you’d open the ACPI branch, then the Microsoft ACPI–Compliant System branch, and then the PCI Bus branch.
-
Resources By Type This view displays devices according to the hardware resources they require. Your computer’s resources are the communications channels by which devices communicate back and forth with software. There are four types:
-
Interrupt Request (IRQ) This is a wire built in to the computer’s motherboard or a device slot. It’s used by the processor and a device to send signals to each other. In other words, the device uses the wire to send a “request” to the processor to “interrupt” whatever the processor is doing (and vice versa).
-
Input/Output (I/O) This is a small block of memory (typically 8 bytes, 16 bytes, or 32 bytes) that acts as a communications channel between a device and the processor or a device driver. Each I/O port address is expressed as a range of hexadecimal numbers. For example, the first I/O port on most systems is used by the direct memory access controller, and its address is the 16- byte range 00000000–0000000F.
-
Direct Memory Access (DMA) This is a connection maintained by a DMA controller chip that enables a device to transfer data directly to and from memory without going through the processor (as it does with an I/O port). The processor tells the DMA controller chip what device to work with and what data is needed. The DMA controller chip then uses the channel to perform the complete data transfer without involving the processor.
-
Memory This is a portion of the computer’s memory that’s allocated to the device and is used to store device-dependent data.
-
-
Resources By Connection This view displays the computer’s allocated resources according to how they’re connected within the computer.
-
Show Hidden Devices When you select this command, Device Manager displays those non–Plug and Play devices that you normally don’t need to adjust or troubleshoot. It also displays non-present devices, which are devices that have been installed but that aren’t currently attached to the computer.
Viewing Device Properties
Each device listed in Device Manager has its own property sheet. You can use these properties not only to learn more about the device (such as the resources it’s currently using), but also to make adjustments to the device’s resources, change the device driver, alter the device’s settings (if it has any), and make other changes.
To select the property sheet for a device, double-click the device or select the device and select Action, Properties. The number of tabs you see depends on the hardware, but most devices have at least the following:
-
General This tab gives you general information such as the name of the device, its hardware type, and the manufacturer’s name. The Device Status section of the dialog box tells you whether the device is working properly, and gives you status information if it’s not (see “Troubleshooting with Device Manager,” later in this chapter). You use the Device Usage list to enable or disable a device (see “Managing Hardware Profiles,” later in this chapter).
-
Driver This tab gives you information about the device driver and offers several buttons for managing the driver. See the following section, “Working with Device Drivers.”
-
Resources This tab tells you the hardware resources used by the device.
Working with Device Drivers
For most users, device drivers exist in the nether regions of the PC world, shrouded in obscurity and the mysteries of assembly language programming. As the go-betweens who broker the dialogue between Windows XP and system hardware, however, these complex chunks of code perform a crucial task. After all, it’s just not possible to unleash a system’s full potential unless the hardware and the operating system coexist harmoniously and optimally. To that end, you need to ensure that Windows XP is using appropriate drivers for all your hardware. You do that by updating to the latest drivers and by rolling back drivers that aren’t working properly.
Updating a Device Driver
Follow these steps to update a device driver:
-
If you have a floppy disk or CD with the updated driver, insert the disk or CD. If you downloaded the driver from the Internet, decompress the driver file, if necessary.
-
In Device Manager, select the device and select Action, Update Driver. (You can also open the device’s property sheet, select the Driver tab, and click Update Driver.) The Hardware Update Wizard appears.
-
This wizard works the same way as the Found New Hardware Wizard discussed previously in this chapter, so follow the instructions given earlier (see “Installing Plug and Play Devices”).
Rolling Back a Device Driver
If an updated device driver is giving you problems, you have a choice of two ways to fix things:
-
If updating the driver was the last action you performed on the system, restore the system to its most recent restore point.
-
If you’ve updated other things on the system in the meantime, a restore point may restore more than you need. In that case, you need to roll back just the device driver that’s causing problems.
Follow these steps to roll back a device driver:
-
In Device Manager, open the device’s property sheet and select the Driver tab.
-
Click Roll Back Driver.
Uninstalling a Device
When you remove a Plug and Play device, the BIOS informs Windows XP that the device is no longer present. Windows XP, in turn, updates its device list in the registry, and the peripheral no longer appears in the Device Manager display.
If you’re removing a legacy device, however, you need to tell Device Manager that the device no longer exists. To do that, select the device in the Device Manager tree and then select Action, Uninstall. (Alternatively, open the device’s property sheet, select the Driver tab, and click Uninstall.) If you’ve defined multiple hardware profiles (as described next, in the “Managing Hardware Profiles” section), Windows XP will ask whether you want to remove the device from all the profiles or just from a specific profile. Select the appropriate option. When Windows XP warns you that you’re about to remove the device, click OK.
EAN: 2147483647
Pages: 126