Working with Digital Media Files
Previous versions of Windows treated all documents more or less the same. Yes, we’ve seen innovations such as the “thumbnails” view for images and the “Web” view for folders that showed a preview of some file types in the margin, but the Windows XP designers and programmers went beyond these simple tweaks. They realized that different document types require different user actions. An image, for example, may need to be copied to a CD, set as the desktop background, e-mailed, or published to the Web. They also realized that many of today’s users—especially home users—do a lot of work with digital media files: images captured from a digital camera or scanner; music files copied from an audio CD or downloaded from the Internet; and video files created via Windows Movie Maker or a third-party video editing program. The result is that Windows XP has many new features specifically designed to help users manage digital media files. We discuss these new features in this section and show you ways to improve upon them and customize them to suit the way you work.
Digging Deeper into Digital Media Files
Windows Explorer has three built-in digital media folders:
-
My Pictures Use this folder for images. The location of this folder is %UserProfile%\My Documents\My Pictures.
-
My Music Use this folder for music and audio files. The location of this folder is %UserProfile%\My Documents\My Music.
-
My Video Use this folder for video clips and animations. The location of this folder is %UserProfile%\My Documents\My Video. (Note that Windows XP doesn’t create this folder until the first time you open an existing video file or save a new video file using Windows Movie Maker.)
Insider Secret You’re free to rename and move all three digital media folders. Windows XP tracks the new names and locations using the My Pictures, My Music, and My Video settings in the following registry key:
HKCU\Software\Microsoft\Windows\CurrentVersion \Explorer\Shell Folders
When these folders are open in Windows Explorer, the task pane on the left is customized to display tasks related to the folder. For example, when the My Pictures folder is open, the Picture Tasks section of the task pane contains the following commands:
-
View As Slide Show Click this command to see full-screen versions of each image in the folder. The images change every five seconds.
Note The Windows XP PowerToys have a couple of tools— the CD Slide Show Generator and the HTML Slide Show Wizard—that give you more options for creating slide shows. We discuss these utilities in Chapter 1, “Mastering Control Panel, Policies, and PowerToys.”
-
Order Prints Online Click this link to run the Online Print Ordering Wizard, which enables you to send digital images to an online printing service, which will then mail the prints to you.
-
Print Pictures or Print The Selected Pictures or Print This Picture Click this link to display the Photo Printing Wizard, which enables you to choose the layout (full page, 5" 7", and so on) that you want to use to print the selected image or images.
-
Set As Desktop Background Click this link to display the selected file as the desktop’s background image.
-
Copy All Items To CD or Copy To CD Click this link to copy either all the folder’s files or the selected files to a recordable CD.
-
Shop For Pictures Online Click this link to connect to the Windows XP Pictures Online Web site, where you can purchase and download images, photos, animations, clip art, and more.
The My Music and My Videos folders have their own customized tasks, although not as many as the My Pictures folder.
Tips for Working with Digital Media Files
Here are a few tips and techniques that you can use to get the most out of working with digital media files in Windows Explorer:
-
Take advantage of the new Filmstrip view. In the My Pictures folder, select the View, Filmstrip command to view the images sequentially, something like a filmstrip.
-
Customize the Details view. Windows Explorer’s Details view (displayed when you select the View, Details command) normally shows four columns only: Name, Size, Type, and Date Modified. However, Windows XP has a number of other columns you can display, such as the dimensions of an image or the bit rate at which a music file was ripped. Select View, Choose Details to open the Choose Details dialog box (see Figure 8-5), or right-click a column heading and select the detail you want to see.
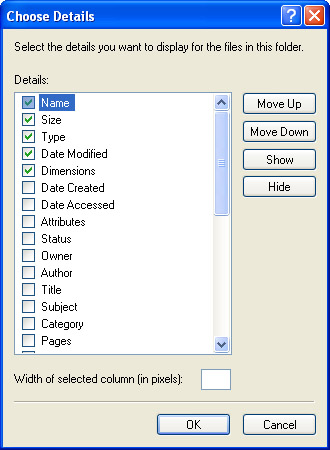
Figure 8-5: : Use the Choose Details dialog box to specify the columns you want to see in Details view. -
Hide file names in the Thumbnails and Filmstrip views. If you hold down the Shift key and double-click a folder, Windows Explorer opens the folder without displaying the file names in the Thumbnails and Filmstrip views. This is a toggle action; to re-enable the display of file names, click a different folder, and then hold down the Shift key and double-click the original folder.
-
Change the default thumbnail size. By default, the images displayed in the Thumbnails view are 96 pixels square. You can change this default by adding a DWORD value named ThumbnailSize to one of the following registry keys and setting it to a decimal value between 32 and 256:
HKLM\SOFTWARE\Microsoft\Windows\CurrentVersion\Explorer\ HKCU\Software\Microsoft\Windows\CurrentVersion\Explorer\
-
Change the default thumbnail quality. When you open a folder in either Thumbnails or Filmstrip view, Windows Explorer creates a file named Thumbs.db and uses it to store the thumbnail versions of each image. The size of this file depends on the quality level that Explorer uses to create the thumbnails: the higher the quality, the larger the file. You can control the quality level by adding a DWORD value named ThumbnailQuality to one of the following registry keys and setting it to a decimal value between 50 (lowest quality) and 100 (highest quality):
HKLM\SOFTWARE\Microsoft\Windows\CurrentVersion\Explorer\ HKCU\Software\Microsoft\Windows\CurrentVersion\Explorer\
Note You can change both the thumbnail size and the thumbnail quality via Tweak UI (see Chapter 1). In the Tweak UI window, open the Explorer, Thumbnails branch.
Creating a Screen Saver Using Digital Images
Rather than displaying an abstract pattern as a screen saver, Windows XP allows you to use a collection of image files. To set this up, follow these steps:
-
Launch Control Panel’s Display icon, or right-click the desktop and then select Properties.
-
Display the Screen Saver tab.
-
In the Screen Saver drop-down list, select My Picture Slideshow. (If the message “There were no pictures found…” is displayed, click the Settings button, and then click the Browse button to navigate to the folder of pictures to use for the slideshow.)
-
Click the Settings button to work with the following options:
-
How Often Should Pictures Change? Use this slider to set the amount of time that each picture is displayed (up to three minutes).
-
How Big Should Pictures Be? Use this slider to set the maximum size of each picture relative to the screen size. For example, if you choose 50%, the pictures are displayed at half the horizontal and vertical dimensions of the screen, resulting in 25% of the screen’s area being used for this display. (By default, pictures smaller than that are displayed at full size, while pictures larger than that are shrunk to fit.)
-
Use Pictures In This Folder Click Browse to choose the folder from which the screen saver gets its images. (The default is the current user’s My Pictures folder.)
-
Stretch Small Pictures When this check box is selected, Windows XP expands small pictures so that they take up the percentage of the screen specified by the How Big Should Pictures Be? slider.
Note Rather than having Windows XP stretch smaller images, you might want to change the size of an image permanently. You can do this using the Image Resizer PowerToy that we discussed in Chapter 1.
-
Show File Names When this check box is selected, the screen saver shows the path and file name of each image in the upper left corner.
-
Use Transition Effects Between Pictures When this check box is selected, the screen saver uses a random transition effect (such as a fade out and fade in) from one picture to the next.
-
Allow Scrolling Through Pictures With The Keyboard When this check box is selected, you can immediately display the next picture by pressing the Right arrow key, and you can display the previous picture by pressing the Left arrow key.
-
EAN: 2147483647
Pages: 126