Tips for Working with Windows Media Player
You saw earlier that Windows supports all kinds of multimedia formats. In previous versions of Windows, the bad news was that to play those formats you had to master a passel of player programs. In Windows XP, the good news is that you need now wrestle with only a single program: Media Player. This clever chunk of software is a true one-stop multimedia shop that’s capable of playing sound files, music files, audio CDs, animations, movie files, and even DVDs. It can even copy audio CD tracks to your computer, burn music files to a CD, tune in to Internet radio stations, and more.
If you don’t see the Windows Media Player icon on the main Start menu, you can convince it to come out to play by selecting Start, All Programs, Windows Media Player.
Playing Media Files
You can open files directly from Media Player by selecting either Open (to launch a media file from your computer or from a network location) or Open URL (to launch a media file from the Internet) from the File menu. Use the controls at the bottom of the Media Player window to control the playback.
Windows XP also gives you many indirect ways to play media files via Media Player. Here’s a summary:
-
Open Windows Explorer, find the media file you want to play, and then double-click the file.
Note To control the media file types that are associated with Media Player, click the Show Menu Bar button in the top left corner of the Media Player window, select Tools, Options and display the File Types tab. Select the check boxes for the file types that you want to open automatically in Media Player. If you don’t want Media Player to handle a particular file type, clear its check box.
-
Insert an audio CD in your CD or DVD drive. If you have a hardware or software DVD decoder installed on your system, you can automatically start playing media files by inserting a DVD disc in your DVD drive.
-
If you have a CompactFlash drive, insert a CompactFlash card that contains music files. If Windows XP asks what you want to do with this disk, select Play The Music Files. If you don’t want to be bothered with this dialog box each time, select the Always Do The Selected Action check box. Click OK.
-
Download media from the Internet.
Tip Here are a few Media Player shortcut keys that you may find useful while playing media files:
Ctrl+P Play or pause the current media
Ctrl+S Stop the current media
Ctrl+B Go to the previous track
Ctrl+Shift+B Rewind to the beginning of the media
Ctrl+F Go to the next track
Ctrl+Shift+F Fast forward to the end of the media
Ctrl+H Toggle Shuffle playback
Ctrl+T Toggle Repeat playback
Ctrl+E Eject the disc from the CD or DVD drive
Ctrl+1 Switch to Full mode
Ctrl+2 Switch to Skin mode
F8 Mute sound
F9 Decrease volume
F10 Increase volume
Setting Media Player’s Playback Options
Media Player comes with several options that you can work with to control various aspects of the playback. To see these options, select Tools, Options. The Player tab (see Figure 8-1 on the following page) contains several settings.
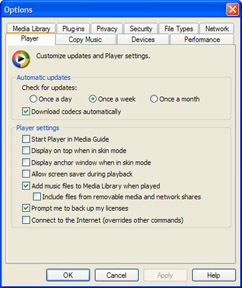
Figure 8-1: Use the Player tab to configure Media Player’s playback options.
-
Check For Updates Use this option to determine how often Media Player checks for newer versions of the program. To prevent Media Player from displaying a message that an update is available, create a string setting named AskMeAgain in the following registry key and set its value to no:
HKLM\SOFTWARE\Microsoft\MediaPlayer\PlayerUpgrade
You can also prevent Media Player from automatically updating itself if it detects that a newer version is available. Create the following key, and then add a DWORD value called DisableAutoUpdate and set its value to 1:
HKLM\SOFTWARE\Policies\Microsoft\WindowsMediaPlayer
-
Download Codecs Automatically A codec enables Media Player to play a particular file format. If this check box is selected, Media Player will automatically attempt to download and install a codec for any file type that it doesn’t recognize. If you prefer to be prompted before the download occurs, clear this check box. You can disable this check box using the Group Policy Editor. Select User Configuration, Administrative Templates, Windows Components, Windows Media Player, Playback and enable the Prevent Codec Download policy.
-
Allow Internet Sites To Uniquely Identify Your Player (In Media Player 9, this check box is called Send Unique Player ID To Content Providers, and it’s on the Privacy tab.) When this check box is selected, Media Player generates an identifier that is unique to your copy of Media Player. When you’re listening to streaming content, this enables a remote Internet server to monitor your connection and, if necessary, make adjustments to improve the quality of the stream. No personal content is delivered to the site, but theoretically a remote site could use the unique identifier to track what you listen to and possibly display targeted ads or other unwelcome content. If you’re concerned about this, clear this check box.
Caution CautionPlaying a file from an Internet site can present a more serious problem: A malicious script could be embedded within the file. To prevent Media Player from executing such scripts, add a DWORD value named PlayerScriptCommands Enabled to the following registry key and set its value to 0:
HKCU\Software\Microsoft\MediaPlayer\Preferences\
In Media Player 9, this is accomplished by simply clearing Run Script Commands When Present on the Security tab. Note, too, that for users of Media Player 8 this problem has been fixed in a security patch. See the following security bulletin for more information and a link to the patch: http:// www.microsoft.com/technet/security/bulletin/MS02-032.asp
-
Acquire Licenses Automatically (In Media Player 9, this check box is called Acquire Licenses Automatically For Protected Content, and it’s on the Privacy tab.) When this check box is selected, Media Player will automatically attempt to get a license for a file if it requires one. If you’d rather that Media Player not acquire licenses automatically, clear this check box.
-
Start Player In Media Guide When this check box is selected, Media Player displays its Media Guide tab at startup, which requires Internet access. This can delay the startup, depending on the speed of your Internet connection, so you can disable the Media Guide startup by clearing this check box.
Note You can view the license information for a file from within Media Player. In either the Media Library or the playlist, right-click the file name, select Properties, and then select the License Information tab (the License tab, in Media Player 9). It’s also a good idea to back up your licenses regularly. To do this, select Tools, License Management, choose a location for the backup, and then click Backup Now (Back Up Now, in Media Player 9).
-
Display On Top When In Skin Mode When this check box is selected, Media Player stays on top of other windows when you switch to Skin mode. You can configure Media Player to play only in Skin mode using the Group Policy Editor. Select User Configuration, Administrative Templates, Windows Components, Windows Media Player, User Interface, and enable the Set And Lock Skin policy. Also, use the Skin text box to specify the name of a skin file. (Note that skin files use the .wmz extension; the default skins can be found in the %ProgramFiles%\Windows Media Player\Skins folder.)
-
Display Anchor Window When In Skin Mode When this check box is selected, Media Player displays a small window in the lower right corner of the screen when you switch to Skin mode. You can disable this check box using the Group Policy Editor. Select User Configuration, Administrative Templates, Windows Components, Windows Media Player, User Interface, and enable the Do Not Show Anchor policy.
-
Allow Screen Saver During Playback When this check box is selected, the Windows XP screen saver is allowed to kick in after the system has been idle for the specified number of minutes. If you’re watching streaming video content or a DVD movie, leave this check box cleared to prevent the screen saver from being activated.
Insider_Secret Media Player’s File menu lists the last few media files that you opened using the File, Open and the File, Open URL commands. If you don’t want these recent files to appear the next time that Media Player is opened, open the Registry Editor and delete the following keys:
HKCU\Software\Microsoft\MediaPlayer\Player \RecentFileList HKCU\Software\Microsoft\MediaPlayer\Player \RecentURLList
(Note that these keys are created only after you’ve used the Open and Open URL commands, respectively, at least once.) Here’s a VBScript that will do this (be sure to save the file with the .vbs extension):
On Error Resume Next Set wshShell = WScript.CreateObject("WScript.Shell") strKey = "HKCU\Software\Microsoft\MediaPlayer\Player\" wshShell.RegDelete strKey & "RecentFileList\" wshShell.RegDelete strKey & "RecentURLList\" Set wshShell = NothingNote, too, that the Windows Media Bonus Pack (discussed later in this chapter; see “Investigating the Windows Media Bonus Pack”) has a feature that will do this for you.
If you want to prevent Media Player from adding items to the recent file list, add the binary value AddToMRU to the following key and set its value to 00:
HKCU\Software\Microsoft\MediaPlayer\Preferences
To reinstate Media Player’s ability to add items to the recent file list, change the AddToMRU value to 01.
Media Player 9 enables you to determine up front whether you want items saved to the recent file list. During installation, when the Select Your Privacy Options screen appears, clear the Save File And URL History In The Player check box. To turn this feature back on after Media Player 9 is installed, select Tools, Options, display the Privacy tab, and select the Save File And URL History In The Player check box. The Privacy tab in Media Player 9 also enables you clear the recent file list by clicking the Clear History button. To delete the list of recent CDs and DVDs, click Clear CD/DVD.
-
Add Items To Media Library When Played (This is called Add Music Files To Media Library When Played, in Media Player 9.) When this check box is selected, Media Player adds music files that you play to the Media Library. For example, if you play a downloaded MP3 file, Media Player adds it to the Media Library in the Audio, All Audio category. Note that by default, Media Player doesn’t add media from removable media to the library.
-
Include Items From Removable Media (This is called Include Files From Removable Media And Network Shares, in Media Player 9.) When this check box is selected, Media Player adds items from removable media, such as a CompactFlash card, to the library when played. Note that you won’t be able to play these items unless the removable media is inserted.
-
Connect To The Internet (Overrides Other Commands) When selected, this Media Player 9 check box enables the program to connect to the Internet even if the File, Work Offline command is selected. This is useful if you want a feature such as the Media Guide to access the Internet even in offline mode.
-
Prompt Me To Back Up My Licenses When this Media Player 9 check box is selected, Media Player reminds you to back up your digital media licenses approximately two weeks after you acquire them.
Copying Music from an Audio CD
Media Player comes with the welcome ability to copy (rip in the vernacular) tracks from an audio CD to your computer’s hard disk. While this process is straightforward, note that you’ll need to take several options into account before you start copying. These options include the location of the folder in which the ripped tracks will be stored, the structure of the track file names, the file format to use, and the quality (bit rate) at which you want to copy the tracks. You control all of these settings on the Copy Music tab of the Media Player’s Options dialog box (select Tools, Options to get there), shown in Figure 8-2.
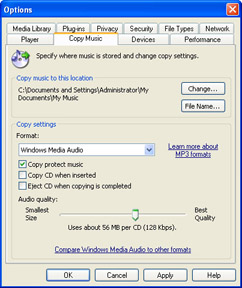
Figure 8-2: : Use the Copy Music tab to specify the options you want to use when copying tracks from an audio CD.
Selecting a Location and File Name Structure
The Copy Music To This Location section of the dialog box displays the name of the folder that will be used to store the copied tracks. By default, this location is %UserProfile%\My Documents\My Music. To specify a different folder (for example, a folder on a partition with lots of free space), click Change and use the Browse For Folder dialog box to choose the new folder.
The default file names that Media Player generates for each copied track use the following structure:
Track_Number Song_Title.ext
Here, Track_Number is the song’s track number on the CD, Song_Title is the name of the song, and .ext is the extension used by the recording format (such as .wma or .mp3). Media Player can also include additional data in the file name such as the artist name, the album name, the music genre, and the recording bit rate. To control which of these details is incorporated into the name, click the Advanced button (or the File Name button in Media Player 9) on the Copy Music tab to display the File Name Options dialog box, shown in Figure 8-3. Select the check box beside each of the details you want in the file names, and use the Move Up and Move Down buttons to determine the order of the details. Finally, use the Separator list to choose which character to use to separate each detail.
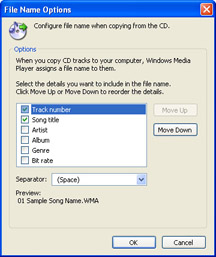
Figure 8-3: : Use the File Name Options dialog box to specify the details you want in the file name assigned to each copied audio CD track.
Choosing the Recording File Format
As originally installed, Media Player supports only a single file format: WMA (Windows Media Audio). This is an excellent music format that provides good quality recordings at high compression rates. If you plan to listen to the tracks only on your computer or on a custom CD, the WMA format is all that you need. However, if you have an MP3 player or other device that doesn’t recognize WMA files, you’ll need to use the MP3 recording format. To get that, you need to purchase and install an MP3 encoder. On the Copy Music tab, click the MP3 Information button (in Media Player 9, click the Learn More About MP3 Formats link) to view a Microsoft Web site that has links to several third-party MP3 encoding packages.
If you have multiple encoders installed, on the Copy Music tab, use the File Format list to choose the encoder you want to use. Note that if you select Windows Media Audio, the Protect Content check box (it’s called Copy Protect Music in Media Player 9) becomes enabled. Here’s how this check box affects your copying:
-
If Protect Content is selected, Media Player applies a license to each track that prevents you from copying the track to another computer or to any portable device that is SDMI-compliant. (SDMI is the Secure Digital Music Initiative; see www.sdmi.org for more information.) Note, however, that you are allowed to copy the track to a writable CD.
-
If Protect Content is cleared, there are no restrictions on where or how you can copy the track. As long as you’re copying tracks for personal use, clearing this check box is the most convenient route to take.
Specifying the Quality of the Recording
The tracks on an audio CD use the CD Audio Track file format (.cda extension), which represents the raw (uncompressed) audio data. You can’t work with these files directly because the CDA format isn’t supported by Windows XP and because these files tend to be huge (usually double-digit megabytes, depending on the track). Instead, the tracks need to be converted into a Windows XP– supported format (such as WMA). This conversion always involves compressing the tracks to a more manageable size. However, because the compression process operates by removing extraneous data from the file (that is, it’s a lossy compression), there’s a tradeoff between file size and music quality. That is, the higher the compression, the smaller the resulting file, but the poorer the sound quality. Conversely, the lower the compression, the larger the file, but the better the sound quality. Generally, how you handle this tradeoff depends on how much hard disk space you have to store the files and how sensitive your ear is to the sound quality.
The recording quality is usually measured in bits per second (this is called the bit rate), with higher values producing better quality and larger files. To specify the recording quality, use the Copy Music At This Quality slider (it’s called Audio Quality in Media Player 9) on the Copy Music tab. Move the slider to the right for higher quality recordings, and to the left for lower quality. Note that Media Player 9 provides two new formats for copying files: Windows Media Audio (Variable Bit Rate) and Windows Media Audio Lossless. Either is available in the Format list in the Copy Settings section of the Copy Music tab. Values available on the Audio Quality slider are changed accordingly.
Copying Tracks from an Audio CD
Once you’ve made your recording choices, you’re ready to start ripping tracks. Here are the steps to follow:
-
Insert the audio CD.
-
Click Copy From CD on the Media Player taskbar. Media Player displays a list of the available tracks. (To get the track names, connect to the Internet, click Get Names, and then click the Finish button.)
-
Select the check boxes beside the tracks you want to copy.
-
Click Copy Music. (The first time you perform this step in Media Player 9, you will encounter two additional dialog boxes that deal with copyright and media protection.) Processing these files can take some time, so monitor the progress by noting the Copy Status column in the list of tracks.
Copying Tracks to a Recordable CD or Device
Media Player can also perform the opposite task: copying media files from your computer to a CD-R, CD-RW, or portable device. Again, there are some settings you should consider before trying out this procedure.
Setting Recording Options
In Media Player’s Options dialog box (select Tools, Options), choose the Devices tab, select the device you want to use, and then click Properties. In the property sheet that appears, select the recording tab. For a CD-R (or CD-RW) drive, you have four options (see Figure 8-4):
-
Enable CD Recording On This Drive Select this option to allow Media Player to use the CD-R drive for recording. You can prevent others from recording to this drive by clearing this check box.

Figure 8-4: In the property sheet for a CD-R or CD-RW drive, use the Recording tab to enable and configure CD recording. -
Select A Drive Where Windows Can Store An “Image” Of The CD To Be Written Before doing the actual recording, Media Player converts your entire playlist into temporary .wav files that get deleted after the recording is complete. Because these are uncompressed files, a full CD’s worth could take up as much as 1 GB of space. Use this list to choose a drive that has at least that much space available.
-
Select A Write Speed Use this list to choose how fast you want Media Player to record to the CD. If you have trouble recording, select a slower speed.
-
Automatically Eject The CD After Writing When this check box is selected, Media Player ejects the completed CD once the recording is complete. If you prefer to check the contents of the CD after the recording to ensure the process completed successfully, or if you want to play the new CD, clear this check box.
Creating a Playlist
Most people find recording is easiest if it’s done from a playlist, a customized collection of music files. Here’s how to create a new playlist in Media Player 8:
-
Select Media Library on the Media Player taskbar.
-
Click New Playlist to display the New Playlist dialog box.
-
Type a name in the Enter The New Playlist Name text box and then click OK. Media Player creates the playlist and displays it in the Media Library’s My Playlists branch.
-
To add a song to the playlist, open the appropriate Audio sub- branch, select the file name in the right pane, click Add To Playlist, and then click the name of the playlist into which you want to add this song.
Tip If the music files you want to work with are on your hard disk, you can add them to the playlist using Windows Explorer. To do this, right-click a file or file selection, select Add To Playlist, choose the playlist you want to use, and then click OK.
To create a playlist in Media Player 9, follow these steps:
-
Select Media Library on the Media Player taskbar.
-
Select Playlists, New Playlist to display the New Playlist dialog box.
-
Enter a name in the Playlist Name text box. Use the View Media Library By list to select how you want to view the media. In the list below, open the appropriate sub-branch and then click the file you want to add. When you’re done, click OK.
Once your playlist is created, you can edit the list by selecting it in the My Playlists branch and then right-clicking the tracks.
Recording to a CD or Device
Here are the steps to follow to record to a CD-R, CD-RW, or portable device:
-
Select Copy To CD Or Device on the Media Player taskbar.
-
Use the Music To Copy list (it’s called Items To Copy in Media Player 9) to choose the playlist or specific individual titles you want to copy. Alternatively, select the Media Library item (genre, album, or artist) that contains the music you want to copy.
-
Select the check boxes beside the tracks that you want to copy. Use the selection summary (in the lower left corner of the Media Player window) to ensure that the total number of megabytes (or minutes, if you’re recording to a CD-R disc) that you select isn’t greater than the total number of megabytes (or minutes) available on the recording device.
-
Use the Music On Device list (Items On Device list, in Media Player 9) to select the drive or device that you want to use as the copy destination.
-
Click Copy Music (in Media Player 9, simply click Copy).
EAN: 2147483647
Pages: 126