7.13. Tables Tutorial In this tutorial, you'll learn how to use Dreamweaver's Layout mode to build a page for the National Exasperator Web site. You'll also practice adding tables using the Insert bar's Table object and gain experience with tracing images and Library elements. 7.13.1. Getting Started Before you begin building the page, download the tutorial files. As always, you'll find them at www.sawmac.com/dw8/; click the Tutorials link to go to the tutorials page, and then click the Table Tutorial link to download a ZIP file containing all the files for this tutorial. When the files have downloaded and decompressed, you should have a folder named DWTables on your computer, containing the Web pages and graphics needed for this tutorial. If you're having difficulties, the Web site contains detailed instructions for downloading the files you'll be using with this book. For this tutorial, you'll build a "Headline Story" for the National Exasperator Web site. When you're done, it will look like Figure 7-43. -
In Dreamweaver, choose Site  New Site . New Site . The Site Definition window appears. Make sure the Advanced tab is selected. (The Basic tab offers a simpler wizard-based approach to setting up sites, but once you've got the handle on setting up sites, it's just too slow. The Site Definition wizard is discussed on Section 1.3.2.) -
Type Tables Tutorial in the Site Name field . This is the name that Dreamweaver uses while you're working on this tutorial. -
Click the folder icon next to the label "Local root folder." The Choose Local Root Folder window opens. -
Browse to and select the DWTables folder . Windows and Macs handle this step slightly differently, as described on Section 1.3.2. Selecting the DWTables folder makes it the local root folderthe folder that holds all the files, graphics, and other folders that are part of a single Web site (see Section 1.3.1). -
Click the OK button . Dreamweaver reads the files in the folder, and displays them in the Files panel. Now you're all set to begin the tutorial. 7.13.2. Creating a New Page and Setting Its Properties You'll first start by creating a new Web page and setting some of its basic properties. -
Choose File New . The New Document window opens. You'll be creating a basic Web page. -
Make sure the General tab is selected and, in the Category list, select the Basic Page option . You'll be using HTML to create the page, but to keep in line with current standards, you'll use the more modern XHTML standard. -
Select HTML in the Basic Page list and, from the Document Type menu in the lower-right corner of the window, select XHTML 1.0 Transitional . Dreamweaver 8 lets you create many different types of HTML files. They're all variations on the same theme, but some have stricter rules than others. Most Web sites these days use either HTML 4.01 Transitional or XHTML 1.0 Transitional. -
Click Create to close the window and create a new, blank document . Dreamweaver generates all the XHTML code for the page. Always save a page immediately after creating it. -
Choose File Save. Save the page as battle.html in the DWTables folder . After saving a new file, it's wise to immediately name the page. -
Select the text "Untitled Document" in the Title field in the document toolbar; type The Battle of the Century . If you don't see the Document toolbar (Figure 1-2), choose View Toolbars Document. Before you start adding tables to this page, you'll add a background image and color , and set a few other page properties. -
Choose Modify Page Properties . The Page Properties window opens (see Figure 7-31). Figure 7-31. The Page Properties window lets you set global properties for a page like link color, text color, background images, and margins. 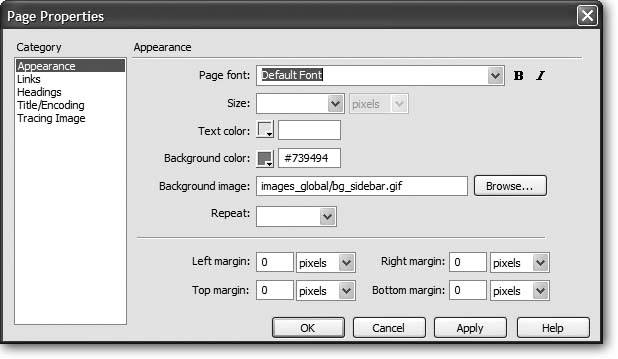 -
In the Background color box, type #739494 ; in each of the four margin boxes (Left, Top, Right, and Bottom), type . This sets a background color for the page and eliminates the space that most Web browsers add around the content of a page. Next you'll add a background image that appears as a bar along the left edge of the page. -
Click the Browse button to the right of the "Background image" box; navigate to the images_global folder and select the file bg_sidebar.gif . The Page Properties window should now look like Figure 7-31. -
Click OK to close the Page Properties window and apply these changes . Whoops! Instead of a single bar along the left edge of the page, there are several vertical stripes filling the page. This isn't what you want. By default, a background image tiles repeatedly both vertically and horizontally. But with Cascading Style Sheets, you can overcome this limitation and control how a background image tiles. In this case, you want the image to tile only vertically (that is, just along the left edge) and not horizontally across the page. You can do this quickly with Dreamweaver's CSS Styles panel. -
Make sure the CSS Styles panel is open (Window CSS Styles) and click the All button to display all of the styles available to this Web page. If the panel isnt already expanded, click the + (triangle) icon next to the label "<style>" in the All Rules pane. Click "body" to select the style (see Figure 7-32) . Dreamweaver creates a CSS style whenever you apply properties to a page (unless you've turned off the Preferences setting discussed on Section 1.3.1). This tag style (see Section 6.1.3) redefines how the <body> tag is formatted. You can modify it as you would any other CSS style (see Section 6.4 for more on editing CSS styles). You'll see the two background properties you set, listed at the top of the list (see Figure 7-32). Figure 7-32. The Properties pane lets you edit the properties of a selected style. To add a property, just click the Add Property link and select the new property name. 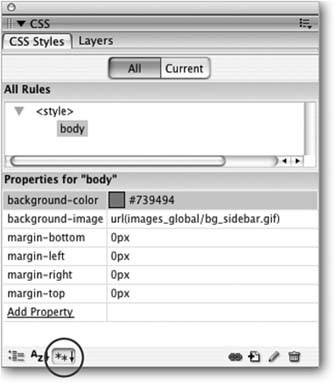
Tip: When you use the Page Properties window, Dreamweaver adds a new body tag style in an internal style sheet in the page. You may prefer to put all of your styles in an external style sheet (see Section 6.1.2). If that's the case, you can skip the Page Properties window and just create a new tag style for the <body> tag in an external style sheet as described on Section 6.2. You can also export the styles from a page into an external style sheet (see Section 6.2.2).
-
Make sure the "Show set properties" button is selected (circled in Figure 7-32). Click the Add Property link and, from the menu that appears, select "back-ground-repeat." If you know your CSS property names , you can also bypass the menu and just type the name. Next you'll set the value for that property. -
Click the menu in the column to the right of the newly added property and select "repeat-y." Notice that the bar now tiles only on the left edge of the page, creating a nice continuous stripe exactly as planned. -
Choose File Save to save your changes . Now you're ready to start building your layout. 7.13.3. Using a Tracing Image and Guides In this tutorial, you'll be building a news page for the National Exasperator Web site. To get a taste of the different table-building methods Dreamweaver offers, you'll use both the Layout mode and the Standard table mode. In this part of the tutorial, you'll use a tracing image and the Layout mode to draw the table design for the banner of the page. In addition, you'll see Dreamweaver 8's new guides feature in action: -
Choose Modify Page Properties . The Page Properties window opens. -
Select the Tracing Image category and click the Browse button . The Select Image Source dialog box appears. -
In the DWTables folder, double-click the file called tracing.gif . This file is a GIF image of the design for this page's banner. -
Move the Page Properties window so that you can see the document window underneath it, and then click Apply . You should see the tracing-image graphic appear in the document window (see Figure 7-33). -
Move the Image Transparency slider to the middlearound 50%and click OK to close the Page Properties dialog box . The image fades into the background of the page. You've just inserted the tracing image a GIF image that you prepared in some graphics program while brainstorming the design of your site, freed from the constraints of actually having to build the Web site while you played around with visual ideas. You'll use this graphic as a pattern for creating the layout of the banner. This image won't show up in a Web browser; it appears only in Dreamweaver. To help you create your layout, you'll next use page guides that help you place and align elements on a page. -
Choose View Rulers Show . Rulers appear at the left and top sides of the Web page. You can drag guides from the rulers and drop them onto the page. Next, you'll add some guides, which help you lay out the banner area of the page. -
Drag from the top ruler down onto the page . A green line appearsthe new guideas well as a number indicating how far away (in pixels) the guide is from the top of the page.
Note: Dreamweaver 8 comes shipped with guides turned on. But if you don't see a green guide as you drag from the ruler, they may somehow have gotten turned off. Look for checkmarks next to the Show Guides and Snap to Guides options in the View Guides menu. If you dont see any checkmarks, then select each choice from the menu to turn them both on.
-
Drag the line until the number reads 97px, and let go of the mouse button . This drops the line in place. If you didn't get it to exactly 97px on your first try, grab the green line and drag again. Figure 7-33. You can use the Page Properties dialog box to change the page's background color, margins, link colors, as well as to apply a tracing image to a page. Call the window up quickly by pressing Ctrl+J (  -J). (If you think you may find rulers helpful, as shown here, choose View Rulers Show.) -J). (If you think you may find rulers helpful, as shown here, choose View Rulers Show.) 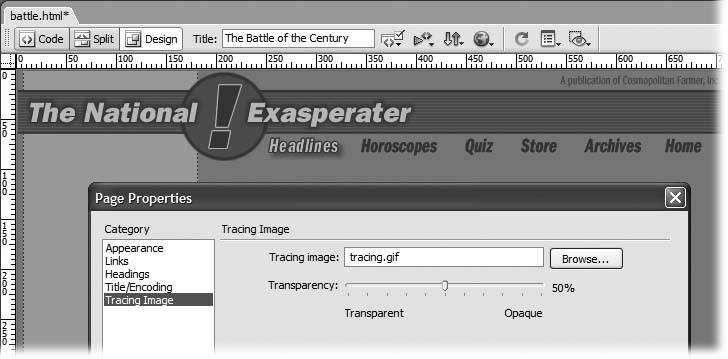 You'll add a few more guides to indicate different areas where you will add table cells. As you'll see in the next section, what looks like a single unified banner is actually a series of images placed in individual table cells . -
Drag two more guides from the top ruler to the 19px mark and the 63px mark . These new guides set off the area above the stripe in the National Exasperator logo and the space below it. You'll add a vertical guide next. -
From the left ruler, drag to add a vertical guide at 247px . You've now set up guides that make it much easier to use Dreamweaver's table drawing tools. -
Choose File Save . Congratulations! You're well on your way to creating a beautiful new Web site. Next, you'll start to add the details. 7.13.4. Building the Banner in Layout Mode You'll use Dreamweaver's Layout mode to build one part of a table-based page design. -
In the Insert bar, click the Layout tab (see Figure 7-6) . This panel contains useful tools for controlling layout and switching between Dreamweaver's table-design viewsStandard, Expanded, and Layout. -
Click the Layout button . Dreamweaver switches to Layout mode. When you first switch to this view, the "Getting Started in Layout mode" window may appear. This window explains how to use the layout tools. If you don't need this wisdom, turn on "Don't show me this message again," and then click OK. -
On the Insert bar, click the Layout Table tool button (also shown in Figure 7-6) . The Layout Table tool lets you draw a table directly in the document window. Once you've drawn the table, you can add cells to it. -
Starting at the upper-left corner of the tracing image, drag diagonally down and to the right, creating a rectangle around the top banner of the tracing imagestop dragging when you've reached the bottom rule and the right edge of the red stripe in the tracing image . A light gray box with a green outline appears over the tracing image. The green tab in the upper-left corner indicates that this is a Layout Table. Unfortunately, Dreamweaver inserts an annoying 15-pixel tall crosshatched area (a gray area on the Mac) that obscures the top part of the tracing image (see Section 7.3.7) and also makes the table you just drew look like it's sitting about 15 pixels below the bottom of the banner. You'll temporarily hide that box next. -
Choose View Visual Aids Hide All . This turns off visual aids that highlight normally invisible elements like image maps and table borders and widths, but that can get in the way of the Layout mode and tracing images. You'll still see the strip with the words Layout Mode at the top of the document, but the other area has disappeared. -
Select the Layout Cell tool (pictured in Figure 7-6) . You'll next add the cells that make up the table. -
Starting at the upper-left corner of the Layout Table, drag to the vertical and bottom guides, as shown in Figure 7-34 . This works best if you start just a few pixels down and to the right of the exact upper corner. The box you just created is outlined in blue. Figure 7-34. Drag with the Layout Cell tool inside a Layout Table to add a table cell. The gray area to the right of the new cell indicates the area of the Layout Table that doesn't yet contain Layout Cells. 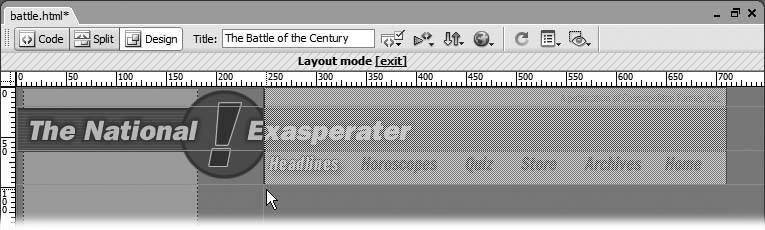
Tip: You can also drag from the bottom-right corner to the upper-left corner to add the cell. This sometimes works better.
Cells are indicated by a light-blue outline. When you release the mouse button, the insertion point blinks inside of the cell you just drew. You're ready to fill it up with text or graphics. This cell contains the site's logo. You may wonder why the cell cuts off part of the National Exasperator name. Table designs often require dividing graphics into multiple rectangles to fit designs into the grid-like structure of tables. In this case, you couldn't use one large graphic for the National Exasperator logo, because the row of navigation buttons would have to overlap ita feat not possible with tables alone.
Note: Mac Note : You may not see a difference between an empty Layout Table (which should have a gray, semi-transparent background) and a Layout Cell (which shouldn't have any background). Sometimes there's no distinction between the two when the page itself has certain background colors setincluding the background color of this tutorial page. For a solution, read the Note on Section 7.3.2.3.
-
Choose Insert Image . Alternatively, select the Common tab of the Insert bar and then click the Insert Image button. Either way, the Select Image Source window appears. You'll select a graphic to match part of the National Exasperator logo. -
Browse to the images_global folder inside of the DWTables folder. Then double-click the file called logo_national1.gif . If the "Image Tag Accessibility" window appears, type The National Exasperator in the Alternate text box and then click OK (for more on this feature, turn to Section 5.2.3). For a refresher on inserting images, turn to Chapter 5. You've just inserted an actual graphic over the sketch you had made in your tracing image. In the event of an actual Web-creation experience, this is just what you would have done: placing actual graphics over the placeholders you had sketched in the tracing image. -
On the Insert bar, click the Layout Cell tool button again . You'll next add three cells to the right of the one you just created: one to advertise the magazine's parent company, another for the rest of the magazine's logo, and a third one to hold the navigation bar. -
Holding down the Ctrl ( ) key, drag from just to the right of the top-right corner of the first cell down to the right, just above the red stripe of the logo (see Figure 7-35) . Holding down the Ctrl ( ) key when creating a cell keeps the Layout Cell tool active, so that you can continue drawing additional cells without clicking the Insert bar again. Figure 7-35. Adding cells to a table is as simple as dragging. With guides added, the sides of a cell snap to other cells already in the table, making aligning the edges of cellsa snap. 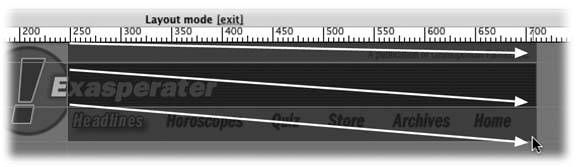 -
Create two more cells for the red stripe of the logo and the navigation bar, as shown in Figure 7-35 . -
Click inside the top cell you just added and choose Insert Image . The Select Image Source window appears. -
Browse to the images_global folder inside of the DWTables folder. Then double-click the file called cosmo_pub.gif . (If the Image Accessibility window appears, type A publication of Cosmopolitan Farmer in the Alternate text box.) You'll notice that the graphic doesn't appear at the right side of the page as it does in the tracing image. -
Move your mouse over the light-blue outline of the cell until it changes color; click to select the cell . Selecting the correct cell is a bit tricky. Since you have several cells touching one another, when you move your mouse over a common border, you can easily select one cell or the other. Watch for an outline to appear around the cell you're about to select. The next step doesn't change the cell's alignmentits placement on the pageonly the alignment of its contents. -
In the Property inspector, choose Right from the Horz Menu . The graphic moves to the right edge of the cell. Next you'll add the rest of the logo. -
Click in the cell immediately below, and choose Insert Image. Select the file logo_national2.gif in the images_global folder . (If the Image Accessibility window appears, use the menu to select <empty>, and then click OK. Alternate text is meant only to provide a text equivalent of a graphic's meaning. Since this graphic doesn't contain any more meaning than the logo you placed in step 9, you don't need to add alternate text.) The graphic with the rest of the word Exasperator appears. However, the red stripe doesn't extend all the way across the page as it does in the tracing image. In fact, if you have a large monitor, the red stripe in the tracing image may not even extend all the way across the document window. Don't worry; you'll address that problem with a little Cascading Style Sheet magic in the next phase of this tutorial. For now, you'll finish the banner. -
Click in the bottom cell . This cell contains the navigation bar for the site. When you release the mouse button, the insertion point blinks inside of the cell. In the next step, you'll insert a canned, ready-made navigation bar. -
Choose Window Assets to open the Assets panel . The Assets panel lets you quickly reuse elements contained in your site, including graphics, colors, Flash movies, and more. (The Assets panel is described in detail on Section 13.3.) -
On the Assets panel, click the last icon on the leftthe one that looks like an open book (circled in Figure 7-36) . This displays the site's Library. The Library lets you save and reuse frequently needed snippets of HTML (see Chapter 16 for much more detail). -
Select "navigation" from the list in the Library window; click Insert at the bottom of the panel . Dreamweaver drops in a row of navigation buttons. Notice that the Property inspector indicates that this is a special type of object called a Library item. You don't need the tracing image anymore, so you'll turn it off next. -
From the View Options menu in the toolbar at the top of your document window, choose Tracing Image (as shown in Figure 7-14) . The tracing image disappears. If there's no checkmark next to Tracing Image in the menu, the tracing image is already hidden. (You can also show or hide a tracing image by choosing View Tracing Image Show.) For the next steps, you need to show the visual aids you hid in step 5. -
Choose View Visual Aids Hide All Visual Aids to remove the checkmark . A checkmark next to Hide All Visual Aids in this menu means the visual aids are hidden; the keyboard shortcut Ctrl+Shift+I ( -Shift-I) is an even faster way to show and hide Dreamweaver's visual aids. You'll notice that the guides you dragged onto the page no longer align with the cells you drew. Unfortunately, Dreamweaver isn't smart enough to move the guides when you show and hide the visual aidsthat 15-pixel-tall crosshatched area (a gray area on the Mac) at the top of the document window. Since you're done designing the banner, you don't need those guides anyway. -
Choose View Guides Clear Guides . Dreamweaver erases the green guidelines. Figure 7-36. You can find and reuse Library items and other site elements, including colors and images, from Dreamweaver's Assets panel. 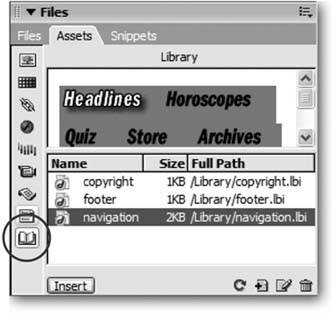
7.13.5. Improving the Banner The banner is coming together, but it still has room for improvement. With a little help from CSS, and some advanced features of Layout mode, you'll make this banner stand out in the crowd . First, you'll address that issue of the logo's red stripe mentioned previously: -
Choose Window CSS Styles to open the CSS Styles panel . You'll start by creating a new style. -
Click the New CSS Rule button (+) on the CSS Styles panel . The New CSS Rule window opens. You'll create a class style that you can apply to the table cell with the second half of the red logo. -
Click the Class radio button. In the Name box, type .banner . Class styles always begin with a period. (If you forget to start with a period, don't worry; Dreamweaver adds it.) -
Make sure the New Style Sheet File button is selected. Click OK . The Save Style Sheet File As dialog box appears. You're about to create the filean external style sheetthat stores the styles for this page. -
Navigate to the DWTables folder. In the File Name box, type styles.css (the Save As box on the Mac), and then click Save to save the file . Cascading Style Sheet files always end in .css; that's how Web servers and browsers can tell what kind of file they are. Having created the external style sheet, you can now create the first style, as suggested by the sudden appearance of the CSS Rule Definition window. -
From the list of category names in the left side of the window, select Background . You can add colors and images to the backgrounds of elements using these properties. In this case, you'll use a graphic that matches the red stripe in the logo. -
Click the Browse button and select the file bg_banner.gif from the images_global folder . You should also set the way the graphic tiles so that it only continues horizontally across the page. -
Choose "repeat-x" from the Repeat menu . The Rule Definition window should look like Figure 7-37. Figure 7-37. The CSS Background properties offer a lot of control over how graphics are placed in the background of a page, table cell, or other page element. They're described in detail on Section 6.7.2.1. 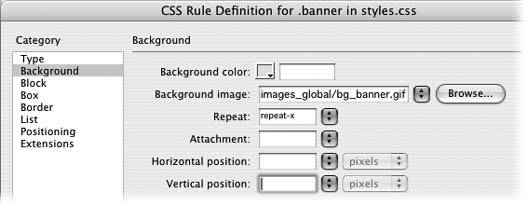 -
Click OK to create the new style . Since it's a class style, you must apply it by hand to the element you wish to format. In this case, it's the Layout Cell containing the second half of the National Exasperator logo. -
Move your mouse over the light blue outline of the cell until it changes color; click to select the cell . You can use the Property inspector to apply a style to this cell.
Note: You can also Ctrl-click ( -click) inside a table cell to select it.
-
On the Property inspector, select "banner" from the Class menu . Notice that the red stripe fills the background of the cell. Since the background graphic matches the stripe in the logo graphic, they appear to form a single unified image. -
Now press F12 (Option-F12) to preview the page in your browser . Maximize your browser window while viewing the page. If you have a high-resolution monitor, you'll notice that red stripe doesn't extend all the way across the browser window, and the Cosmopolitan Farmer graphic doesn't butt up against the right edge of the window. The page would look much better if the banner could automatically stretch to fill in the gapa tricky bit of HTML programming, but an easy step in Dreamweaver.
Note: Windows XP Note : If you preview this page in Internet Explorer, you may see an ominous looking "To help protect your security" message in a yellow box. This is IE's way of saying there's some JavaScript in this page (the navigation bar uses rollover images). To get rid of this message, just return to Dreamweaver and choose Commands "Insert Mark of Web." This problem is discussed in detail on Section 5.6.
Return to Dreamweaver. Click the second column's header menu (Figure 7-38), and then choose Make Column Autostretch . The Make Column Autostretch option makes one column in a table stretchy, as described on Section 7.3.6, so that it can grow or shrink to fill the available space in a browser window. Figure 7-38. The width of a column is listed at the bottom of the column in Layout mode. Clicking this number reveals a menu of optionsincluding Make Column Autostretch, which is what you want here. 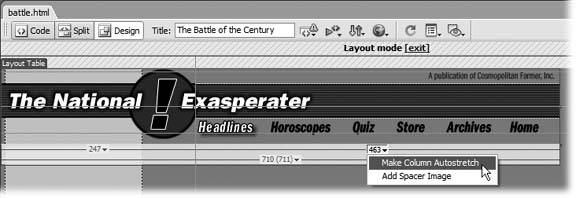 As soon as you choose this command, a dialog box appears asking if you're sure you want Dreamweaver to insert spacer graphics (Section 7.3.6.2). -
In the dialog box, turn on "Create a spacer image file," and then click OK . Dreamweaver uses a special trick for the Autostretch feature: it creates a tiny, 1-pixel, transparent GIF graphic. That's what Dreamweaver is prompting you to save now. -
In the Save Spacer Image window, navigate to the DWTables images_global folder. Save the image with the name spacer.gif . Dreamweaver adds a 1-pixel tall row at the bottom of the banner table, and inserts the graphic into the left cell. The right column can now stretch to fit the browser window, since the spacer prevents the left cell from collapsing down to nothing. (See Section 7.3.6 for more on how this works.) -
Choose File Save to save all your work so far . Press F12 (Option-F12) to view the final banner design in your default browser. Try resizing your browser window and notice how the stripe expands and contracts and the Cosmopolitan Farmer graphic always moves to the right edge of the window. The page is looking extremely promising .
Note: If, when you preview the page, the two images that make up the logo don't seem to align correctly, the culprit is most likely the height that Dreamweaver set for the Layout Cells (see Section 7.3.3). To eliminate the height settings, choose Clear All Heights from the Layout Table's contextual menu (see Figure 7-8).
7.13.6. Building the Content Table Now that you have the banner, it's time to turn to the actual contents of the page. This news page has two basic areas for content: a sidebar that runs along the left edge of the page and the large area to the right for the text of the news story. You'll start by adding another guide to the page. -
From the ruler on the left edge of the document window, drag a green vertical guide to the 200px mark . You'll use this guide to help you draw a table cell. -
On the Layout tab of the Insert bar, make sure the Layout button is selected . Figure 7-6 shows this button. -
Click the Layout Cell tool on the Insert bar . You don't have to start with the Table tool when working in Layout mode. If you simply draw a cell, the program creates a Layout Table to fit. -
Starting just below the information for the first layout table (the gray area with numbers like 247), drag down a few inches and to the right until you've created a cell that touches the green guide (see Figure 7-39, left) . This creates a new cell and a new Layout Table. But notice that the new cell doesn't butt up against the bottom of the first Layout Table. It's about 30 pixels below that first table. That's OK, but the page looks better if the sidebar content sits directly below the banner, so resize this cell in the next step.
Note: Windows Fans : No matter what you do, you won't be able to draw a table cell that fits exactly below the first Layout Table. This is true even if you hide all visual aids. Dreamweaver doesn't always work logically! In fact, it's downright buggy . (Thank goodness you have this book.) Mac Fans : You do have a way out of this dilemma. Actually two ways: If you hide all visual aids, you can (unlike your Windows counterparts) draw a cell starting just below the banner table that fits exactly below the first table. Another option is to draw the cell from the bottom right to the top left until the Layout Cell snaps into place at the left edge of the document window and right below the banner table.
-
Select the cell by clicking carefully on its edge. Drag the resize handle at the top of the cell upward until it touches the bottom of the first table (Figure 7-39, right) . Layout mode lets you draw table cells anywhere on the page, so that you can easily create gutters between blocks of text and add margins between the edge of the page and a table cell. Although it's a fast and easy way to control layout, it's not necessarily the best way to build a Web page that's fast-loading. Layout mode can lead to some complex tables that require lots of slow-loading HTML code. As a general rule, the simpler the table, the better the Web page. Figure 7-39. Left: With the Draw Layout Cell tool, you just drag across the document window to create a cell.
Right: Adjusting the cell's size is a simple matter of dragging one of the cell's resize handles. 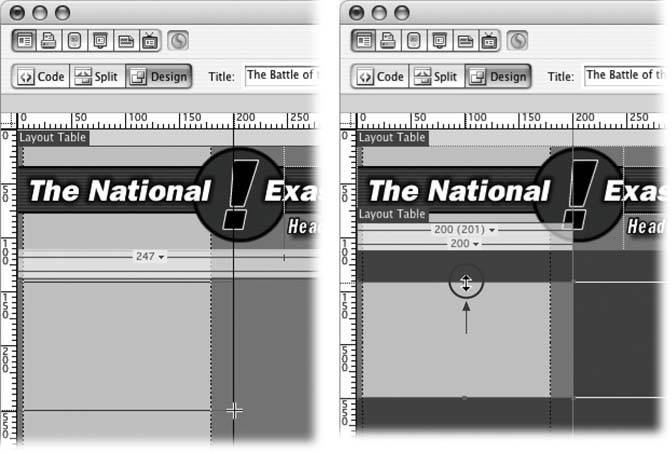 In this case, you're going to create a very simple table composed of just two columns , one for the sidebar and one for the main story text. To fine-tune the design and the placement of text within each cell, you'll use Cascading Style Sheetstoday's professional method of choice. -
Select the Layout Cell tool one last time and draw a rectangle just to the right of the sidebar cell you added in the last step . Since this cell holds the main text of the page, the cell should fill the rest of the space to the right of the sidebar. Next, add some already-created text to each cell. -
Choose File Open. In the DWTables folder, double-click the file called side-bar.html . This page holds the text for the sidebar. Instead of having to type all this information, you'll just copy and paste it from another Web page. -
-
Switch back to the page you're working on by clicking its tab battle.html at the top of the document window . This supremely easy way to switch between open documents has finally been added to the Mac version of Dreamweaver. -
Click inside the small sidebar cell. Choose Edit Paste to paste the text into the cell . (Ctrl+P [ -P] works for the keyboard fanatics .) The text doesn't fit perfectly inside the sidebar. That's OK. Momentarily, you'll create a CSS style to fix that. -
Choose File Open. In the DWTables folder, double-click the file called main_text.html . This page holds the text for the main story. -
Choose Edit Select All to select all of the text on the page; choose Edit Copy to copy it . Now you'll switch back to your layout and paste the copied text. -
Click the battle.html tab. Your Web page reappears. -
Click inside the larger cell in the middle of the page. Choose Edit Paste . The text doesn't fit perfectly here, either. It's a bit close to the navigation bar, and it nearly touches the sidebar text. Again, this is a problem easily fixed with CSS. But first, you'll set the main content cell to autostretch, so, like the banner, it grows and shrinks to fit a visitor's browser window. -
From the column-header menu above the cell with the main story text, choose Make Column Autostretch . This makes the cell flexible, as described in step 13 of the previous instructions. The cell now expands to fill the browser window so that you can see all the text. -
Choose File Save. Press F12 (Option-F12) to preview your work in your browser . It's a good idea to check your work in a browser every time you try something new, because Web pages can look slightly different in a browser window. The page is coming together, but you still need to deal with the text in the main part of the page. You'll do that next. 7.13.7. Using CSS to Control Table Cells In the last chapter, you saw how Cascading Style Sheets can control the look of text. But you can apply CSS to all sorts of HTML elements. In this case, you'll build a couple of styles to enhance the look of the sidebar and main text cells: -
On the CSS Styles panel, click the New CSS Rule button (+). (If the CSS Styles panel isn't open, choose Window CSS Styles.) The New CSS Rule window opens. You'll create a class style that you can apply to the sidebar table cell. -
Click the Class radio button. In the Name box, type .sidebar . Class styles always begin with a period. This style controls the space around the text inside the sidebar. -
Click OK . The CSS Rule Definition window opens. Since you've already created an external style sheet, Dreamweaver automatically adds this new style to it. -
Click the Box category . With CSS, you can control the padding of each side of a table cell individually. This offers much more control than basic table properties. -
Turn off the "Same for all" box below the Padding settings; type 25 in the Right padding box and 10 in the Left padding box . The window should look like Figure 7-40. -
Click OK to close the window and create the new style . Since this is a class style, you must apply it manually to the table cell. -
Move your mouse over one of the edges of the sidebar cell. When the border around the cell changes color, click to select it . Alternatively, you can hold down the Ctrl ( ) key and click anywhere inside the cell to select it. -
From the Class menu on the Property inspector, select "sidebar." The sidebar style indents the left and right margins of the text so that it fits neatly inside the cell. If the left and right margins still don't look right, you can edit the padding values for the style (see Section 6.4 for information on how to edit a style). For the next part of this tutorial, you'll create a style for the main text. -
Follow steps 13 to create another new class style. Name the style .story . Next, you'll format the new style to make the main story text easy to read on the Web. -
Click the Box category. This time, leave the Padding property's "Same for all" box turned on and type 15 in the top box . This setting places 15 pixels of space all the way around the inside of the style. -
Click the Background category. Select white with the color picker (see Section 1.3.3) . You can also simply type #FFFFFF (the hexadecimal code for white) in the Background color box. Either method sets the entire cell to white. But so it doesn't appear too boxy, you'll soften the design by rounding the top-left corner of the cell. Figure 7-40. The CSS Cell Padding property works much like the Table tag's Cell Padding property: it adds space between a border (an edge of a cell, for example) and what's inside. But using Cascading Style Sheets, you can control the amount of padding separately for each edge of a cell. 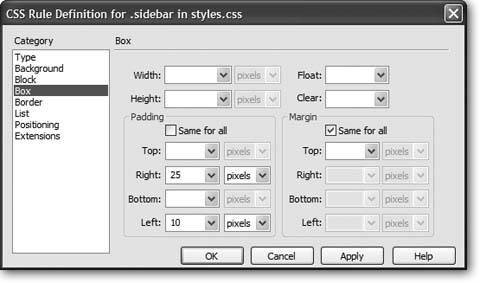 -
Click the Browse button to the right of the Background image box. Navigate to and select the file content_corner.gif in the images_global folder . This file contains a graphic of a soft corner curve that matches the background color of the rest of the page. But since you don't want the graphic tiling over the entire cell, you need to set it to not repeat. -
From the Repeat menu, select "no-repeat." Because the graphic is going to appear in the upper-left corner, you can use the horizontal and vertical positioning properties to place it there. -
From the Horizontal position menu, choose Left, and from the Vertical position menu, choose Top. The window should now look like Figure 7-41. Click OK . That's all you need to do for this style. Now it's time to apply it to a table cell. -
Follow steps 78 to apply the new style story to the cell containing the news story . The text should indent from the edges of the cell, the cell's background should turn white, and a small curve should appear in the top-left corner of the cell. Figure 7-41. CSS's background properties let you fine-tune the placement of background images. In this case, the image of a rounded corner appears once, in the top-left corner of a table cell, providing a gentle curve that softens the look of the page. 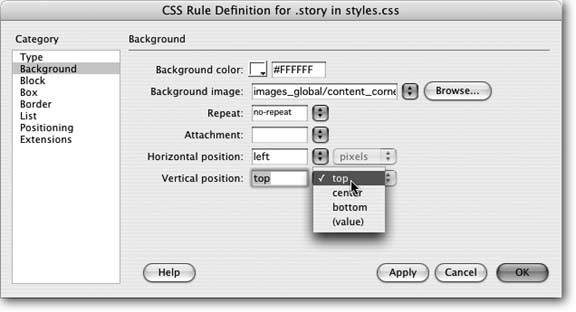
7.13.8. Using the Table Object Like the Layout Table, the Table object is a useful tool for laying out Web pages; it's also the only way to achieve certain structures, like the nested table you'll create in the following steps. The Table object is available only in Standard view, not Layout mode. For the next steps, you'll need the battle.html Web page you were working on in the previous steps. If it's not already on the screen, launch Dreamweaver and open the battle.html file.
Tip: Choose File Open Recent to see a list of the 10 most recently viewed documents. Choose a files name to open it.
-
Click the Layout tab on the Insert bar. Then click the Standard view button to switch out of Layout mode . The Layout Table tabs disappear, and the outlines of the tables and cells change to dotted lines. This is how Dreamweaver displays tables in Standard view. -
Click just before the T in the "The Battle of the Century" headline . You've placed the insertion point at the beginning of the cell. -
Choose Insert Table . Or click the Insert Table button on the Insert bar. Either way, the Insert Table dialog box opens. -
Type the settings shown in Figure 7-42, pressing Tab to jump from box to box . Don't forget to set the pop-up menu to "pixels." Figure 7-42. Unlike Layout Tables, which you draw by dragging with the mouse, you create tables in Standard view by typing in dimensions and properties in the Insert Table dialog box. (This dialog box, in fact, is available only in Standard view.)  -
Click OK . The two-row, one-column Table object appears in your Web page, outlined by transparent (but now highlighted) borders. -
With the table selected, from the Align menu in the Property inspector, choose Right . The table jumps to the right side of the main story area, and the text wraps around its left edge.
Tip: You can also use the CSS Float property to make the table (or any element) align to the right side of the page. See Section 6.7.4 for more on how to do this.
-
Ctrl-click ( -click) both cells in this new table, so that a black border surrounds both cells . Both cells are now selected. The Property inspector changes to reflect the properties of these cells. -
In the Property inspector, choose Center from the Horz menu . You've just center-aligned whatever you put into these cells. Now you're going to fill them up. -
Click the top cell; then, choose Insert Image . Of course, you can also click the Image button on the Insert bar's Common tab. Either way, the Select Image Source dialog box opens. -
Browse to the images_global folder in the DWTables folder; double-click the file called fight.gif . (If the Image Accessibility window appears, type Nessie vs. Big Foot in the Alternate text box.) An artist's rendering of the story appears. -
Click the bottom cell, and then type Artist's Rendering . Adding text to a cell is as simple as typing it, but there's much more you can do with text in Dreamweaver, as discussed in Chapter 3. There are also many things you could do to improve the look of this table. For example, try creating a CSS class style that adds a black border around the table and indents the text and image from the edges of the table. To polish off the design, you'll attach another external style sheet with some canned styles. -
On the CSS Styles panel, click the Attach External Style Sheet button (see Figure 6-1) . The Attach External Style Sheet window appears. -
Click the Browse button; in the DWTables folder, select the file more_styles.css . Click OK to close the window and attach the external style sheet . The sidebar and main story text miraculously changeall thanks to the power of CSS contextual selectors (see Section 6.6.3). -
Choose File Save. Press F12 (Option-F12) to preview your work in your default browser (see Figure 7-43) . Congratulations: You've built a page with a precise layout and flexible design. If you compare this page with the page you built in Chapter 1, you can see the greater control (and freedom) that tables offer the Web designer. In the next chapter, you'll explore anothernewermethod of laying out Web pages using Cascading Style Sheets. Feel free to compare with the finished Web page at www.sawmac.com/dw8/. Figure 7-43. Tables are one approach to creating Web pages that are more visually sophisticated than what's possible with basic HTML. 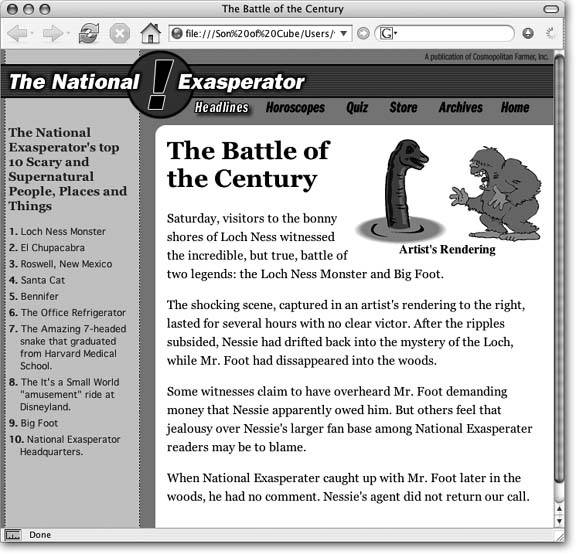
|