Section 2.1. Adding Text in Dreamweaver
In many ways, Dreamweaver works like a word processing program. When you create a new document, the blinking cursor appears at the top of the page, ready for you to begin typing. When you finish a paragraph, you press Enter or Return to start a new one. Text, as well as anything else you add to a Web page, starts at the top of the page and works its way to the bottom.
2.1.1. Adding Special Characters
Many useful special characterssuch as copyright or trademark symbolsdon't appear on your keyboard, making them difficult or impossible to type. The Text tab of the Insert bar lets you use a variety of symbols and international characters quickly by clicking an icon.
To open this panel:
-
From the menu on the Insert bar, choose Text .
If the Insert bar isn't visible, choose Window
 Insert to open it, or use the keyboard shortcut Ctrl+F2 ( -F2).
 The palette shown in Figure 2-1 appears. Many of the options let you add common HTML tags like the <b> (bold) and <strong> (strong) tags, most of which you can apply more easily using the Property inspector or keyboard shortcuts, as discussed in the next chapter. This panel also features less frequently used tags like <abbr> (abbreviation) or <dl> (definition list). You can satisfy your curiosity about these tags by using Dreamweaver's HTML reference (see Section 9.6).
The last option on the bar is actually a menu that offers a wide range of symbols and international characters. Unlike regular Western characters, such as a or z , these special characters are represented in HTML by a code name or number. For instance, a trademark symbol () is written in HTML as ™.
-
From the menu at the right end of the Insert bar, select the symbol you wish to insert (see Figure 2-1) .
Dreamweaver inserts the appropriate HTML code into your Web page. (Alternatively, you can select the Other Characters option to bring up the wider- ranging Insert Other Character dialog box shown at bottom in Figure 2-1.)
Note: If you set the encoding of your Web page to anything other than Western in the Page Properties window (by choosing Modify
Page Properties and clicking the Title/Encoding category), you can reliably insert only line breaks and nonbreaking spaces. The other special characters available from the Character category of the Objects panel may not work. 2.1.2. Line Breaks
Pressing Enter creates a new paragraph, exactly as in a word processor. Unfortunately, Web browsers automatically insert a blank line's worth of extra space above and below paragraphswhich is a real nuisance if you're trying to create several single- spaced lines of text, like this:
- 702 A Street
- Toadsuck, AR
- 98789 USA
Here, each part of the address is on its own line, but it's still just a single paragraph (and shares the overall formatting of that paragraph, as you'll learn in the next chapter).
Tip: If you want to entirely dispense with the space that browsers insert between paragraphs, don't use line breaks each time. Instead, use CSS to eliminate the top and bottom margins of the <p> tag, as described in the tip in on Section 6.7.4.1.
To create this effect, you need to insert a line break at the insertion point, using one of these techniques:
-
From the Characters menu on the Text tab of the Insert bar, select Line Break (the first menu option at top in Figure 2-1).
-
Choose Insert
HTML Special Characters Line Break. -
Press Shift+Enter.
Tip: When you place a line break in Dreamweaver, you may get no visual hint that it's even there; after all, a regular paragraph break and a line break both create a new line of text.This is especially likely if you copy text from applications other than Microsoft Word or Excel. Text from other programsespecially email programscan be loaded with an infuriating number of line breaks. To add to the confusion, a line break may go unnoticed if it occurs at the end of a long line. Your only hope is to make line breaks visible.To do so, choose Edit
Preferences (or Dreamweaver Preferences on the Mac), or press Ctrl+U ( -U). Click the Invisible Elements category. Make sure the Line Breaks checkbox is turned on. Now you'll see each line break appear as a small gold shield Visual Aids and make sure the Invisible Elements checkbox is turned on.)You can select a line break by clicking the shield, and then delete it like any page element. Better yet, select the shield, and then hit Enter or Return, to eliminate the line break and create a new paragraph.Another way to avoid pasting hidden line breaksnew in Dreamweaver 8is the Paste Special command (see Section 2.2.2). 2.1.3. Nonbreaking Spaces
You may've noticed that if you type more than one space in a row, Dreamweaver ignores all but the first space. This isn't a glitch in the program; it's standard HTML. Web browsers ignore any spaces following the first one.
Therefore, a line like "Beware of llama," with several spaces between each word, would appear on a Web page like this: "Beware of llama." Not only do Web browsers ignore multiple spaces, but they also ignore any spaces that aren't between words. So if you hit the Space bar a couple of times to indent the first line of a paragraph, you're wasting your time. A Web browser won't display any of those spaces.
This feature makes good sense, because it prevents Web pages from being littered with extraneous spaces that many people insert when writing HTML code. (Extra spaces in a page of HTML often make the code easier to read.)
There may be times, however, when you need more than one space in a row. Consider the text navigation bar at the bottom of a Web page, a common Web page element that lists the different sections of a Web site. Visitors can click one of the section titles to jump directly to a different area of the site. For clarity, many designers like to add multiple spaces between the text links, like this:
- News Classifieds Jobs
In all these cases, a nonbreaking space can save the day. It looks just like a regular space, but it acts as glue that prevents the words on either side from being split apart at the end of a line. (That's why it's called a nonbreaking space.)
Note: Designers used to use the nonbreaking space to create an indent on the first line of paragraphs. Fortunately, you don't need to resort to such trickery anymore. The CSS Text-Indent property, described on Section 6.7.3, creates the same effect more efficiently .
But when designing Web pages, you'll probably be interested in this fascinating cousin of the regular Space bar for a different reason: it's the only "text spacer" you can use in HTML text.
To insert a nonbreaking space, click where you wish to add the space, and then do one of the following:
-
From the Characters menu on the Text tab of the Insert bar, select Non-Breaking Space (the second menu option at top in Figure 2-1).
-
Choose Insert
HTML Special Characters Non-Breaking Space. -
Press Ctrl+Shift+Space bar (
 -Shift-Space bar).
Note: If you often add multiple spaces, Dreamweaver offers a shortcut. Choose Edit
Preferences to open Dreamweavers Preferences window (in Mac OS X, choose Dreamweaver Preferences instead). Click the General category. Then, under "Editing options," turn on "Allow multiple consecutive spaces." Now, whenever you press the Space bar more than once, Dreamweaver inserts nonbreaking spaces.In fact, Dreamweaver 8 is even smarter than that. It inserts a regular space if you press the Space bar just once, a nonbreaking space followed by a regular space if you hit the Space bar twice, and multiple nonbreaking spaces followed by a final regular space if you hit the Space bar repeatedly. Since nonbreaking spaces act like glue that keeps words stuck together (see the box below), the extra regular spaces allow the lines to break normally, if necessary. | TROUBLESHOOTING MOMENT Keeping Headlines Together |
| You can use nonbreaking spaces as invisible glue that keeps two or more words together on a single line. That's a very useful tactic when you're dealing with headlines, for example, in which a single word, if forced onto its own line, would create unappealing white space and confuse the headline's meaning, as shown here. Adding a nonbreaking space between the words "Mother" and "Says" in this example ensures that those words won't get split across a line break, and helps clarify the presentation and meaning of this headline. You can use any of the three methods that are described on Section 2.1.3. There is also a CSS property called White-space to which you can apply the value "nowrap" [see Section 6.7.3]. This move prevents words from wrapping to the next line, effectively gluing them together.) 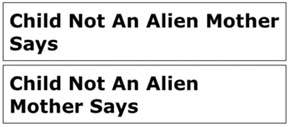 |
2.1.4. Adding a Date to Your Page
The Common tab of the Insert bar offers an icon called Date. Clicking this icon ( ![]() )or choosing Insert Date opens the Insert Date dialog box (Figure 2-2). Either way, Dreamweaver inserts todays date, as your computer understands it, onto your Web page in progress. You can also specify whether to include the day of the week and the current time.
)or choosing Insert Date opens the Insert Date dialog box (Figure 2-2). Either way, Dreamweaver inserts todays date, as your computer understands it, onto your Web page in progress. You can also specify whether to include the day of the week and the current time.
Figure 2-2. When you insert a Date object (a placeholder for the actual date) onto a Web page, you have several additional options: If you want to add the day of the week, choose the format you want from the "Day format" pop-up menu (top). You may also choose to add the current time in hours and minutesin either military time (22:18) or regular time (10:18 PM)from the "Time format" pop-up menu (bottom).
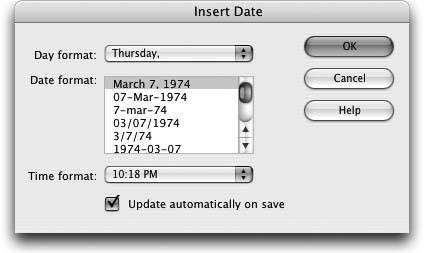
Select the format you wish from the Date Format list. There are 13 different formats to choose from, such as March 7, 1974 or 3/7/74.
You may wonder why Dreamweaver includes an insert-date function anyway. How hard is it to type Thursday, July 12 ?
Actually, the real value of the Insert Date feature lies in the "Update Automatically on Save" checkbox. Choosing this option forces Dreamweaver to update the date each time you save the document.
Many designers use this feature to stamp their Web pages with dates that indicate when the contents were last updated. For example, you might type This page was last revised on : and then choose Insert Date and select the "Update automatically on save option. Now, each time you make a change to the page, Dreamweaver automatically changes the date to reflect when you saved the document. You never again have to worry about it.