Section 24.2. Building a Static Page from an XML File
Dreamweaver 8 provides two methods for converting XML files into Web browserfriendly pages: server-side and client-side approaches. With the server-side approach (discussed on Section 24.4), all the XML- related files are read on the application server and processed by a program Dreamweaver creates. The resultregular HTMLis spit back across the Internet to a visitor's Web browser. The client-side approach is very different: the transformation of the XML file happens directly within a visitor's Web browser (which is known as the "client"). Most modern browserslike Internet Explorer 6, Safari, and Firefoxcan actually read XML and XSL files (that's the file containing the XSLT style sheet), apply the XSLT instructions, and then generate a display that looks just like a Web page. You'll learn about this approach next .
Note: XSL files hold the XSLT and XPath code that transform XML into another format like HTML.
Presenting XML using a client-side approach requires two filesthe XML file and an XSLT style sheet. The XSLT style sheet is created in Dreamweaver very much like you'd create a Web page. In fact, when working in Design view, you won't really notice any difference between creating XSLT and creating a regular HTML Web page; you can add design elements like logos and other graphics, use table-based or CSS-based layout techniques, and even format the XML content much like you'd format dynamic text from a recordset (see Section 21.2.1).
The first thing you need to do is add an XML file to your site. This could be a file supplied by your client, one you've created yourself, or one produced by a computer program. Dreamweaver's client-side XSLT tools work only with XML files located in your site.
Note: Dreamweaver's server-side XSLT tools let you retrieve XML files from anywhere on the Web. This capability's useful for grabbing news feeds from other Web sites, for example. See Section 24.3 for details.
Once you have an XML file that you're ready to "transform" into a good-looking Web page, you create an XSLT file in one of two ways: by creating a new, blank XSLT document or by converting an already created HTML page into an XSLT file.
To start with a fresh, blank canvas:
-
Choose File
 New .
New . The New Document window opens.
-
Make sure the General tab is selected; click the Basic Page category, select XSLT (Entire Page), and click the Create button .
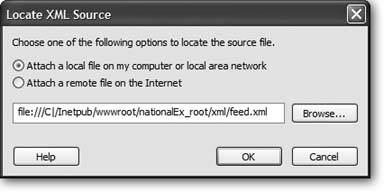
The Locate XML Source window appears (Figure 24-1). Because XSLT is meant to make an XML file look great, you need to tell Dreamweaver which XML file to use.
Note: Don't choose the XSLT (Fragment) option. This is used only with dynamic Web pages, as discussed on Section 24.3.
Figure 24-1. Only the first option"Attach a local file "works with a static, client-side page. By contrast, dynamic, server-side pages (Section 24.3) can use either an XML file stored on your site or from any other site on the Web.
-
Click the Browse button and locate the XML file in your site. Click OK .
Dreamweaver finds the file in your local site, reads its contents, and displays the file's tags and properties in the Bindings panel. At this point, jump to Section 24.4 to learn how to add XML data to the page.
-
Save the new XSLT style sheet .
Make sure the file ends in the extension .xsl. In addition, you must save the file in the same folder as your XML file. If you don't and the XSLT file contains links, graphics, and other linked elements, they may not show up when the XML file is viewed .
It may be easier to create your page designlogo, banner, navigation, copyright, layout, and so onfirst. Or, you may have an already completed Web page design that you'd like to use for displaying the information from your XML file. In either case, you can convert the HTML to XSLT by following these steps:
-
Open the HTML page .
Don't use a dynamic page. In most cases, you'll run into trouble with the programming code in these types of pages. It's best to start with a plain vanilla HTML design.
-
Choose File
Convert XSLT 1.0 . Dreamweaver makes a copy of the HTML page, converts it to XSLT, and then saves it into the same directory as the Web page, with a file extension of .xsl. So, for example, if you converted a file named products.html into XSLT, Dreamweaver would create a new document named products.xsl and save it in the same folder in your site.
You next have to "attach" an XML file to the XSLT file. This step, which is automatically taken care of when you create a new, blank XSLT file (see Section 24.2), is required so that Dreamweaver knows which XML file you plan on formatting.
-
Open the Bindings Panel (Window
Bindings) and click either the "Source.." or the XML link (see Figure 24-2) . The Locate XML Source window appears (Figure 24-1). The process, at this point, is the same as when creating a new XSLT document (Section 24.2)that is, click the Browse button, locate the XML file in your site, and then click OK.
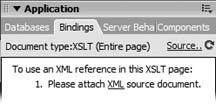
Figure 24-2. Both the "Source.." and the XML links in the Bindings panel let you select the XML file you wish to format.
Whichever method you choose to create the XSLT file, it behaves just like a Web page in Dreamweaver. In other words, you can use Design view to add tables, graphics, text, and so on. You can even use CSS styles to format elements on the page. But behind the scenes, Dreamweaver adds some pretty weird-looking code: if you delve into Code view in one of these pages, you'll see things like <xsl:template match="/"> and <!ENTITY nbsp " ">. So unless you understand XSLT well, it's best to stick to Design view as much as possible. Accidentally deleting or changing any of the XSLT code may break the page.
Note: Although Dreamweaver claims that it's "attaching" the XML file to the XSLT document, it's really just adding a comment tag to the XSLT file, like this: <!--DWXMLSource="feed.xml" -->. This comment helps Dreamweaver know which XML file to use with the XSLT documentso don't delete it. Technically, you actually attach an XSL file to an XML file to make this whole process work (as described below).
You use the Bindings panel to insert XML elements into your Web page. The process is very much like working with recordsets on dynamic pages (see Section 21.2.1). The only difference is that instead of the data coming from a database, it comes from an XML file. You can apply CSS to the XML data and format the page as you would any Web page, with tables or CSS for layout, background images, and so on. You can also add various cool options like repeat regions and conditional statements. This process is the same for client-side and server-side processed XSLT files, and is discussed in depth starting on Section 24.4.
The final piece required to transform an XML file into a presentation for a Web browser is to attach the XSLT style sheet to your XML file. In this client-side scenario, the Web browser reads the XML file, loads the attached XSLT style sheet, and formats the XML according to the instructions in the XSL filepretty much the same as when displaying a Web page with an external CSS style sheet. To attach the XSL file to the XML, follow these steps:
-
Open the XML file and choose Commands
Attach an XSLT Stylesheet . The Attach XSLT Stylesheet window appears. It just has a single option: select the XSLT style sheet.
-
Click the Browse button and select the XSLT style sheet (the file ending in .xsl) you created earlier, and then click OK .
This step writes code into the XML file that links the XSL file (that's the XSLT style sheet) to the XML file.
Note: Make sure the XSLT and XML files are in the same folder in your site. If they're not, links may not work and graphics may not appear.
-
Press F12 (Option-F12) to preview the XML file in a Web browser .
The Web browser loads the XML file and the XSLT style sheet and transforms the whole mess into a display that looks just like a Web page.
This client-side approach is (relatively speaking) easy: You don't need to bother setting up an application server or any of the other components required for a dynamic Web site. It does have some big drawbacks, however. For example, not all Web browsers can view XML files. Most of the latest and greatest can: Internet Explorer 5 and 6, Firefox, and Safari, for example. But this means that if you're attempting to reach a large audience, this client-side method may not be the answer. It also means visitors need to download both the XML and XSL files. In some cases, you'll display only part of an XML file; if the file's large, your visitors will need to wait longer than they should have to in order to download all of the data (even the stuff you never intend to display) from the XML file. Finally, you can't take advantage of one of Dreamweaver's new XSLT feature's greatest uses: including news, blogs , and other Web site feeds in your Web pages.
Fortunately, Dreamweaver's server-side approach overcomes all of these limitations. Its XSLT server behavior produces regular HTML out of XML and XSLT style sheets. And, fortunately, since Dreamweaver handles all of the complex programming required to make this happen, it's no more difficult than building a dynamic Web page.