Section 18.1. The History Panel Revisited
As you work on a Web page, Dreamweaver keeps track of everything you do. You can see a list of your actionsyour history in the History panel. Each document has a separate history, which Dreamweaver discards when you close the document or quit the program.
You can use the History panel to quickly undo or redo multiple actions (see Section 2.5), but that's only the tip of the iceberg. You can also use it to replay and record a series of actions you wish to repeat. If you've ever used macros in Microsoft Word or actions in Adobe Photoshop, you'll probably quickly get the hang of this feature.
To open the History panel, choose Window  History, or press Shift+F10 (see Figure 18-1).
18.1.1. Replay Your Steps
To replay a step in the History panel, click the step's name to highlight it. You can also select multiple steps by using one of these methods :
-
To select a group of consecutive steps, drag over them. You can drag your cursor across either the labels or icons. Take special care not to move your cursor onto the History slider on the left edge of the window, as clicking there undoes or redoes steps (Section 2.5.2).
-
You can also select consecutive steps by holding down the Shift key as you click down the list.
-
To select steps that aren't consecutive, Ctrl-click (
 -click) only the ones you want. For example, say you hit Return, typed hello , and then inserted a horizontal rule. If you wanted to omit the step where you typed hello , you could Ctrl-click ( -click) the other two. Dreamweaver ignores unselected steps.
Now, when you click Replay (see Figure 18-1), Dreamweaver replays the selected steps in an encore performance. For example, if you insert an image using the Common tab of the Insert bar (see Section 5.1), that's recorded as one step. You could then add that image to your page again, later, simply by clicking where you want the image to appear and then replaying the "insert image" step. Unfortunately, you can't reorder the steps; they always play from the top of the list to the bottom.
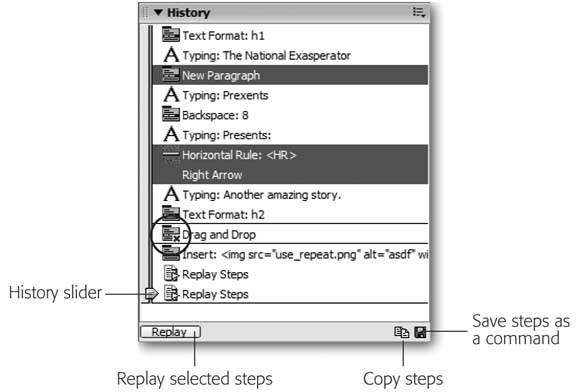
Figure 18-1. The History panel lists every little step you've taken while working on the current documenteven typos. You can replay one or more actions on the list, copy them for use in another document, or save them as a command in the Commands menu. If Dreamweaver can't replay an action, such as a mouse click, it appears with a red X next to it (circled). Furthermore, you can't replay two consecutive steps if you clicked or dragged in the document in between them (you'll see a solid line in the History list separating such steps). Dreamweaver merely replays the first selected step. The History slider indicates where you are in the document's history.
Once you've created a series of steps, you can reuse it. For example, say you format a paragraph as a bulleted list and apply a custom style to it. Once Dreamweaver records these steps in the History panel, you can select more text and replay those steps to format it the same way. Now imagine that, instead of a two-step process, you have a 10-step chore that involves not only keystrokes, but multiple visits to the Insert bar and Property inspectoryou can begin to see the power of this feature.
Tip: You probably know that you can repeat your last action by pressing Ctrl+Y (
Repeat. For example, if you type the word hello in the document window, pressing Ctrl+Y ( 18.1.2. Exceptions and Errors
Unfortunately, Dreamweaver can't record and play back everything. The exceptions generally involve making changes in certain dialog boxes or moving objects with the mouse. For example, you can't record tasks you perform in the Modify Page Properties dialog box. And you're left to your own devices when you want to click, drag, or drop a graphic in the document window.
On the other hand, not everything you do with the mouse is off-limits to the History panel. It can track most common tasks, like clicking the Insert bar, choosing a menu item, or clicking in the Property inspector to set a property. Also, you can avoid using many mouse movements by using the equivalent keystrokes, which Dreamweaver can record. (See the box "Keyboard to the Rescue" below.)
If you take a step, such as a mouse drag, that Dreamweaver can't replay, a red X appears next to it in the History panel. A line between two actions also indicates a step that can't be repeated. This problem usually arises when you've clicked in the document window (to deselect a selected image, for example). One way you can avoid these non-recordable actions is to get into the habit of deselecting an object in the document window by pressing the keyboard's arrow keys instead.
| FREQUENTLY ASKED QUESTION Keyboard to the Rescue |
| If Dreamweaver can't track mouse movements, how can I replay an action that involves selecting something ? It's easy to use the mouse to make selections and move items around the screen, but you can do much of the same with the humble keyboard. That's a good thing, because if you can type it, Dreamweaver can record it. To move up one line, for instance, press the up arrow key; to move down a line, press the down arrow. You can move to the top or bottom of the document window with the Page Up and Page Down keys, or move to the beginning or end of a line by pressing Home or End. Press Shift while pressing the right or left arrow key to select the object or letter to the right or left of the insertion point. Add the Ctrl ( (You don't have to memorize all of this. You can print out a complete list of keyboard shortcuts, as described on Section 19.1.) |
18.1.3. Copying and Pasting Actions
Each document has its own history. Thus, if you work on one page and then switch to another, the History panel changes to reflect only the actions you performed on the new document. The biggest drawback of this quirk is that you can't immediately replicate a series of steps you've made in one document by replaying them in another document.
For example, while working on your home page, you might click the Date object in the Insert bar to insert the current date (see Section 2.1.4), and then choose a format for the date in the dialog box. Then, say you want to place the date on another page using the same format. But when you switch to that page and click Replay on the History panel, your steps aren't there!
Fortunately, there's a workaround: ye olde copy/paste routine. Select the steps you want to copy (see "Replay Your Steps" on the opposite page for selection techniques), and then click the "Copy selected steps" button (see Figure 18-1) on the History panel. (The regular copy shortcut, Ctrl+C or ![]() -C, doesn't work in this situation.) Now switch to the new document, select an object (or click to place the insertion point), and then choose Edit Paste or press Ctrl+V ( -V).
-C, doesn't work in this situation.) Now switch to the new document, select an object (or click to place the insertion point), and then choose Edit Paste or press Ctrl+V ( -V).
Dreamweaver responds by playing the copied steps.
18.1.4. Save Steps as Commands
It's quick and easy to replay and copy steps to automate repetitive tasks, but if you close the document or quit Dreamweaver, your recorded actions disappearand with them, any chance you had of replaying them in the future. What if you come up with a great sequence of steps that you'd like to use over and over again?
| POWER USERS' CLINIC Copy (and Study) Actions |
| Dreamweaver is relatively easy to customize, because the objects that appear in the Insert bar, the behaviors available from the Behaviors panel, and even the Property inspector are all, behind the scenes, combinations of HTML pages and JavaScript programs. If you understand JavaScript, you can add your own commands, behaviors, and objects. When learning JavaScript, however, you may need all the help you can get. The History panel's Copy Steps feature is a good place to start. To study how Dreamweaver's built-in commands, behaviors, and objects have been programmed, copy one or more actions using the method that's described above. Switch to a text editor like Notepad or TextEdit (Word will work, too), and then choose Edit What you see is the JavaScript code that Dreamweaver uses to carry out those actions. You'll find out, for example, that while you perceive adding a new paragraph to your Web page as a matter of hitting Enter, to Dreamweaver it looks like this: dw.getDocumentDOM( ).newBlock( ) . The History panel also has a secret shortcut that lets you view the JavaScript code for each step, right inside the panel: Ctrl+Shift+click ( |
The solution: Before it disappears forever, turn it into a custom command . That way, Dreamweaver adds your command to the bottom of the Commands menu, and you can choose it whenever you want from there.
To save steps as a command, select the steps you want to copy (see "Replay Your Steps" on Section 18.1 for selection techniques), and then click the Save Steps button (its icon looks like a little floppy disk) on the History panel.
The Save as Command dialog box pops open. (If you've selected steps that Dreamweaver can't replay, such as mouse movements, a warning appears. Click Yes to continue without those steps; the valid steps work just fine.) Type a short, descriptive name, and then click OK. Now take a look at the Commands menusure enough, your command now appears at the bottom.
To use your custom command, simply select its name from the Commands menu.
Note: If you decide you want to delete your command or change its name, choose Commands
Edit Command List. In the dialog box that appears, click the commands name to select it. Type a new name or click Delete. 18.1.5. Recording Commands
You can also create a command by telling Dreamweaver to watch and record your actions. This time, Dreamweaver doesn't let you perform mouse movements while you're recording, so you can be sure recorded commands will play back properly.
To record a command, make sure the relevant Web page document is frontmost, and then choose Commands Start Recording, or press Ctrl+Shift+X ( -Shift-X). The cursor turns into a cassette-tape icon to indicate the command is recording. Now's your chance to do whatever you want Dreamweaver to memorize. (If you try to use the mouse to move or select anything in the document window, Dreamweaver complains with a dialog box.)
When you're finished, choose Commands Stop Recording, or press Ctrl+Shift+X ( -Shift-X). Your cursor returns to normal, and Dreamweaver saves the sequence as a command, which you can replay by choosing Commands Play Recorded Command.
Note, however, that this command disappears when you quit Dreamweaver or record another command. (Dreamweaver can only save one recorded command at a time.) If you want to preserve it for posterity, you have to save it to the Commands menu, like this:
-
Choose Commands
Play Recorded Command . The History panel lists this action as Run Command.
-
Click the Run Command step in the History panel .
The step is highlighted to indicate you've selected it.
-
Click the Save Steps button (its icon looks like a little floppy disk) .
The Save as Command dialog box appears.
-
Type a name for the command; click OK .
Dreamweaver adds your new command to the Commands menu, where it's ready for action in this or any future Dreamweaver session.