The System Preferences Application
You can adjust all the preferences and settings for your Mac from the System Preferences application, which is a central repository for preference panes, individual modules that control specific types of preferences. Each preference pane controls a precise part of your Mac’s operations, and their names tell you exactly what settings they cover: Network, Print & Fax, Dock, Accounts, and so on.
| Note | System Preferences cover aspects of your Mac that can be configured globally—that is, it doesn’t configure specific applications. Most applications, including the Finder, have their own preferences. It’s easy to confuse the Finder and the operating system, but if you look at the Finder preferences (see Chapter 4), you’ll quickly notice the difference between Finder settings and the global settings that you can change in the System Preferences. Many of the System Preferences affect the current user, but some affect the entire system. |
You can open the System Preferences by clicking its icon in the Dock, or by selecting the Apple menu | System Preferences, as shown in Figure 9-1.
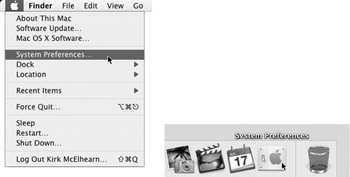
Figure 9-1: Two ways to open the System Preferences: from the Apple menu (left) or the Dock (right)
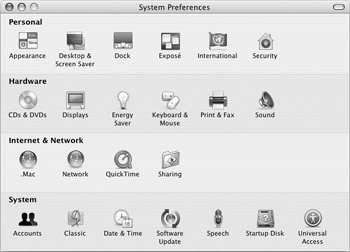
The System Preferences application contains some two dozen icons (see Figure 9-2), each of which opens a preference pane where you can change settings for a specific part of the operating system.
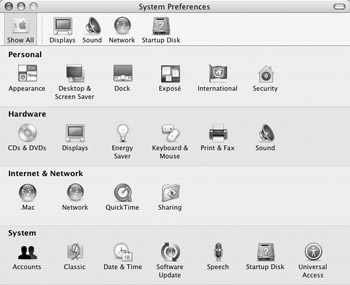
Figure 9-2: The System Preferences application is an interface for almost two dozen preference panes.
When you open the System Preferences, its icons are displayed in four categories:
-
Personal These preference panes control personal settings, such as the way the Dock displays, your Desktop background and screen saver, Expos settings, and the type of keyboard layout you use.
-
Hardware These preference panes control your Mac’s hardware: the way your Mac reacts when you insert a CD or DVD, the way your mouse works, your screen resolution, and more.
-
Internet & Network This is where you enter Internet and network settings such as account information, your .Mac settings, and whether you want to share items on your Mac across a network.
-
System This category deals with system functions such as setting the date and time, updating your Mac’s software, and managing user accounts.
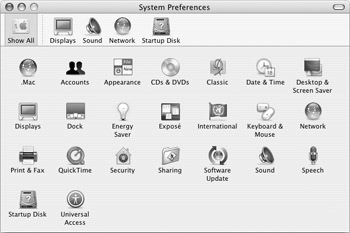
To access any preference pane, just click its icon once; the System Preferences window changes to display that preference pane, changing size if necessary.
At the top of the System Preferences window is a toolbar containing several of the icons found in the categories below. These icons, considered to be some of the most commonly used preference panes, are placed here for easy access. There is also a Show All icon, which lets you return to the global view whenever you have finished working with a specific preference pane.
You can add preference icons to this toolbar by dragging an icon from the window to the toolbar area, as shown in Figure 9-3.
Figure 9-3: Drag an icon from the System Preferences window to the toolbar to get quick access to it.
You can remove icons from the toolbar by dragging them off the toolbar. When you do this, the icon disappears from the toolbar in a puff of smoke.
You can make the System Preferences window smaller, if you wish, by hiding its toolbar. Select View | Hide Toolbar to display the window like this:
You can also access any of the preference panes from the View menu, which is shown in Figure 9-4. Just select the preference pane you want to view from this menu.
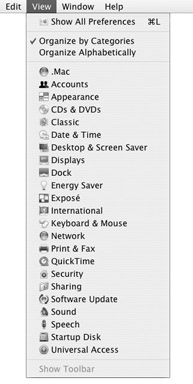
Figure 9-4: To display any of the preference panes, select it from the View menu.
This menu also lets you choose how you want to display the preference pane icons. The default display is Organize By Categories, which is shown in Figure 9-4, but you can also choose Organize Alphabetically to display them in alphabetical order.
Some software, especially software used to control hardware devices, installs preference panes on your Mac so you can configure these devices. These preference pane icons are placed in an additional category called “Other” at the bottom of the System Preferences window. (See Figure 9-5.) This Other category only displays if you have non-Apple preference panes installed on your Mac.
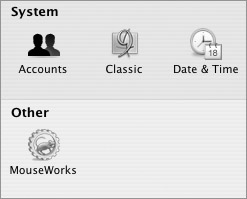
Figure 9-5: Third-party preference pane icons are added to the bottom of the window, in the Other category.
| Note | If you don’t have an administrator account (see Chapter 8 for more on administrator accounts), you won’t be able to change all the System Preferences. Some of these preferences, such as most of those in the Personal category, are accessible to all users, since they only affect your individual environment. But other preferences, such as Startup Disk, Network, and Sharing, which affect all users on your Mac, are only accessible to administrators. Unfortunately, the category groupings don’t correspond to this distinction: for instance, the Security preference pane, in the Personal category, contains both user-accessible and administrator-only settings; the .Mac preference pane, in the Internet & Network category, is a user-accessible preference pane, but other panes in the same category, such as Network and Sharing, are not. |
Set Personal Preferences
The Personal preferences section contains six icons for preference panes that let you set user-specific preferences. With the exception of some settings in the Security preference pane, changes you make to these preferences only apply to your user account.

Appearance Preferences
The Appearance preferences (Figure 9-6) let you adjust certain appearance settings, change the number of recent items shown in the Apple menu, and set font smoothing options. Click the Appearance icon to display this preference pane.
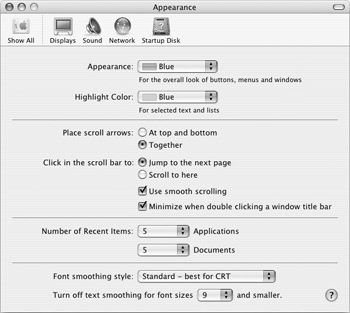
Figure 9-6: The Appearance preference pane allows you to change some display options.
You can set the following options in the General preference pane:
-
Appearance Choose either Blue or Graphite for buttons, scroll bar controls, highlights, the Apple menu, and window items.
-
Highlight Color Choose from eight preset colors for text selections and list highlighting, or choose your own color by selecting Other... and picking a color from the Color window.
-
Place Scroll Arrows Choose whether you want scroll arrows at the top and bottom of windows or together at the bottom of the scroll bar.
-
Click in the Scroll Bar To Choose from Jump to the Next Page or Scroll to Here. If you choose Jump to the Next Page, this makes documents or windows scroll one window up or down when you click in the scroll bar. If you choose Scroll to Here, your scroll bar is considered to be proportional to the size of the entire window or document, and clicking in the scroll bar moves to a position relative to the location where you click.
-
Number of Recent Items Choose the number of recent Applications and Documents that display in the Apple menu. (See Chapter 4 for more on the Apple menu.)
-
Font Smoothing Style Mac OS X offers font smoothing, which smoothes the display of fonts on your screen. Choose from four types of font smoothing, depending on the type of screen you have.
-
Turn Off Text Smoothing Choose the smallest size fonts you want smoothed. If very small text is smoothed, it can be hard to read.
Tip To get more information on this or any preference pane, click the ? icon at the bottom of their windows. This opens the Apple Help Viewer at the section that corresponds to the current preference pane. (For more on using the Apple Help Viewer, see Chapter 4.)
Desktop & Screen Saver Preferences
The Desktop & Screen Saver preferences let you change your Desktop picture and choose a screen saver. See Chapter 4’s “Customize Your Desktop” section for instructions on setting a Desktop picture.
To choose and configure a screen saver, click the Desktop & Screen Saver icon and then click the Screen Saver tab.
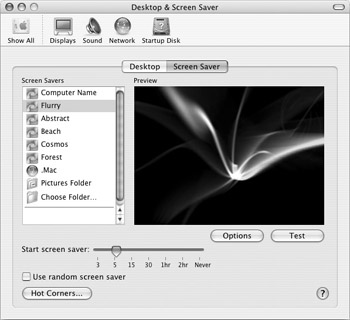
This tab shows you a list of available screen savers at the left, a preview at the right, and several settings at the bottom of the window.
Choose a screen saver in the Screen Savers list; the preview window shows you a small version of your choice. Some screen savers offer options—if the Options button is available, click this to configure the selected screen saver. You can also click Test to get a full-screen preview of it. Move your mouse to return to the preference pane.
If you want to use a random screen saver, check the Use Random Screen Saver check box. To choose when the screen saver starts, set a value in the Start Screen Saver slider.
| Note | Some screen savers, such as Flurry, are dynamic and change automatically; others, such as Cosmos and Forest, are sets of pictures that fade from one to the other. You can also choose a .Mac slide show, if you have uploaded your own pictures to your .Mac account, or you can subscribe to another user’s .Mac slide show. Choosing the Pictures Folder or another folder (click Choose Folder and select a folder) creates a screen saver from your own pictures. |
You can choose to set hot corners for your screen saver. You can set whether moving your pointer to that corner turns the screen saver effect on immediately or prevents it from activating. To set hot corners, click the Hot Corners button. A sheet displays showing pop-up menus for the four hot corners. It’s possible that some of these are already assigned to Expos functions (see Chapter 4 for more on Expos ); if so, you can choose to change these hot corners to screen saver functions. If you want to use a hot corner to turn on your screen saver, select Start Screen Saver from the pop-up menu in that hot corner. To use a hot corner to never turn on a screen saver (for example, if you use your Mac to watch DVDs), select Disable Screen Saver for that hot corner.
In the old days of computers, it was possible for your screen to get a burn-in effect when its display remained the same for too long. This problem affected screens displaying text interfaces more than graphical interfaces. But CRT manufacturers have changed the way screens work, so this problem is rarely, if ever, seen now.
Screen savers were designed to protect screens from this burn-in, but in most cases they did little more than amuse computer users, displaying flying toasters or other strange items. This is the case today—screen savers don't save your screen, but can show you that your computer is still on, and provide attractive graphics when you're not busy.
However, LCD screens may actually be damaged by screen savers—if, instead of dimming the screen, your LCD displays a screen saver, it could shorten the lifespan of the screen's backlight. In the Energy Saver preference pane, you can set your screen to dim after a certain time, which offers much more protection than any screen saver.
| Tip | Want more screen savers? Mac OS X doesn’t come with a big choice. You can download plenty of free screen savers from the Web. Some web sites for movies or bands, and some fan sites, offer screen savers you can download and use with Mac OS X. (For example, if you’re a Lord of the Rings fan, go to www.lordoftherings.net to download some neat screen savers.) You can also search for “screen saver” at Version Tracker (www.versiontracker.com) or MacUpdate (www.macupdate.com), two web sites that list Mac software and provide links for downloads. |
Dock Preferences
The Dock preferences let you change the position and size of the Dock, its visibility, and other options. See Chapter 4’s “Customize the Dock” section for instructions on using this preference pane.
Expos Preferences
Expos preferences let you choose how to use the Expos feature, which helps you switch among applications and windows. For more on Expos , see Chapter 4.
International Preferences
The International preferences (Figure 9-7) let you adjust certain settings relative to the country you are in: language, date and time format, number format and the input menu. Click the International icon to display this preference pane.
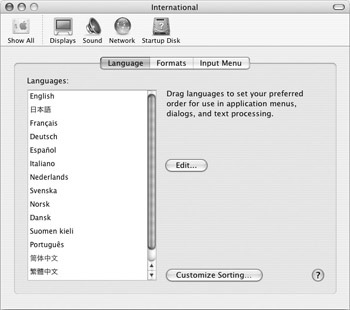
Figure 9-7: The International preference pane is where you choose settings relative to your country.
This preference pane has three tabs:
-
Language Drag languages to your preferred order in the left section. Your Mac OS X interface is in the topmost language shown in this list. If you want to use Mac OS X in a different language, change the language order and log out, and then log in again. (But if an application does not have language resources for the preferred language, it displays in the next available language in the list.) Click the Customize Sorting button to choose scripts and behaviors, which affect sort order, case conversion, and word definitions for the selected script in applications that do not support Unicode.
-
Formats Choose your desired date, time, and number formats here. For dates, you can choose by country or customize the way dates are displayed. For times, choose your desired time format here, and select whether you want time displayed in a 12-hour or 24-hour format. For numbers, select a number format. You can choose by country, or customize separators and currency symbols. You can also choose whether U.S. (feet and inches) or metric measurement units are used.
-
Input Menu Choose the type of keyboard layout you want to use. You can choose several keyboard layouts, and if more than one layout is chosen, an Input Menu is added to the menu bar of all applications. If you use an alternative keyboard layout, such as Dvorak, this is where you choose it. This is also where you can choose to display the Character Palette and Keyboard Viewer in the Input Menu. (See Chapter 13 for more on the Character Palette and Keyboard Viewer.)
Security Preferences
The Security preference pane offers settings that affect the security of both your user account, with FileVault, and your computer in general. The top section of this preference pane, which controls FileVault, is accessible to all users, and affects only your account. For more on FileVault, see Chapter 19.
The bottom section of the Security preference pane is only accessible to administrators, and offers general settings that help make your Mac more secure.
-
Require Password to Wake This Computer from Sleep or Screen Saver If you check this option, you’ll need to enter a password when you wake your computer from sleep or when you reactivate it after a screen saver has displayed.
-
Disable Automatic Login Checking this disables automatic login, and forces your Mac to display its login screen every time it starts up. If you want to use automatic login, you can choose which user logs in automatically on the Accounts preference pane; see Chapter 8 for more on automatic login.
-
Require Password to Unlock Each Secure System Preference If you check this option, users will have to enter a password each time they want to access a secure system preference, even if they have an administrator account. If you don’t check this, administrators will never have to enter their password to access secure system preferences.
-
Log Out After ... Minutes of Inactivity This setting logs out your Mac, no matter which account is active, after a set period of inactivity. Enter a number of minutes in the field, or change the time by clicking the arrow buttons.
Hardware Preferences
The Hardware preferences category contains six icons for preference panes that let you set preferences for your hardware. (See Figure 9-8.)

Figure 9-8: The Hardware preferences category
Any changes you make to these preferences only apply to your user account, with the exception of Energy Saver and Print & Fax preferences, which apply to all users of your Mac.
CDs & DVDs Preferences
The CDs & DVDs preferences (Figure 9-9) let you choose how your Mac acts when you insert a CD or DVD. Click the CDs & DVDs icon to display this preference pane.
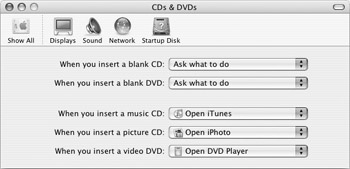
Figure 9-9: The CDs & DVDs preference pane and its five options
Use this pane to choose what your Mac should do when you insert a blank CD or DVD. You can select from the following:
-
Ask What to Do The Finder asks you what you want to do.
-
Open Finder This prepares the disk for copying in the Finder.
-
Open iTunes/Open iDVD If you insert a blank CD, this opens iTunes, and prepares the disk for copying in iTunes. If you insert a blank DVD, this opens iDVD.
-
Open Other Application If you use a different application to burn CDs or DVDs, choose it here by selecting this menu item, and then browsing to that application and selecting it.
-
Run Script If you want to run an AppleScript when inserting a blank CD or DVD, choose this menu item, and then browse to the location of the AppleScript and select it.
-
Ignore If you want nothing to happen when you insert a blank CD or DVD, choose this.
When you insert a music CD, a picture CD, or a video DVD, the bottom three choices let you decide what to do. You can have the default applications open automatically (iTunes, iPhoto, DVD Player), or you can choose to have your Mac open another application, run a script, or ignore the disk.
Displays Preferences
The Displays preferences (Figure 9-10) let you choose your Mac’s screen resolution, color depth, and refresh rate. You can also adjust its contrast and brightness, and, if you have multiple monitors, choose how they are displayed. Click the Displays icon to display this preference pane.
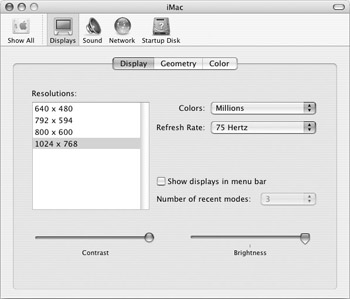
Figure 9-10: The Displays preference pane, where you can adjust your monitor settings
This preference pane may be different depending on the type of Mac you have. In Figure 9-10, there are three tabs, but you’ll have a fourth tab if more than one monitor is connected to your Mac.
-
Display Choose your resolution, color depth, and refresh rate. You can adjust the contrast and brightness using the sliders at the bottom. And if you check Show Displays In Menu Bar, a Menu Extra lets you change resolution and color depth on-the-fly by clicking the Menu Extra and selecting one of its choices.
-
Geometry If you have a CRT screen connected to your Mac, or if you have an all-in- one Mac with a CRT screen (a nonflat panel iMac, or an eMac), this tab lets you adjust your screen’s geometry: height and width, centering, and so on.
-
Arrange If you have more than one monitor connected to your Mac (not shown in Figure 9-10), this lets you choose whether the display is mirrored (the same display on both monitors) or extended (side by side). You can also set the relative position of the two displays over the virtual desktop (if the display is extended) and choose which one has your menu bar.
-
Color You can choose a color profile here, or calibrate your screen and make a custom ColorSync profile.
Energy Saver Preferences
The Energy Saver preferences (Figure 9-11) let you choose when your Mac goes to sleep, when its monitor should dim, and other options. Click the Energy Saver icon to display this preference pane. You must be an administrator to make changes to this preference pane. If the lock icon at the bottom left of the pane shows a closed lock, click this icon and then enter your administrator’s password to make changes.
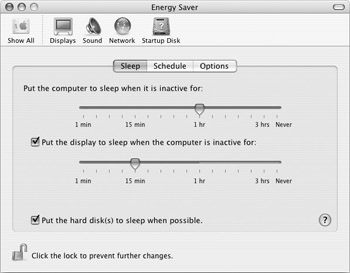
Figure 9-11: The Energy Saver preference pane lets you choose when to put your Mac to sleep.
Choose whether you want your Mac to go to sleep and after how long, and choose whether you want it to dim its display to save energy. On the Schedule tab, choose whether you want to start up your computer at a specific time every day, on weekdays or on weekends, and whether you want it to go to sleep or shut down at a specific time. The Options tab gives you some additional options, such as waking when the modem detects a ring or restarting automatically after a power failure.
Figure 9-11 shows the Energy Saver preference pane on a desktop Mac. If you have an iBook or PowerBook, it is slightly different. You have two views: a simple view that lets you choose from a group of preset energy settings, and a detailed view, which lets you select more options. (Click the Show Details button to see this view.) You can also choose different settings for when your laptop is running on battery power or when it’s plugged into a power adapter.
| Tip | Want to use your Mac as an alarm clock? It might be overkill, but you can set it to start up at a specific time each day, and choose to open, say, an MP3 file at startup (see the “Startup Items” section in Chapter 8 for more on launching files at startup). |
Keyboard & Mouse Preferences
The Keyboard & Mouse preferences (Figure 9-12) let you choose a key repeat rate and the delay until repeat when you hold down keys on your keyboard, as well as let you control a Bluetooth keyboard and mouse. It also allows you to turn on Full Keyboard Access, for users who cannot use a mouse or other pointing device. Click the Keyboard & Mouse icon to display this preference pane.
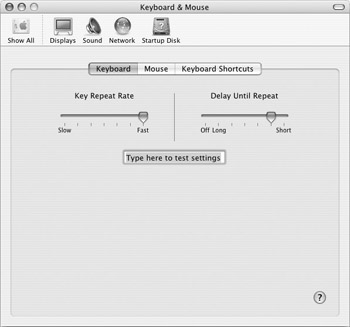
Figure 9-12: The Keyboard tab of the Keyboard & Mouse preference pane
The Keyboard tab lets you adjust settings for typing. The Key Repeat Rate slider allows you to set the speed at which keys repeat when you hold them down. And you can use the Delay Until Repeat slider to choose the time before keys start repeating when you hold them down. If you have an Apple wireless mouse and keyboard, this tab can also be used to adjust settings for these devices, and allows you to check your battery power.
The Mouse tab of this preference pane lets you adjust your mouse’s tracking speed, scrolling speed (if you have a scroll wheel), and double-click speed.
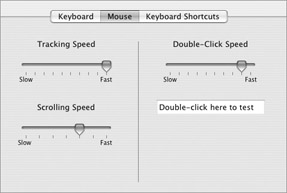
Choose a tracking speed, scrolling speed, and double-click speed for your mouse. If you use a third-party mouse with its own driver, use that device’s preference pane or settings application; those settings override the Mouse preference pane.
If you have an iBook or PowerBook, this preference pane is different; it contains a second tab for trackpad settings and options.
As with the Mouse tab, you can set tracking and double-click speed, and you can also choose from several specific trackpad options. You can use the trackpad for clicking (which means that when you tap the trackpad it is the same as a mouse click), or for clicking and dragging. You can also use Drag Lock, so you can tap, drag, and then tap again to release the item you dragged.
You can also have the trackpad ignored while you are typing. This is practical since you may rub your thumbs against it, moving the cursor to another line when you are typing. If you check Ignore Trackpad When Mouse Is Present, the trackpad is turned off when you have an external mouse plugged into your Mac.
If you have a Bluetooth adapter in your Mac, there will be an additional tab (between Mouse and Keyboard Shortcuts) called Bluetooth. That’s where you set the options for wireless Apple mice and keyboards.
The Keyboard Shortcuts tab lets you change or assign keyboard shortcuts to specific system functions, such as screen captures (pictures of your screen) or universal access. You can also set the keyboard shortcut for hiding and showing the Dock, and you can change or set the keyboard shortcut for any menu item in whichever application you use.
To change a preset shortcut, click the Shortcut column for the action whose shortcut you want to change. When the text becomes highlighted, type a new keyboard shortcut. This shortcut is applied immediately.
To set a keyboard shortcut for an application, click the + button. A sheet displays.
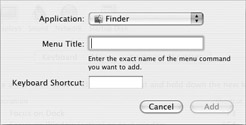
Select an application from the Application pop-up menu by choosing one of the applications shown in the menu, selecting Other to browse and find another application, or choosing All Applications to apply your keyboard shortcut to all applications on your Mac.
Enter the exact name of the menu command in the Menu Title field, and then enter a keyboard shortcut in the Keyboard Shortcut field. Click Add and this shortcut is added.
| Note | You cannot use any shortcuts made up of just the z key and a letter key. You can, however, use any z-number combination as a shortcut. |
Keyboard shortcuts, whether applied to selected applications or to all of them, don’t become active until the next time you launch the applications. Any applications that are open while shortcuts are applied must first be closed and restarted before the changes take effect.
| Note | When entering a menu command to use with a keyboard shortcut, this menu command must be exactly as it appears in the application’s menu. This means that you must respect case (capital letters), and when you see a command such as Save As..., you must enter an ellipsis (…), not three sequential periods. On a U.S. keyboard, you can type an ellipsis by pressing OPTION-; . |
| Caution | When setting keyboard shortcuts, you may choose a shortcut that is already used by a specific application for another menu command. If you do so, you’ll find that one of the two shortcuts (usually the one already used by the application) won’t work. Check carefully in your application before applying any shortcuts. |
If you decide you want to delete all your keyboard shortcuts and reset them to their defaults, click the Restore Defaults button.
| Tip | When you change any keyboard shortcuts, your applications show these new shortcuts in their menus. If you have forgotten which shortcuts you have set, just look in your menus for a reminder. |
The final option on this screen, Turn on Full Keyboard Access, lets you turn on features that enable users who cannot work with a mouse or other pointing device to use their Mac. For more on this feature, see your Mac’s online help.
Print & Fax Preferences
The Print & Fax preferences (see Figure 9-13) let you choose certain settings for printing and for sending and receiving faxes. You can choose your default paper size and your default printer, and you can set up your Mac to receive faxes. Some of the settings on this preference pane are accessible to all users, but to set up printer sharing and faxing you must have an administrator account.
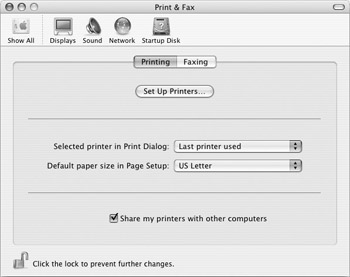
Figure 9-13: The Printing tab of the Print & Fax preference pane lets you choose certain printing settings.
At the top of this tab is a button, Set Up Printers, which opens the Printer Setup Utility. See Chapter 14 for more on adding and setting up printers.
In the middle of this tab, you can choose which printer to display in print dialogs: select a printer from the pop-up menu, or select Last Printer Used, so each time you print, the last printer is automatically selected. (If you only have one printer, you won’t need to worry about this.)
Select a Default Paper Size in Page Setup, so all your applications know what size paper you use. The pop-up menu gives you a dozen choices, including US Letter, US Legal, A4, and many others.
At the bottom of this tab is a check box option, Share My Printers with Other Computers. See Chapter 12 for more on sharing printers across a network.
The Faxing tab lets you set up your Mac to receive faxes.
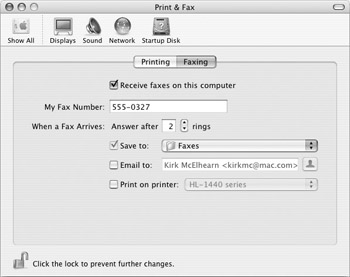
To turn on fax reception, check Receive Faxes on this Computer. Enter your telephone number in the My Fax Number field; this number is displayed on faxes you send from your Mac.
Choose how you want your Mac to react when receiving a fax:
-
Answer after ... Rings Enter a number here; you probably want to choose a number around 4 or 5 if you use the same line for a telephone; if you have a dedicated line, choose 1.
-
Save To Select a folder to save faxes you receive. Incoming faxes are saved as PDF files, which you can view with the Preview application, or with Acrobat Reader. Choose from Faxes (which is located in your home folder), Shared Faxes (located in the /Users/ Shared folder), or select another folder.
Tip If you have multiple users on your Mac, and you want all users to have access to incoming faxes, choose Shared Faxes. All your users will be able to view and copy files in this folder.
-
Email To You can have your Mac send the PDF files of all incoming faxes to the e-mail address of your choice. Enter an e-mail address, or click the Address Book icon to open your Address Book, and then select a person to send the fax to.
-
Print on Printer Select a printer if you want incoming faxes automatically printed after they arrive.
Note You must select at least one of the three choices telling your Mac what to do when a fax arrives, but you can select more than one if you want: you can have faxes saved and e-mailed, for example, or saved and printed. In any case, it’s a good idea to save them so you always have archives of your incoming faxes.
Sound Preferences
The Sound preferences (Figure 9-14) let you choose alert sounds and adjust your computer’s volume. They also let you choose your input and output devices if you have other sound hardware. Click the Sound icon to display this preference pane.
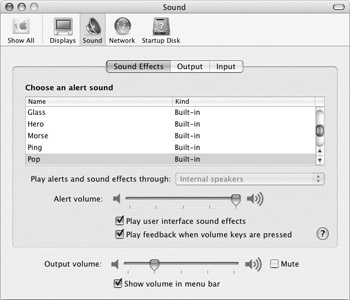
Figure 9-14: The Sound preference pane lets you set sound volume, alerts, and more.
The Sound preference pane has three tabs:
-
Sound Effects Choose an alert sound, alert volume, and output volume. Decide whether you want interface sound effects (when you move files to the Trash or empty the Trash, for example), and whether you want audible feedback when you raise or lower the volume with the volume keys. Check Show Volume in the Menu Bar if you want a menu extra displayed at all times. Click this menu extra and move the slider to change your Mac’s volume.
-
Output This lets you choose a sound output device (if you have one other than your internal speakers), its balance, and its volume.
-
Input This lets you choose a sound input device (such as an internal or external microphone, or any other sound input device) and its volume.
Internet & Network Preferences
The Internet & Network preferences category (see Figure 9-15) contains four icons for preference panes that let you set preferences for Internet use, networking, and your .Mac account (if you have one).
Figure 9-15: The Internet & Network preferences category
Changes you make to the .Mac and QuickTime preferences only apply to your user account; changes to Network and Sharing preferences apply to all users on your Mac, and you must be an administrator to make them.
.Mac Preferences
The .Mac preference pane lets you configure your .Mac account (if you have one) and manage your iDisk. See Chapter 11 for more on using .Mac.
Network Preferences
The Network preferences are where you enter important information so your Mac can access either an internal network or the Internet. This is where you enter the name of your Internet service provider and where you set up your modem or other network interface. See Chapter 12 for instructions on using this preference pane.
QuickTime Preferences
QuickTime is Apple’s multimedia software architecture that handles audio and video playback on your Mac. The QuickTime preferences (Figure 9-16) let you adjust the way QuickTime works.
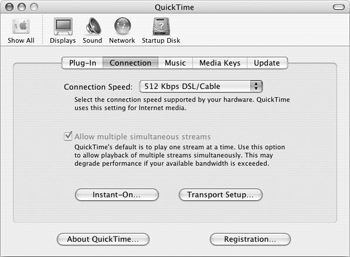
Figure 9-16: The Connection tab of the QuickTime preference pane
In most cases, QuickTime’s default settings are appropriate. One setting you might want to check is the Connection Speed setting on the Connection tab (see Figure 9-16). You should choose the speed at which you connect to the Internet to make sure that media is downloaded properly. If you connect to the Internet over an internal modem, it is probably 56 Kbps. If you have an ISDN, cable, or DSL connection, check with your Internet service provider for the correct speed. If you are on a company network, check with your network administrator.
Sharing Preferences
The Sharing preferences are where you turn on file sharing, printer sharing, Internet connection sharing, and more. See Chapter 12 for instructions on using this preference pane.
System Preferences
The System preferences category (see Figure 9-17) contains seven icons for preference panes that let you choose settings for system features.

Figure 9-17: The System preferences category
Changes you make to the Classic, Software Update, Speech and Universal Access preferences only apply to your user account; changes to Accounts, Date & Time, and Startup Disk preferences apply to all users on your Mac, and you must be an administrator to make them.
Accounts Preferences
Mac OS X is a multiuser operating system, and this preference pane lets you create, edit, manage and delete user accounts. See Chapter 8 for instructions on using this preference pane.
Classic Preferences
The Classic preference pane (Figure 9-18) lets you choose where your Mac OS 9 System Folder is, if you have one, and lets you start or stop the Classic environment.
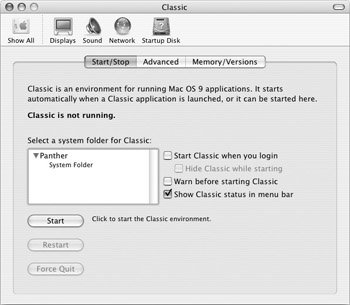
Figure 9-18: The Classic preference pane lets you manage the Classic environment.
Select where your Mac OS 9 System Folder is located in the Start/Stop pane. You may need to click the disclosure triangle next to the name of your volume to see its System Folder.
| Tip | In some cases, your System Folder may be dimmed in the Classic folder list. If this is the case, close the Classic preference pane and open the Startup Disk preference pane. Select your Classic folder as a startup disk, and then close this preference pane and save your changes. Go back to the Classic preference pane; you should now be able to select your System Folder to use for Classic. (Don’t forget to go back to the Startup Disk preference pane and change your startup disk back to your Mac OS X volume!) |
You can start the Classic environment by clicking Start; this button changes to Stop when Classic has started running. You can stop it by clicking the Stop button. If Classic ever freezes, click the Force Quit button to shut down the Classic environment.
You can check Start Classic When You Log In and Hide Classic While Starting if you wish. It’s only useful to start Classic on login, though, if you plan to use it every day. Check Warn before Starting Classic to have your Mac display an alert before launching the Classic environment, and check Show Classic Status in Menu Bar to display a menu extra showing Classic status and giving you quick access to Classic functions.
| Note | In Chapter 13, I tell you more about using Classic and working with Classic applications. |
The Advanced and Memory/Versions tabs let you manage advanced features of the Classic environment and view the memory usage of Classic applications. For more on using the Classic environment, see your Mac’s online help.
Date & Time Preferences
The Date & Time preferences (Figure 9-19) let you set your Mac’s date, time, and time zone, as well as synchronize its clock with a network clock, and choose settings for the display of your menu bar clock. Click the Date & Time icon to display this preference pane.
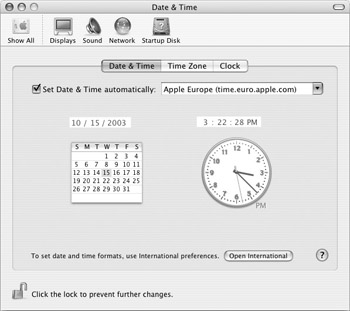
Figure 9-19: The Date & Time preference pane lets you adjust your Mac’s date and time, and manage other date and time settings.
This preference pane has three tabs:
-
Date & Time Set your Mac’s date and time here and make sure your Mac is always on time by synchronizing its clock with a network clock.
-
Time Zone Select your time zone here.
-
Clock Choose settings for your Mac’s clock: whether it is displayed in the menu bar or as a window, whether it shows as digital or analog, and whether it shows seconds, the day of the week, and more. You can even have your Mac announce the time using Apple’s Text to Speech technology.
Software Update Preferences
Mac OS X provides a built-in software update program that checks your Mac’s software and offers to download new versions when they are available. See Chapter 22 for instructions on using this preference pane.
Speech Preferences
Your Mac can both talk to you and understand speech (within limits). The Speech preferences (Figure 9-20) let you choose settings for these functions, if you choose to use them. Click the Speech icon to display this preference pane.
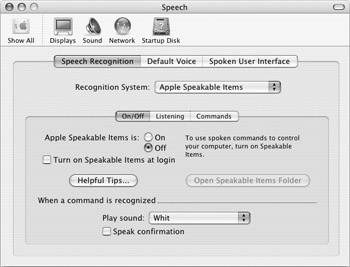
Figure 9-20: The Speech preference pane lets you control how your Mac talks to you or listens to you.
Apple’s Speech Recognition is not a technology that lets you dictate and have your words converted to text, but a feature that lets you give orders to your Mac, using preset phrases, so your Mac can do things at your command. You can tell it to open and close windows, switch applications, check your e-mail, copy or paste data, and more. The Speech Recognition tab lets you control this function.
The other speech technology on your Mac is text-to-speech. This lets certain applications speak their text, reading out loud to you in a synthetic voice. While these voices are not perfect, they can be very helpful for people with visual impairments. The Default Voice and Spoken User Interface tabs let you control this function.
To learn more about these two speech features, see your Mac’s online help.
Startup Disk Preferences
The Startup Disk preferences (Figure 9-21) control which disk or volume your Mac starts up from. Click the Startup Disk icon to display this preference pane. You must be an administrator to make changes to the Startup Disk preferences.
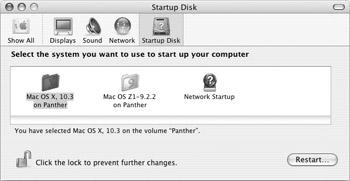
Figure 9-21: The Startup Disk preference pane is where you choose which disk or folder your Mac uses to start up.
If you have more than one disk or volume in your Mac, or if you have external hard disks, use this pane to choose which disk to use. You can also choose Network Startup if your Mac can start up from a network. If you are on a network, check with your network administrator for more about this.
To change the startup disk, click one of the system folders in the list and then close the preference pane to save your settings. If you wish to restart right away, click the Restart... button. Your Mac will display an alert asking you to confirm that you want to restart, and then it will restart from the disk you selected.
| Note | Macs made before 2003 can start up in Mac OS 9 or Mac OS X (if they are supported by Mac OS X). Some Macs made in 2003 can start up in Mac OS 9 as well, but most models released in 2003 or later can only start up in Mac OS X. |
Universal Access Preferences
The Universal Access preferences (Figure 9-22) let you turn on special features for people who have difficulties with seeing, hearing, or using the keyboard or mouse. Click the Universal Access icon to display this preference pane.
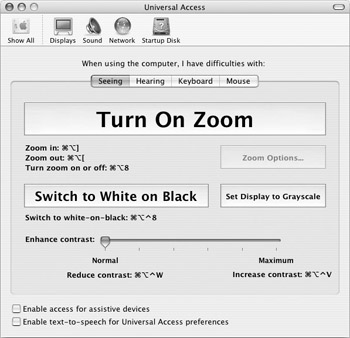
Figure 9-22: The Universal Access preference pane lets you turn on special functions to help disabled people use a Mac.
This preference pane has four tabs:
-
Seeing This tab lets you turn on special functions for people who have difficulties with seeing: you can zoom your screen, change the display to white on black, change the display to grayscale, enhance the contrast, and more.
-
Hearing This tab lets you turn on functions useful for people who have difficulties with hearing, offering visual feedback instead of alert sounds.
-
Keyboard This tab offers functions for people who have difficulty pressing more than one key at a time or repeating keystrokes.
-
Mouse This tab offers functions for people who have difficulty using a mouse or other pointing device.
The Keyboard preference pane offers additional functions to facilitate keyboard use in its Full Keyboard Access tab.
Additional Preference Panes
In addition to the standard preference panes previously mentioned, there are two others that may appear in your Hardware category (if you have the appropriate hardware): Bluetooth and Ink.
Bluetooth Preferences
Bluetooth is a networking technology you can use to connect your Mac to Bluetooth-enabled mobile phones and other devices, such as Palm PDAs and more. You can exchange files using Bluetooth, and use a wireless keyboard and mouse, including Apple’s wireless models. If your Mac doesn’t have a Bluetooth adapter, you can buy one that plugs into one of its USB ports.
The Bluetooth preference pane (Figure 9-23) lets you set up your Bluetooth adapter, set up devices, and configure Bluetooth file exchange.
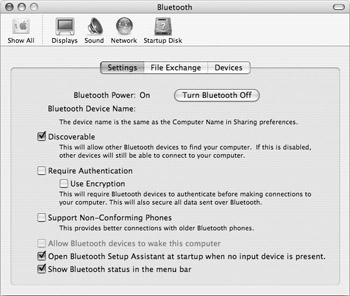
Figure 9-23: Set options for using Bluetooth devices in this preference pane.
The Bluetooth preference pane has three tabs:
-
Settings This tab lets you turn your Bluetooth device on and off, lets you choose if you want other devices to be able to discover it, lets you turn on authentication and encryption, lets you put a Bluetooth Menu Extra in your menu bar, and more.
-
File Exchange This tab lets you control how your system behaves when you exchange files using Bluetooth, and allows you to turn on browsing for other Bluetooth devices and choose a folder for them to browse.
-
Devices This tab lets you add, set up, and pair new Bluetooth devices.
Ink Preferences
Ink is a handwriting recognition technology that you can use with a graphic tablet. You can write on the tablet and the Ink technology converts your writing into text. The Ink preference pane (Figure 9-24) lets you configure Ink handwriting recognition and allows you to turn on and off gestures and create your own word lists for uncommon words.
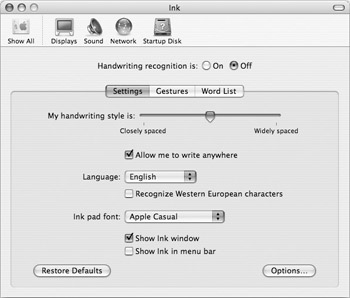
Figure 9-24: The Ink preference pane lets you configure handwriting recognition using a graphic tablet.
The Ink preference pane has three tabs:
-
Settings This tab lets you fine-tune your handwriting style, and choose the recognition language and display font as well as other options.
-
Gestures This tab lets you turn on and off gestures for punctuation, spaces, and other nonalphanumeric characters.
-
Word List This tab lets you add your own uncommon words to Ink’s recognition dictionary.
EAN: 2147483647
Pages: 171