Create DVDs with iDVD
If your Mac is equipped with a SuperDrive (an optical drive that can read and write both CDs and DVDs), you’ll be able to use Apple’s iDVD to create your own DVDs and put your videos and pictures in motion. Continuing with the tight integration of Apple’s digital media applications, iDVD lets you create slide shows of your iPhoto albums and video DVDs from videos you’ve edited with iMovie, and use your iTunes music to make soundtracks for them.
To start working with iDVD, click its icon in the Dock or double-click its icon in the Applications folder. iDVD will ask you if you want to create a new project or open an existing project. If this is your first project, click Create Project and enter a name for your project file.

Create Video DVDs
If you’ve used iMovie to create a video, the easiest way to create a video DVD with iDVD is to click the iDVD button in iMovie, and then click Create iDVD Project. This launches iDVD and imports all the files you need to create your video DVD.
| Note | iDVD limits you to 90 minutes of video. Even though a DVD can hold much more, Apple has applied this limit to keep a clear separation between iDVD, which is a free consumer application, and their commercial DVD Studio Pro. |
Click the Customize button to display the Customize drawer, and then click the Themes button and select a theme. See the “Create a DVD Menu” section later in this chapter to find out how to customize your theme’s menu.
You can’t make any changes to your movie in iDVD; all you can do is choose how it will be displayed, by choosing a theme and buttons and then burning it to a DVD. You can, however, put additional items on the DVD. You can add a slideshow by following the instructions in “Create Photo DVDs,” the next section of this chapter. Click the Slideshow button to add a slideshow entry in the menu, and add your photos as explained earlier.
You'll need a G4 or G5 Mac to run iDVD, and you'll also need a SuperDrive. However, as of version 3.01 of iDVD, you can run the program on any G4 Mac, even without a SuperDrive. Naturally, you won't be able to write your DVD if you don't have a SuperDrive, but you'll be able to author it and work on it, transferring it to a SuperDrive-equipped Mac when it's time to burn.
The easiest way to get iDVD onto a non-SuperDrive–equipped Mac is to connect it to another Mac with iDVD installed over a network, or using FireWire target mode (see Chapter 20). Copy the application to your Applications folder and you'll be able to use it.
You can include more movies on your DVD. If you want to do this, you’ll need to have finished QuickTime movie files. In the beginning of this section, I suggested you use iMovie’s buttons to transfer your movie project to iDVD, but this only works for your first movie. If you want to include several movies, export them from iMovie first so you have QuickTime movie files. Make sure to export them in Full Quality DV format. (See the “Export Your Video” section earlier in this chapter for more on formats.)
Click the Folder button to add a new folder to your DVD. Click its name, type a new name, and then double-click the folder name to open it. You’ll see a screen with the theme you’ve already chosen, but with no content.
Click the Customize button to display the Customize drawer, and then click the Movies button. Drag a movie into the main iDVD window to add it to the folder.
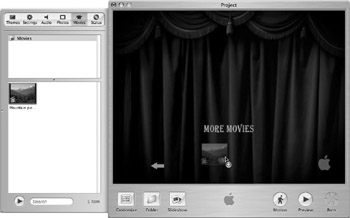
To return to the main menu, click the Back arrow.
You can add several movie files to a single folder, and you can add as many folders to your DVD as you want.
You can also add files to the DVD-ROM part of your DVD. Click the Customize button to display the Customize drawer, and then click the Status button. Click the pop-up menu and select DVD-ROM Contents. Drag any files you want into this list. These files will be accessible to any computer that can read the DVD. You could add, for example, the original movie and picture files from your DVD project so other users can copy them.
You should preview your DVD before you burn it. Click the Preview button, and your theme and menus display as they will in the final DVD. You’ll also see a controller that looks like a remote control. You can click any of the menu buttons on your menu and view their contents. Use the controller to pause, stop, or return to the main menu.
When you’re ready to burn your DVD—when you’re sure everything is perfect—click the Burn button, and then follow the instructions to burn the DVD. Make sure everything is just right before starting, though, because once you burn a DVD, you can’t change its contents, and DVD-R media is expensive.
Create Photo DVDs
It’s really easy to create photo DVDs using iDVD. Start by selecting a theme for your DVD. When you first open iDVD, it displays a default theme; a theme is a combination of a background, music, and fonts used for your menus. Click the Customize button at the bottom of the iDVD window to display the program’s Customize drawer. At the top of this drawer are several buttons. Click Themes to see the themes you can choose from.
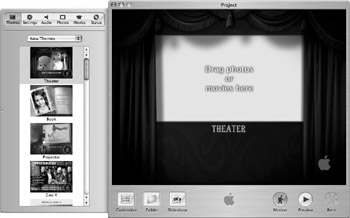
You can select Old Themes, New Themes, or All from the pop-up menu (future versions of iDVD may have other choices here), and then scroll through the available themes to make your choice. Click a theme to select it.
To create a photo DVD, click the Slideshow button on the iDVD window. You’ll see that a slideshow icon with the text “My Slideshow” has been added to the menu of your DVD in the main window. You can change this text to a more appropriate name by clicking the slideshow icon and then clicking the My Slideshow text. Type a new name for your slideshow.
Next, double-click this name to access the slideshow list and add photos.
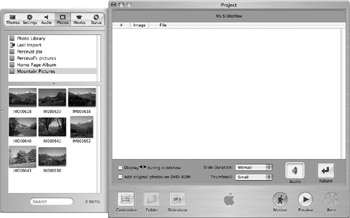
Click the Photos button to see a list of your iPhoto photo albums and Photo Library. If you already created photo albums in iPhoto, you can drag one or several of your albums to the slideshow list of the iDVD window. You can also drag individual photos from any album or from your iPhoto Library, up to a maximum of 99 photos. After you do this, the photos display in the iDVD window as thumbnails, with their names next to them.
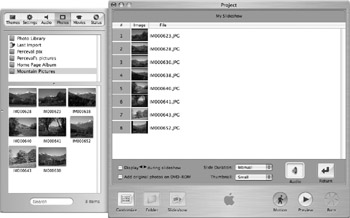
You can reorder the photos by dragging them to different positions; they display in the order shown in the main iDVD window. Select a duration from the Slide Duration pop-up menu.

You can add music to your slideshow, using digital music files in your iTunes Music Library. Click the Audio button, select a song, and drag it to the Audio well of the iDVD window.
You can see how your slideshow will look by clicking the Preview button. This displays your slideshow in the iDVD window.
| Note | iDVD converts your slideshow into video to display on a standard DVD player. If you want to include your original photos, check Add Original Photos on DVD-ROM. This means that other users will be able to copy your photos from the DVD to their computer if they want to. |
When you’ve added all your photos and music, you can burn your DVD by clicking the Burn button. Follow the instructions to create your DVD.
| Caution | DVDs created with an Apple SuperDrive should play in most DVD players, but you should test a DVD in yours first before you make too many. Apple has a list of drives they have tested at this page: www.apple.com/dvd/compatibility. While they haven’t tested all drives, you can at least find if they have tested yours and it doesn’t work. If your drive isn’t on the list, it still might be able to play SuperDrive DVDs. |
Create a DVD Menu
When you start watching a DVD on your TV, it always contains a menu. This is an opening screen, with a picture or video and with links you can click to start viewing the DVD’s content.
When you select a theme in iDVD, this theme is your menu. You can change the text it contains, add items to it, and add a photo or video to liven it up. Each theme has drop zones, places where you can add photos or videos to the menu.
You can select these items from the Customize drawer and drag them to these drop zones. Click Customize to display the drawer, and then click Photos. Select a photo and drag it to the drop zone, or click Movies and drag a video.
To change the theme’s title, just click its text and type your new text. To change the text for the buttons of any other content you add, such as a slideshow or a movie, just click the button and type some text. If you click the Settings button in the Customize drawer, you can change the button’s size, font, color, and more.
To add music to your menu, click the Music button and locate the song you want to use. Drag the song onto the main iDVD window. You won’t see any visual feedback, other than a plus (+) icon on the cursor, as you do this, but your music will start playing.
EAN: 2147483647
Pages: 171