Finding Fixing Problems
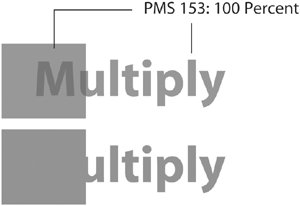
Finding & Fixing ProblemsInDesign provides a number of tools that are useful when you're playing "What's wrong with this picture?" before you send your job to the print service provider. Several tools help you spot problems visually, and the Preflight function provides a written report. Forensic ToolsPreview Mode (View > Screen Mode > Preview) simplifies your view of the document, hiding any nonprinting objects such as guides, frame edges, and hidden text characters so that you can concentrate on content. You can toggle the Preview mode among four states: Normal, Preview, Bleed, and Slug. But you can easily toggle between the two most common states, Normal and Preview, just by pressing the W key on your keyboard. In addition to simplifying your view, Preview mode will hide any images or other elements that have been assigned a nonprinting attribute in the Attributes palette (Window > Attributes). If you've set an object to nonprinting while you experiment with your design, its disappearance in Preview mode serves as a reminder to fix the attribute or delete the object. Overprint Preview (View > Overprint Preview) can be used to confirm that you've set objects to overprint. But perhaps more importantly, you can use it to catch common problems. For example, white objects set to overprint will disappear during output, and they'll disappear during Overprint Preview as well. Why is this? With rare exceptions, white in illustration and page layout just signifies "this is blank paperno ink prints here." The rare exception would be a literal white ink created for printing on metallic surfaces or clear substrates. What kind of a fiend would set a white object to overprint? Oh, nobody does it intentionally. It's usually the result of creating a black object, such as a logo, in a drawing program and then setting it to overprint. Subsequently changing the object's fill to white does not turn off the overprint attribute. Overprint preview also provides a more realistic representation of blending modes applied to spot-color objects. The default view mode in InDesign doesn't always correctly represent blending modes other than plain old Normal (Figure 12.35). Figure 12.35. It's impossible to have 200 percent of a single ink without a second printing plate. But if you create two objects with the same 100-percent spot fill, and then apply the Multiply blending mode (top), InDesign's display implies that the overlapping area will be darker. But turn on Overprint Preview (bottom), and the display tells the true story. Activating Overprint Preview turns on High Resolution Display, so you may experience slower performance in a graphics-heavy document. When you're finished using Overprint Preview, turn it off to speed up performance. Flattener Preview (Window > Output > Flattener Preview) uses red highlighting for text and vector content that may be rasterized during the output process (Figure 12.36). Notice the word may. During a direct export to PDF, InDesign CS and CS2 perform engineering feats to avoid rasterizing such content. However, when you select File > Print, both versions may be forced to rasterize vectors and text content that interacts with transparency. The Flattener Preview can't prevent rasterization, but it provides a visual warning. Use it as a guide as you modify stacking order and layering in a file. Figure 12.36. The Flattener Preview uses red highlighting (here, represented by black) to indicate potential text and vector rasterization. The Component Information dialog (Figure 12.37) provides a peek under the hood of your copy of InDesign, as well as a glimpse of a document's life story. In Windows, hold down the Control key as you choose About InDesign from the Help menu. On the Macintosh, hold down the Command key and choose About InDesign from the InDesign menu. Figure 12.37. The Component Information box provides details about the application itself as well as the currently active open document.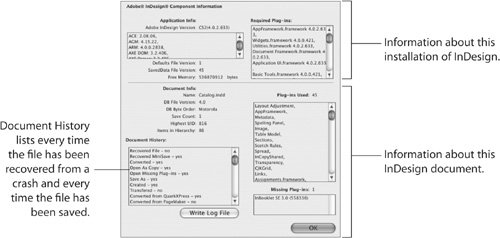 The top part of the dialog shows information about the current version of InDesign (Figure 12.37 shows version 4.0.2.633) and the active plug-ins. This may be useful if you need help from Adobe tech support, since you'll need to provide the current version and other environmental information when you call. The bottom part of the dialog displays information about the active InDesign document, including the very useful Document History, which constitutes a personal diary of the document. You'll see whether the document was converted from QuarkXPress or PageMaker, whether it's been recovered after a crash, and how many times it's been saved (including the versions and platforms in effect during the saves). Would you ever be this nosy about a file? Well, if it's neuroticcrashing frequently or just plain acting strangetake a look at the Document History. If the file has had a traumatic childhood, it may be worth exporting it to InDesign Interchange as a purification ritual. Then, open the Interchange file and make a new start. Info PaletteOften overlooked, the Info palette (Window > Info) provides valuable information about image and text content (Figure 12.38). Select an image frame, and the Info palette displays color space such as RGB, CMYK, or grayscale, along with the effective resolution in ppi. Effective resolution is the actual resolution of the placed image, which is a product of the original scanned resolution and any scaling. For example, a 300 ppi image scaled to 200 percent in InDesign has an effective resolution of 150 ppi, which would be inadequate for standard 133150 lpi printing. Figure 12.38. The Info palette shows the color space and resolution of a selected image (left) and alerts you if there is overset text for a selected story (right). Numbers after the plus sign indicate overset text.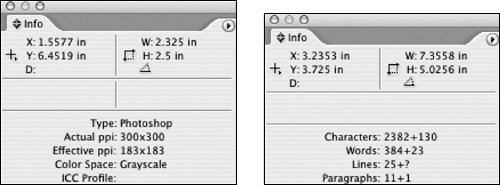 You can click a text frame, and the Info palette will tell you if there is overset text at the end of the story, even if the end is many pages downstream. In Figure 12.38, the entry "Words: 384+23" indicates that there are 23 words in overset text. Preflight and PackageThe preflight features in InDesign (File > Preflight) aren't quite as intensive as those in dedicated preflight applications such as Markzware's FlightCheck. But using the built-in preflight routine can ensure that you catch problems before sending the job out (Figure 12.39). Figure 12.39. Preflight warns you of problems such as missing images and fonts. Here, it highlights an RGB image and also indicates that the image's resolution is only 150 ppi.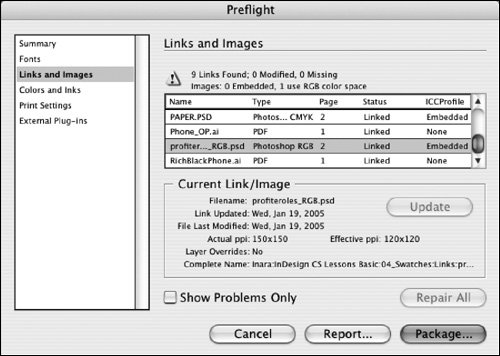 InDesign's preflight uses triangular yellow caution icons to alert you to missing images and fonts as well as RGB images. However, it isn't blatant about mentioning image resolutionthere are no yellow triangles, and there's no way to set up the preflight process to flag images below a certain resolution. You're on your own there. If you're concerned that you might overlook problemsor if you need to preflight multiple filesconsider using one of the preflight utilities from Markzware, such as FlightCheck Studio or FlightCheck Designer. InDesign's Package function (File > Package) copies all necessary fonts and art files into a folder for job submissionunder most circumstances. However, if you're using Multiple Master fonts, you'll have to manually package any font instances you've created, because InDesign packages only the parent font. For example, if you've created and used Myriad MM 700 BD 600 NO, InDesign packages only the Myriad MM. While Multiple Master fonts were a great concept, this sort of challenge may inspire you to avoid them. If you've created any text layers in Photoshop and placed the image as a native PSD into InDesign, fonts will not be packaged. It's preferable to save such images as Photoshop PDF files anyway, since fonts can be embedded, and vector edges remain sharp when imaged from Photoshop PDFs placed in InDesign. |

EAN: 2147483647
Pages: 132