Resolution and Image Fidelity
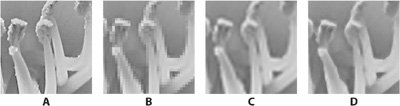
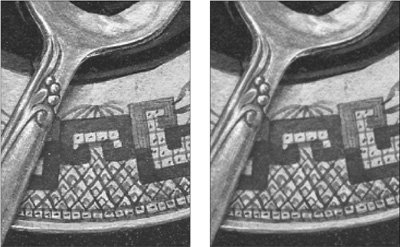
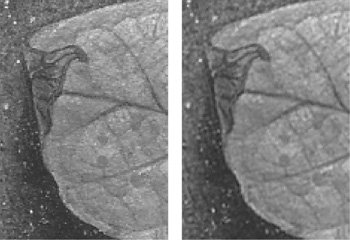
| The resolution of an image is generally measured in pixels per inch (ppi) unless you speak metric, in which case it's expressed in pixels per millimeter. Determining the proper resolution for Web images is simple: 72 ppi at final size. But there are strongly held (and hotly debated) beliefs regarding the appropriate image resolution for printing. Some hold that 150 percent of the final screen ruling value is sufficient, and some believe twice the final ruling is preferable, largely because it's easier to calculate the resolution. For example, an image that will be printed at 150 line screen should have a resolution of 300 ppi. When typical hard drives held 80 MB, networks were glacially slow, and RIPs choked on 15 MB PostScript files, it was important to trim off every little bit of fat, so we agonized over resolution. But now, with hard drives measured in hundreds of gigabytes, and RIPs with much more robust digestive tracts, we can afford the luxury of a few extra pixels. That said, there's rarely an advantage to exceeding 300 ppi, even for higher line screens such as 175 lpi printing. So put away the calculator. For most circumstances, 300 ppi at final size is adequate and provides a bit of elbow room if you have to slightly reduce or enlarge an image. Scaling UpWhen enlarging or reducing an image, consider the pertinent word in the previous paragraphyou may slightly reduce or enlarge an image. When an image is scanned or captured by a digital camera, the number of pixels contained in that image is fixed. As long as the original digitizing process netted sufficient pixels for your intended use, fine. But when you enlarge an image in an image-editing application such as Photoshop, you're attempting to generate missing information, a process called interpolation. This interpolation process works reasonably well (considering that you're asking it to make something out of nothing), but the result is never as good as a proper-sized original scan. And the more drastic the transformation, the less satisfying the outcome (Figure 4.2). Figure 4.2. You can't truly make something from nothing. Notice the loss of detail in the scaled-up versions.A: Original 300 ppi scan B: Original 72 ppi scan C: Results of increasing resolution of B to 300 ppi D: Results of increasing resolution of B to 300 ppi by using a specialized fractal-based scaling plug-in to enhance the results Because of the limitations imposed by resolution, it behooves you to anticipate how the image will be used and to set your scan percentage accordingly. For typical image content, you can probably scale up to 120125 percent. If the image is background content without much detail, such as a soft-focus landscape or a gauzy sunset, you have more leeway and you can probably get away with scaling up to 150200 percent. Conversely, if you need to maintain very small details, you may be limited to less than 120 percent. Scaling DownRemember that scaling down also requires interpolation. While the loss of data may not be quite so obvious when you reduce the size of an image, there will be some softening of detail (as shown in Figure 4.3), so it's still best to plan ahead, and make your initial scan as close as possible to the dimensions at which you intend to use it in a page-layout program. Generally, if you find it necessary to scale an image down below 5075 percent in your page layout, consider rescanning. And, as with enlargements, try to use an even scaling factor, such as 120 percent rather than 119.6954 percent. Figure 4.3. Surprise! Even scaling down an image can slightly soften detail. The image on the left was scanned at 25 percent. The image on the right was scanned at 100 percent, and then scaled down to 25 percent. If detail is important, it's better to scan to the correct final size. Planning AheadNow that you're terrified to scale an image up or down, what is the safe path? If you do your own high-resolution scans, and you anticipate doing a lot of experimentation with image size as the design develops, you might consider just doing quick-and-dirty FPO (for position only) scans to start. Since such images are meant to be used only as placeholders, they can be low resolution (72100 ppi). Build and tweak the design, scaling images as you wish. Then, when the layout is finalized, note the image scale factors, do the final scans to size, and replace the FPO images with the real scans. (Digital photographs are discussed shortly.) Alternatively, if you want to do all your scanning at one time, but still would like some flexibility in scaling, scan one large and one small version of each image at the outset and work with those. If you rely on the print service provider to perform scanning, the responsibility may be on their scanner operator's shoulders, not yours, depending on the workflow. Previously, when desktop scanners produced considerably lower-quality scans than those of service providers, there were two common approaches to placing scans. In one approach, the printer was given transparencies and an indication of scan size, usually via markings on the transparency sleeve (since there still had to be some notion of final size, however sketchy). The printer then provided low-resolution FPO scans to be used in designing. When the job was submitted, the printer substituted the high-resolution images for the FPOs. This approach is still used frequently in catalog production, since it's saner for the print service provider to color-correct and manage the large repositories of images that are used in multiple publications. This low-resolution/high-resolution swap is usually referred to as OPI (Open Prepress Interface), Automatic Picture Replacement (APR, a Scitex solution), or just plain image swap. It's a bit more complicated than simply reducing the resolution of the images used as FPO scans. In these image-replacement workflows, the low-resolution images contain internal PostScript comments that identify them as low-resolution versions of particular images. Special server-based processes are required to perform the high-resolution substitution when the job is imaged. Because the high-resolution scans have already been done, it's advisable to avoid scaling images outside the standard 75-125 percent range in your page layout. If your design demands scaling beyond those limitations, let the print service provider know. They may need to rescan the image, and then supply you with a new low-resolution placeholder image for best results. Note There is a significant issue to be considered when using OPI/ APR workflows for work incorporating transparency, such as that available in Adobe InDesign or QuarkXPress 7.0. The short story is that high-resolution final images need to be in place in layouts when the job is imaged or exported to PDF. If your printer is supplying OPI-based, low-resolution images to you, ask them to advise you of the best way to approach this issue. It doesn't mean you can't use transparency. It just means some special handling may be required. For an extensive discussion of transparency in InDesign, see Chapter 12, "InDesign Production Tips." The second approach is to do your own FPO scans, resizing to your heart's content in a page-layout application. Supply the transparencies and other art (such as reflective prints or original artwork) to the print service provider with 100-percent-sized printouts of your job, and let them do the scans and image replacement. In both of these scenarios, it's important to note that you can't do anything useful to the low-resolution FPO images themselves. Any retouching, color-correction, compositing, or silhouetting would have to be re-created on the high-resolution scans, thus wasting any work performed on their low-resolution representations. Digital PhotographsAs digital photography displaces film-based work, the prepress workflow may change a bit, but the basic rules are still the same. Photographers who formerly supplied transparencies are increasingly providing digital images, which eliminates the scanning step. While direct digital images lack the visible grain that would be apparent in extreme enlargements of transparencies, they're still subject to showing visible pixels when enlarged beyond the recommended 125 percent mark. Since there is no film original to rescan, and it's rarely feasible to reshoot, try to avoid any extreme enlargements with purely digital shots. Or at least be prepared to deal with the pixelated consequences. Fractal enlargement plug-ins such as Genuine Fractals from onOne Software may give you slightly better results with extreme enlargements, but they can't miraculously transform a tiny, low-resolution scan to something appropriate for a magazine cover. Nothing beats a healthy original image, chock full of detail. Cropping and Transforming ImagesIt would be great if you could anticipate the exact size, crop, and angle at which you'll want to use an image in your page layout. But it's difficult to see that far down the line at the moment you're slipping a transparency under the lid of your flatbed scanner. Oh, and watch out for that little gust of wind that comes along just as you're putting the lid down. . . CroppingShould you crop your images during scanning? Maybe. You probably should crop if you're fairly certain about future image use. Leave a reasonable rind around the image area you intend to use, to provide some elbow room when you place the image in the final page. However, if you think you'll want to crop the image more generously in the near futuremaybe you're not sure if you might want to show a row of four buildings instead of just the one in the middlethen it's worth scanning the whole shebang. But don't feel compelled to scan an entire image just to get the two-inch golf ball that you're going to silhouette anyway. Rotating ImagesAlmost any transformation, whether resizing or rotating, will require interpolation of pixel information. The only safe rotations are 90-degree incrementsanything else will result in softening of detail (see Figure 4.4). Think of those rows and columns of pixels, much like the grid of a needlepoint pattern. Imagine what a challenge it would be to redraw that pattern at a 42-degree angle. It should give you a little sympathy for the math Photoshop has to do. Figure 4.4. Rotation at anything other than 90-degree increments degrades detail. An image scanned at the correct angle (left) is sharper than an image rotated 42 degrees after scanning (right). All these cautions about transforms such as scaling and rotating are not intended to strike terror in your heart. Don't be afraid to enlarge, reduce, or rotate if you need to. Just be prepared for the unavoidable loss of detail and the degradation of the image's appearance. Try to resize in even increments, and beware of oblique rotations such as 1.25 degrees in the interest of maintaining as much information as possible. Successive transformationsscaling and then rotating, for exampleare particularly destructive. Let your conscience be your guide. How important is the detail in the image? If it's a key product shot, it's worth rescanning (if possible). If it's a less important image, such as a ghosted background or a decorative bit, you needn't feel quite so guilty about the transformation. Where to Transform: Image Editor versus Page Layout ApplicationIf you are going to transform digital images, does it matter where the transformation takes place? If you use Photoshop to scale an image, is the result superior to the outcome of scaling within your page-layout application? The answer is an unqualified, "It depends." If you perform your scaling and rotation in Photoshop or another image-editing application, and then place the resulting image in a page layout at 100 percent with no rotation, you do have a pretty good idea of how the finished piece will look. If, however, you induce the scaling or rotation in a page layout, you've only requested those transformations. They don't really take place until the job is processed by the RIP. This adds a bit to the processing time and job complexity at the RIP, and it also puts you at the mercy of that RIP's implementation of scaling and rotation algorithms. Even if you generate and submit PDFs, the transformations within that PDF are still pending, and they are implemented only when the PDF is processed by a RIP. Be comforted by the fact that late-model RIPs can chew a lot more information in a shorter time than they used to. Rotating a few images here and there won't prevent the processing of your job. However, despite the improvements in RIP technology, it is still possible to build a job that can't be processed by a RIP. (Please don't take that remark as a personal challenge.) Keep in mind, too, that if you've rotated an image in Photoshop, and then subsequently applied additional scaling or rotation in a page layout, you've transformed it twice. It's not the end of the world, but you may see some slight softening of detail in the finished piece. |
EAN: 2147483647
Pages: 132