The Formula Workshop
 |
| |||||||||
The Formula Workshop is a new feature of Crystal Reports 9. It is the master container for all other formula-related activities. Figure 4.5 shows the Formula Workshop displayed with the Workshop Tree and New button options visible. Some features of the Formula Workshop are as follows:
-
The gray background is the default display; if a formula is selected, the Formula Editor displays in place of the gray background.
-
The Workshop Tree is initially docked to the left border of the Formula Workshop and is not labeled.
-
All windows in Formula Workshop are dockable or floatable.
-
The Workshop Tree can be dragged off the border to float anywhere on the screen.
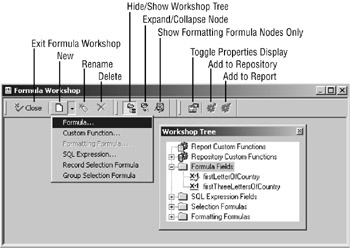
Figure 4.5. The Formula Workshop and the Workshop Tree
The buttons at the top of the Formula Workshop help you navigate and customize the Formula Workshop interactively.
Close This button exits you from the Formula Workshop and all open windows within it. If there are unsaved changes, you’ll be asked if you want to save the changes before exiting. If you elect to save your changes and are editing a formula, the code is checked for syntax errors. If there is an error in the code, Crystal notifies you that there is an error and asks if you want to save it anyway; this is a great new feature of Crystal Reports 9. In prior releases, if there was an error in the code, you had to correct it before exiting or delete the code before exiting. Now you can save your work as is and come back to it later.
| Note | The word syntax refers to the rules of a programming language that govern the structure of statements and commands. New Use this option to create new formulas, custom formulas, formatting formulas, SQL expressions, record selection formulas, and group selection formulas. When you click the New button directly, a window for a new object of the type that is selected in the Workshop Tree opens. If you click the drop-down arrow to the left of the button, a menu displays and lets you choose the type of Formula object to create at that point. Right-clicking the selected object in the Workshop Tree also displays a menu that contains the New menu item. Rename This option opens the Formula Name window and allows you to rename the currently selected Formula object. You can also right-click the selected object in the Workshop Tree to rename an item. Delete Use this option to delete the currently selected Formula object. You can also right-click the selected object in the Workshop Tree to delete it. Hide/Show Workshop Tree This toggle button option displays or hides the Workshop Tree window. If you click the button to show the Workshop Tree, it displays in whatever docked or anchored position it was in when it was hidden. Expand/Collapse Node This option expands and collapses selected nodes or multiple selected nodes in the Workshop Tree. This option has no effect if no category or element in the Workshop Tree is selected. Show Formatting Formula Nodes Only This option toggles the expansion of the Report objects in the Formatting Formulas category in the Workshop Tree. Notice the difference between Figure 4.6 and Figure 4.7. When the nodes are expanded, you can select a node and click the New button to create a formatting formula; this option appears grayed out in Figure 4.5 and becomes available when a report node is selected. |
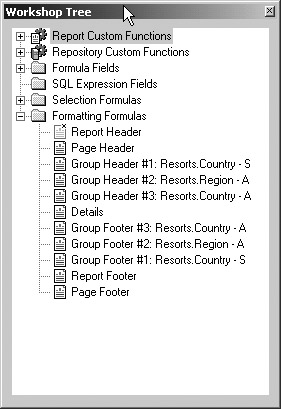
Figure 4.6. Formatting Formula folder without all nodes displayed
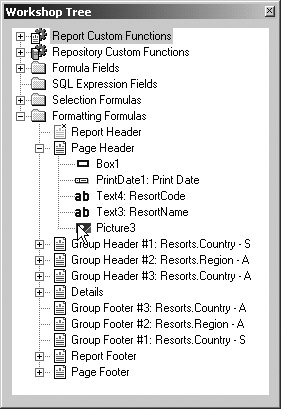
Figure 4.7. Formatting Formula folder with all nodes displayed
When you click the New button with a report node selected, the New Formatting Formula dialog displays. The options in the list of formatting commands vary depending on which section or report element was selected when the New button was clicked. Figure 4.8 shows the dialog for the formula coding opportunities for the Report Header section, and specifically the New Page After option is selected. Any code written here is also accessible through the X+2 button in the application area of Crystal, which in this example is the Section Expert X+2 New Page After check box shown in Figure 4.9. See Chapter 8, “Customizing Sections,” for more ideas on how to control section behavior and use the Section Editor.
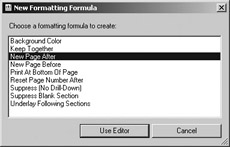
Figure 4.8. New Formatting Formula
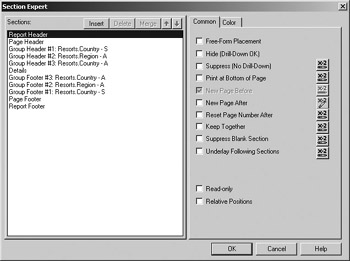
Figure 4.9. Section Expert New Page After option button indicating code with a different icon.
Selecting the Use Editor button on the New Formatting Formula dialog opens the Formula Editor window; at this point, you code a conditional formula that evaluates to True in order to force the behavior selected in the formatting option list.
Toggle Properties Display When you are working on a custom function, this button toggles between the editor and the Properties windows. See the section “Crystal Custom Functions” for more information on working with custom functions.
Add to Repository Use this option to add the currently selected object to the centralized Crystal Repository. For more information on how the repository works, see Chapter 5, “Working with the Crystal Repository.”
Add to Report This option is available when you select an object in the Repository Custom Functions category of the Workshop Tree. Selecting this option adds the selected function to the report. This results in a change in the Workshop Tree to copy the function from the repository into the Report Custom Functions area. Figure 4.10 shows the SixSigma Repository function after being added to the report. Notice the symbol to the left of the function name; in the report, it has the gear symbol plus a connection pipe symbol, while in the repository it has only the gear symbol.
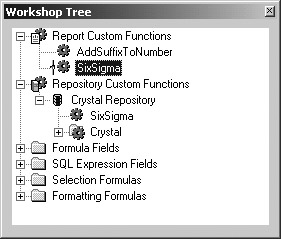
Figure 4.10. Adding a Repository function to the report
The Workshop Tree
Within the Formula Workshop, the Workshop Tree is a centralized area to access code for any existing Report objects as well as code new Formula objects. Figure 4.11 shows the completely expanded Workshop Tree with access to Report Custom Functions, Repository Custom Functions, Formula Fields, SQL Expression Fields, Selection Formulas, and Formatting Formulas.
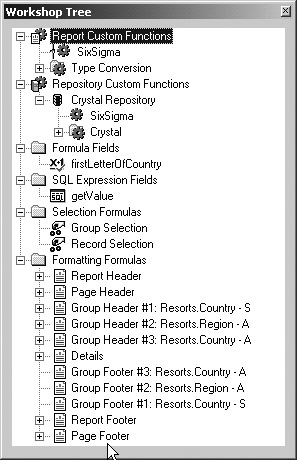
Figure 4.11. The complete Workshop Tree
Formulas Accessed from the Workshop Tree
The category folders for formulas in the Workshop Tree represent most of the formulas you’ll use in Crystal Reports. You can think of the Workshop Tree as a central portal to help keep you organized and quickly edit formulas. Let’s take a quick look at what the general category of formulas does in Crystal Reports.
Report Custom Functions Custom functions are code modules that can be stored at the report level and called by any other formula within the report. Custom functions are a new feature to the Crystal family. The functions are reusable within a single report.
Repository Custom Functions Custom functions can be stored in the Crystal Repository. This enables them to be shared with other reports. The functions are reusable across multiple reports. The Crystal Repository is a new feature in Crystal Reports 9.
Formula Fields Formula fields are fields that exist in the report, are given a name, and calculate a value that is used within the report for display purposes or as interim values for use in other calculations.
SQL Expression Fields SQL expressions are calculations performed at the database level using the functions and commands of the Structured Query Language. In the Formula Editor, the Function Tree and the Operator Tree display SQL-related functions and operators instead of Crystal functions and operators. For a background on the components of a SQL command, refer to Chapter 11, “Using SQL in Crystal Reports.”
Selection Formulas Selection formulas in Crystal refine the data brought back from the data source or displayed in the report. Record-selection formulas limit the set of data that is available to Crystal, while group-selection formulas suppress groups of data at a time.
Formatting Formulas Do you want to set alternate line colors for every record in the Details section? How about forcing a new page before each group? These kinds of things are done with formatting formulas. Formatting formulas can change the look and behavior of a report element. A new feature in this release of Crystal Reports is the ability to access all formatting formulas from a central place in the Workshop Tree.
| Note | In earlier releases of Crystal Reports, all formatting was done through the report element editors (e.g., the Field Editor). |
Formulas Not Accessed through the Workshop Tree
While access to many formulas in Crystal Reports is provided through the centralized Workshop Tree, there are still a few formula areas that are not in the Workshop Tree.
Running Total Fields
Running total fields are used to accumulate values that aren’t captured in Crystal’s built-in summary operations. These fields are created from the Field Explorer, not the Workshop Tree. Let’s say, for instance, that you wanted to count all five-star resorts in Canada with sales figures that meet a specified threshold value. Since this involves multiple fields and business logic to determine which resorts to include, none of the built-in summarization or methods will work and a running total would be used instead. Refer to Chapter 6, “Summarizing Information,” for more information on running totals.
Searching for Data in a Report
There is one additional place where formulas can be coded in Crystal Reports that is not accessible from the Workshop Tree: the Search Expert. This expert is used to find data in a report and is therefore available only in Preview mode. You can access it through a toolbar icon or by choosing Edit > Find on the menu. A simple Find dialog is shown in Figure 4.12, with the word “Cancun” being looked for in the report. To open the Search Expert, click the Advanced Find button.
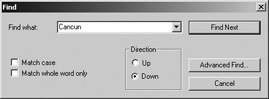
Figure 4.12. The Find dialog
The Search Expert opens in a rather dreary mode, as shown in Figure 4.13, but once you click the New button, you have access to all the fields in the report and group information to build a condition clause. You can build criteria to search for a value in a particular field, for instance, checking to see if a City field contains “Cancun,” which is a more refined search than simply looking for it generally in the report. Figure 4.14 shows a search involving “Cancun” once again, but this time the search is limited to looking for data values in the City field. The formula used to generate the search appears at the bottom of the dialog (or is hidden until you click a Show Formula button). You have full access to the Formula Editor at this point to write a customized data search.
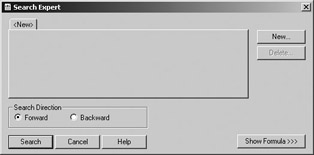
Figure 4.13. The Search Expert
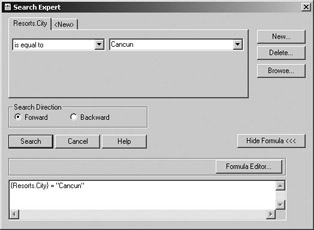
Figure 4.14. Using conditions in the Search Expert
Creating Formulas in Crystal Reports
Crystal Reports 9 provides three ways to create formula code:
-
The Formula Editor
-
The Formula Expert
-
The Formula Extractor
The Formula Editor will be familiar to veteran users of Crystal Reports and provides a complete environment for coding a formula. The Formula Expert is a new feature in Crystal Reports 9 that adds a non-coding interface to the creation of formulas by basing a new formula on an existing custom function. Likewise, the Formula Extractor builds a new function based on an existing function in a fill-in-the-blanks type of screen. (Crystal doesn’t actually call the Extractor tool “the Formula Extractor,” but we’ll take a leap here and refer to it by that name as all the window labels use wording like “Extract Custom Function from Formula.”)
We’ll introduce each interface in this section, and then later we’ll code a custom function from scratch in the Formula Editor and revisit that function with the Formula Expert and the Formula Extractor.
The Formula Editor
The Formula Editor, shown in Figure 4.15, is a place to type code, check it, use built-in functions and operators, and access fields on the report or in the data source. All code is written in the bottom part of the window. The buttons along the top, described below, help perform the tasks involved in creating and editing formulas.
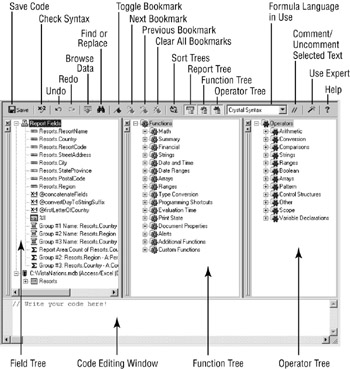
Figure 4.15. The Formula Editor
Save Code After making code changes in the editing window, use this button to save the changes. If there is an error in the code, a dialog message will prompt you to see if you want to save the code anyway. Saying “Yes” saves the code even though there is an error in it so that you can come back and figure out the problem later. Saying “No” leaves you in Edit mode for the formula and displays a message providing general information about the error.
Keyboard shortcut: Alt+S
Check Syntax This button checks the syntax of the code in the editing window for correctness. Any typing errors related to language syntax will be caught at this point; logic errors in your code, however, will not be caught. If Crystal finds an error, it attempts to put the cursor in the vicinity of the error. If it finds no errors, a dialog happily reports this wonderful event.
Keyboard shortcut: Alt+C
Undo This button reverses any typing recently performed in the editing window.
Keyboard shortcut: Ctrl+Z
Redo Reapplies any typing that was previously reversed using the Undo button in the editing window.
Keyboard shortcut: Ctrl+Shift+Z
Browse Data This option is active when a report field or database field is selected in the Field Tree, and it displays a scrollable dialog showing sample values in the field.
Keyboard shortcut: Alt+B
Find or Replace Use the Find option to search for and/or replace words and phrases within the Field Tree, Function Tree, Operator Tree, or edit code window. Figure 4.16 shows a search for the word “If” in the edit code window.
Keyboard shortcut: Ctrl+F
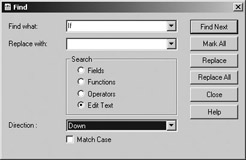
Figure 4.16. Finding things in the Formula Editor
Toggle Bookmark Bookmarks are small, blue, rounded rectangle markers that can be placed to the left of a line of code in the edit code window. Use the bookmark feature to mark an area of code that you want to come back to later in the editing session of a long formula. All bookmarks are automatically cleared when the editing window is closed.
Keyboard shortcut: Ctrl+F2
Next Bookmark Use this option to navigate to a bookmark that appears below the line of code that currently has the focus. This option is unavailable when bookmarks are not being used.
Keyboard shortcut: Ctrl+Alt+F2
Previous Bookmark Use this option to navigate to a bookmark that appears above the line of code that currently has the focus. This option is unavailable when bookmarks are not being used.
Keyboard shortcut: Shift+F2
Clear All Bookmarks This option removes all bookmarks interactively. This option is unavailable when bookmarks are not being used.
Keyboard shortcut: Ctrl+Shift+F2
Sort Trees When one of the three tree windows at the top of the Formula Editor has focus, using this option sorts the category list in alphabetical order or back to their original order.
Keyboard shortcut: Alt+O
Field Tree This option toggles the Field Tree window open or closed. You can also right-click the background of the Tree window to display a submenu from which you can select the Hide option to close the window.
Keyboard shortcut: Alt+F
Function Tree This option toggles the Function Tree window open or closed. You can also right-click the background of the Tree window to display a submenu from which you can select the Hide option to close the window.
Keyboard shortcut: Alt+U
Operator Tree This option toggles the Operator Tree window open or closed. You can also right-click the background of the Tree window to display a submenu from which you can select the Hide option to close the window.
Keyboard shortcut: Alt+P
Syntax Use the drop-down list shown in Figure 4.17 to choose between Crystal Syntax or Basic Syntax. The code in the edit window is checked for correct syntax against whichever language is chosen in this drop-down box. You can set a global default for your formula language choice by choosing File > Options, choosing the Reporting tab, and setting the Formula Language at the bottom of the tab. Keyboard shortcut: Ctrl+T
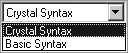
Figure 4.17. Choosing the formula language in the Formula Editor
| Warning | Switching from one language to another in the Formula Editor does not automatically update the code in the edit window; you must correct the lines of code manually for the formula language chosen. Comment/Uncomment Selected Text After selecting a block of code (one line or multiple lines) in the edit code window, use this button to comment or uncomment the entire block. If Basic Syntax is the formula language in effect, each commented line of code is prefixed with a single quote (‘), while when Crystal Syntax is being used, each line of commented code is preceded with two forward slashes (//) to signal that the code following the symbols will not execute. Use this option when you have a block of code that is not working properly and you want to debug it but leave it intact. Keyboard shortcut: Alt+M |
| Tip | You can also use this button to comment out blocks of code as a formula changes during its lifetime; it’s a good idea to preserve old versions of the code by commenting out but never deleting the original code. Use Expert This button toggles from the Formula Editor to the Formula Expert when a custom formula is being edited. Keyboard shortcut: Alt+X |
| Warning | If the current formula is not a custom function, using this option will delete all the code in your Formula Editor editing window and then open the Formula Expert. Help This option opens the Crystal Reports help file to an area that provides help specifically for the Formula Editor. If the help file is already open and minimized, clicking this button will redisplay the help file. If the help file is open but not minimized, nothing will happen onscreen, so you’ll need to switch on the help window manually to give it focus. Keyboard shortcut: Alt+H |
Earlier in this chapter in Table 4.1 we provided definitions for three components of a formula:
Variable A named placeholder whose value can change; a variable references a storage location in a computer’s memory.
Constant A named placeholder whose value does not change; a constant references a storage location in a computer’s memory.
Operator Specifies the type of calculation to be performed on the values to either side of the operator.
With these abbreviated definitions in mind, examine the three windows at the top of the Formula Editor in Figure 4.15 and map the above definitions to the windows and what is being provided in each window:
-
Field Tree
-
Function Tree
-
Operator Tree
You can drag and drop each of the Tree windows to reposition it as well as close it using the X button in its window. The Tree windows can be free-floating, by right-clicking on the window and unselecting allow docking, or they can be docked to the top, bottom, or sides of the Formula Editor, if the Allow Docking Option is selected (which it is by default). Click the arrow button in each Tree window to toggle that window to full-screen mode or back to its opening size.
The Field Tree
The Field Tree represents the field variables currently in the report. The value of a field variable can change for each record in the database. The Field Tree also provides access to all of the fields within the data source, not just the ones on the report. In Figure 4.15, shown previously, the Report Fields branch is completely expanded while the C:\VistaNations.mdb branch is collapsed. You can tell from the latter branch what type of connection was made, and you can expand it to access all tables and fields available to the report through the data source. Report fields and database fields are variables in a Crystal report. You can also create one more kind of variable in Crystal: a temporary variable. Temporary variables are named values in your code that are used within a block of code and discarded when the code returns its final value to the report. As we discussed earlier, in reporting average temperatures when converting from Fahrenheit to Celsius, the following code uses temporary variables:
Average = TotalTemperatures / NumberOfValues
TotalTemperatures and NumberOfValues are both temporary in the sense that they collect values during the life of the formula, and when the Average value is returned to the report, computer memory for storing TotalTemperatures and NumberOfValues is released and the variables no longer exist.
There is an additional concept relevant to variables, and that is the concept of scope. The scope of a variable determines when and where the variable can be used. Crystal Reports supports three types of variable scope:
Local The variable and its value exist only during the life of the function and then go away. The computer memory associated with the variable is given back to the general memory pool for reuse.
Global The variable and its value exist for the life of the report; when a report is closed, all computer memory associated with the variable is returned to the general memory pool for reuse.
Shared Shared variables allow data values to be passed between a Crystal subreport and a Crystal main report. This is the only mechanism for sharing data between a subreport and a main report. For more information on subreports, refer to Chapter 6.
The Function Tree
The Function Tree provides categorized access to all the built-in functions in Crystal Reports as well as any custom functions that are stored in the report; the lists are slightly different for Crystal Syntax versus Basic Syntax. Double-clicking a function name in the Function Tree adds it to the code editing window. Each category in a tree can be expanded or collapsed, and the calling syntax for the function is shown as well. Figure 4.18 shows a few of the Math functions with the Truncate function expanded to display two ways to call the function: with one argument or with two.
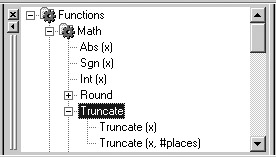
Figure 4.18. Expanding and collapsing categories in the Function Tree
In addition to double-clicking a function name to add it to the editing window, the new Keyword Auto Complete feature in Crystal Reports 9 lets you quickly add functions while typing in the code editing window. Press Ctrl+spacebar to activate the Keyword Auto Complete tool, which shows a list of function names that match what you’re typing. Type as little or as much of the function name as you know, and then press Ctrl+spacebar to see similar functions based on what you typed. Figure 4.19 shows the result of typing the characters “Le” and then pressing Ctrl+spacebar; the selection window shows the built-in functions Left and Length. If nothing is typed when you press Ctrl+Space, an alphabetized list of applicable functions displays, as shown in Figure 4.20.
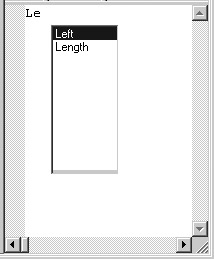
Figure 4.19. Function Keyword Auto Complete with a typed value
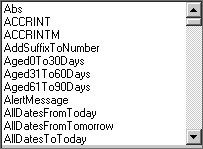
Figure 4.20. Function Keyword Auto Complete without a typed value
Double-clicking an item in the list presented by Keyword Auto Complete copies the function name into the code editing window.
| Note | Examples of how to use the function are found in the help file, but you do need to search on the function name to find them. There are no F1 or context-sensitive help jumps based on function names. |
The Operator Tree
The Operator Tree, shown previously in Figure 4.15 in the top-right window, is a categorized list of operations that can be performed on data. Operators can be mathematical, such as addition, or string-based, such as concatenation, or even logically based, such as the operators AND and OR. The categories of operators determine the type of data that will be processed by the operator. Operators are known as either unary operators or binary operators. A unary operator works on one piece of data; a binary operator works on two pieces of data, one on either side of the operator. The concatenation operation we mentioned earlier uses the plus sign as a binary concatenation operator; it joins the two strings on either side of it, as shown here:
"Name: " + {table.LastName} + ", " + {table.FirstName} A special operator used in all programming languages is the assignment operator. Its purpose is to take the value from the expression on the right and store that value in the memory location referenced by the identifier on the left; here’s an example in Basic Syntax that takes the text string Miller and stores it in the memory location referenced by the identifer lastName:
lastName = "Miller"
The syntax for the assignment operator is slightly different in Crystal Syntax, with a combination of a colon and an equal sign being used in place of the single equal sign:
lastName := "Miller"
Table 4.2 lists the operators and the syntax for each. As with functions, the list of operators supported and their syntax may differ slightly from Crystal Syntax to Basic Syntax. Neither language is case-sensitive, so the syntax is shown using the same case for both languages.
| Operator Name | Crystal Syntax | Basic Syntax |
|---|---|---|
| Assignment | := | = |
| Add | x + y | x + y |
| Subtract | x - y | x - y |
| Multiply | x * y | x * y |
| Divide | x / y | x / y |
| Integer divide | x \ y | x \ y |
| Percent | x % y | Not supported |
| Modulus | x mod y | x mod y |
| Negate | -x | -x |
| Exponentiation | x ^ y | x ^ y |
| To currency | $x | Not supported |
| Equal | x = y | x = y |
| Not equal | x <> y | x <> y |
| Less than | x < y | x < y |
| Greater than | x > y | x > y |
| Less than or equal to | x <= y | x <= y |
| Greater than or equal to | x >= y | x >= y |
| Concatenate | x + y | x + y |
| Concatenate | x & y | x & y |
| Subscript | x[y] | x(y) |
| In string | x in y | x in y |
| Insert Empty String | "" | "" |
| In range | x in y | x in y |
| Make range | x to y | x to y |
| Left endpoint excluded in range | x_to y | x_to y |
| Right endpoint excluded in range | x to_y | x to_y |
| Both endpoints excluded in range | x_to_y | x_to_y |
| Up to | upTo x | upTo x |
| Up to but not including | upTo_x | upTo_x |
| Up from | upFrom x | upFrom x |
| Up from but not including | upFrom_ x | upFrom_ x |
| Range less than | Is < x | Is < x |
| Range greater than | Is > x | Is > x |
| Range less than or equal | Is <= x | Is <= x |
| Range greater than or equal | Is >= x | Is >= x |
| Not (logical) | Not x | Not x |
| And (logical) | x and y | x and y |
| Or (logical) | x or y | x or y |
| Xor (logical) | x xor y | x xor y |
| Eqv (logical) | x eqv y | x eqv y |
| Imp (logical) | x imp y | x imp y |
| Make array | [x,…] | Array (x,…) |
| Subscript array | x[y] | x(y) |
| In array | x in y | x in y |
| Redim array | Redim x[n] | Redim x(n) |
| Redim preserve array | Redim preserve x[n] | Redim preserve x(n) |
| Starts with (text pattern) | x startsWith y | x startsWith y |
| Like (text pattern) | x like y | x like y |
| Note | The Crystal documentation states that while an operator might be supported in both languages, one syntax might be preferred when using Crystal Syntax and another might be preferred when using Basic Syntax. We believe that you should try to keep things simple when writing code and if an operator works the same in both languages, use the common operator for better compatibility should you someday decide to switch languages. Besides, remembering one operator is just plain easier than remembering two! |
The Editing Window
The editing window appears on the bottom half of the Formula Editor, as shown in Figure 4.15. In this free-form typing area, you can directly type code as well as use the Field Tree, Function Tree, and Operator Tree to copy and paste the objects listed within into the editing window. When you select an object in one of the trees and double-click it, the code necessary to reference the field, function, or operator is added to the editing window wherever the cursor is currently.
Formulas consist of variables, operators, and constants combined with control structures and statements of the programming language being used. All of these statements are written in the code editing window.
The Formula Expert
If writing code is new to you, you might want to start with the Formula Expert. Using the Formula Expert lets you create a new formula by using an existing custom function as a pattern. The Formula Expert opens when you do any of the following in Crystal Reports:
-
Create a new formula field in the Field Explorer and click the Use Expert button (see Figure 4.4).
-
Edit an empty formula from the Formula Fields category in the Field Explorer.
-
Click the Use Expert toolbar icon in the Formula Editor.
Code created using the Formula Expert converts to code viewable (and editable) in the Formula Editor. The purpose of the Formula Expert shown in Figure 4.21 is to provide a point-and-click approach to creating formula code.

Figure 4.21. The Formula Expert
In the top-left corner of the Formula Expert, choose the custom function to use as the basis for your new function. The list shows the custom functions that exist in the current report as well as those that are stored in the repository. Choosing a function from the list sets three values for the function you are creating:
Summary This area contains the comments written by the programmer of the custom function to describe the purpose and use of the function. The summary is a read-only value.
Return Type This area is set to the type of data that will be returned by the new function. The return type is a read-only value.
Function Arguments Arguments are the values passed from a calling function to the function that is going to do a calculation. The names of the arguments are determined by the underlying custom function as are the data types and descriptions of the parameters. Each row in the bottom half of the dialog represents one argument to the function and all its identifying information. The name, data type, and description are read-only.
The value of each function argument can be interactively set at this point. You can type values directly or use the drop-down list choices provided. In the formula shown in Figure 4.21, for example, the regionAbbreviation parameter has its initial value set to Select Field or Enter Value; it does not contain an initial default value. For the formula to run correctly, a valid value is required for this parameter; to be valid, it must be the correct data type defined for the argument. Clicking this field reveals the drop-down list shown in Figure 4.22; the bottom half of the list of choices is shown in Figure 4.23 and includes all field values in the report, group names, SQL commands, running totals, and constants.
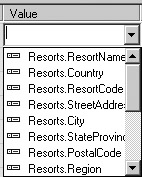
Figure 4.22. Populating a parameter value in the Formula Expert

Figure 4.23. Additional choices
Once you’ve set values for each argument to the function, save it to the report by clicking the Save button. When the function is saved, two things happen:
-
The function is added to your report’s custom functions.
-
Any custom functions that your new function uses are also added to your report’s custom functions.
As the function is being saved, you’ll see dialog boxes similar to those shown in Figure 4.24 and Figure 4.25 telling you which functions are being added to your report.
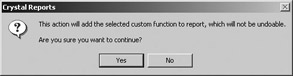
Figure 4.24. Saving a formula created with the Formula Expert
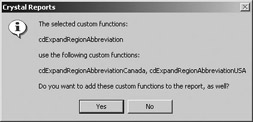
Figure 4.25. Dependencies on other custom functions
The result is the inclusion of all the custom functions involved in the one you created showing up in the Workshop Tree under the Report Custom Functions area, as shown in Figure 4.26.
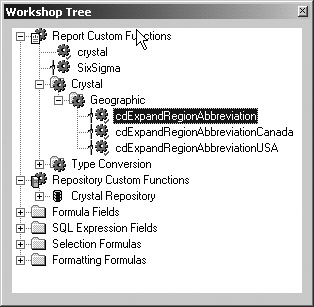
Figure 4.26. The Workshop Tree after using the Formula Expert
If you want to start over again with new values after making modifications to the arguments, click the Reset Values button. For fields that have default values, the first valid default value in the list of all default values is placed in the input box when you choose Reset Values. If the field doesn’t have a default value, the generic Select Field or Enter Value message displays.
When you click the More Info button, the complete properties of the custom function display; this is where the summary information originated. From here, you can also see what category it falls into in the Function Tree, where it is stored, what version of editing it is using, who the author is, and any help text associated with the function. Figure 4.27 shows the properties for the built-in Crystal function cdExpandRegionAbbreviation.
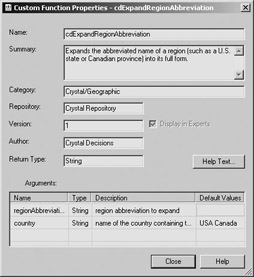
Figure 4.27. Viewing properties of custom functions
You can click the Use Editor button to view the code that the Formula Expert created and continue working on it in the Formula Editor. The Save button saves the currently open formula and leaves you in Edit mode in the Formula Expert. The Help button activates help specific to working with the Formula Expert.
| Use of content on this site is expressly subject to the restrictions set forth in the Membership Agreement | |
| Conello © 2000-2003 Feedback | |
EAN: 2147483647
Pages: 217