Template Files
 |
| |||||||||
A template in Crystal Reports is simply an RPT file that is intended to be reused. It is stored in a special directory that allows it to be used as a formatting structure to easily style other reports. The idea is to set the format once and then create many reports off the same template; this reduces code maintenance headaches. Any report can be used as the basis for a template. Storing it in a separate template directory using Save As preserves the original report and makes the template easy to locate.
Built-In Templates
The goal of a template file is to standardize a set of formatting options for implementation in many reports. Crystal Reports ships with a set of built-in templates that have been preformatted in popular styles. Each file is an .RPT file in its own right and is stored in the Templates subdirectory beneath the Crystal Reports installation directory. The list of template .RPT files is shown in Figure 13.1 and described below. The file names shown are the actual operating system file names. Each operating system file name is also known with a more readable alias inside of Crystal Reports. In Crystal dialog windows, templates are listed by alias name with the actual operating system file name in parentheses.
| Note | If you saved an image preview of the first page of the report using File > Summary Info and the Save Preview Picture option, the image displays alongside the list of templates. The built-in reports all have preview images. |
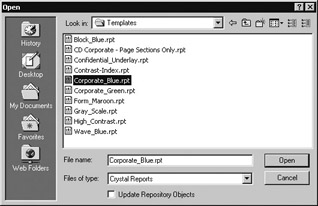
Figure 13.1. Template files
Block_Blue (Block_Blue.rpt) This template uses blue fonts and blue drop shadows on boxes and borders. The detail data displays inside a light-gray-bordered box. The report title appears at the top in blue, while beneath is a drop-shadowed rectangular box that contains the report comment that was created from the File > Summary Info area. The Powered By Crystal logo appears at the top right in a Page Header.
CD Corporate - Page Sections Only (Crystal Decisions Corporate _ Page Sections Only.rpt) This template formats the Page Header and Page Footer only; it uses Crystal logos to demonstrate image placement. The report title appears at the top in black. A text object with a three-line company address appears at the bottom in black.
Confidential_Underlay (Confidential_Underlay.rpt) This template uses black and gray fonts and rounded border boxes. The word Confidential appears as a background image in light gray; the text is arranged on a 45-degree angle. The detail data displays on a white background with a dashed black underline beneath each detail line. The report title appears at the top in black. The Powered By Crystal logo appears at the top right in a Page Header.
Contrast Index Sample (Contrast-Index.rpt) This template takes a reverse color approach with a black background and blue solid boxes separating groups of data. Text font is white.
Corporate_Blue (Corporate_Blue.rpt) This template uses blue fonts and light blue boxes with borders. The detail data displays on a white background with a blue underline beneath each detail line. Chart development is accounted for in a report header. The report title appears at the top in blue, while beneath is a simple rectangular box containing the report print date, the last modified date, and a report comment that was created from the File > Summary Info area. The Powered By Crystal logo appears at the top right in a Page Header and at the bottom-left corner.
Corporate_Green (Corporate_Green.rpt) This template uses dark green fonts with light green and gradient green boxes. The detail data displays on a white background with a green underline beneath each detail line. Chart development is accounted for in a Report Header. The report title appears at the top in green, while beneath is a simple rectangular box containing the report print date, the last modified date, and a report comment that was created from the File > Summary Info area. The Powered By Crystal logo appears at the top right in a Page Header.
Form_Maroon (Form_Maroon.rpt) This template uses maroon fonts and dark pink boxes and borders. The detail data displays inside a dark-pink-bordered box. Group names appear along the left margin rotated 90 degrees as vertical text. The report title appears at the top in maroon, while beneath is a drop-shadowed rectangular box containing the report comment that was created from the File > Summary Info area. The Powered By Crystal Logo appears at the top right in a Page Header.
Gray Scale (Gray_Scale.rpt) This template uses thick black and gray rectangular borders to delineate groups. The report title is placed in a rectangular box and drop-shadowed. The Powered By Crystal logo appears at the top right in a Page Header.
High_Contrast (High_Contrast.rpt) This template uses a black background with colorful blue, maroon, and green solid rectangles separating the headers, groups, and data. The detail data prints in a white font in blue boxes. The Powered By Crystal logo appears at the top right in a Page Header.
Wave_Blue (Wave_Blue.rpt) This template uses quite a few colors! Black borders, blue borders, white letters, black letters, peach boxes with blue drop shadows, and, oh yes, light and dark green charts. It demonstrates the use of rounded rectangular boxes to create a portal look and feel.
Creating Templates
In addition to the built-in templates provided with Crystal Reports, you can create your own templates or modify the built-in ones. Creating a template is easy! All you have to do is create a report and save it to a special directory. Templates are stored in their own directory beneath the Crystal Reports installation directory. Figure 13.2 shows where they are stored in a computer in which Crystal Reports was installed on the C: drive.

Figure 13.2. Storage location
Any file located in the Templates directory is automatically available as a template. It is important that the report be given a title; its title acts as a descriptive name showing up in the list of all Crystal Reports templates built-in or user-created. To give the report a title, use the menu sequence File > Summary Info to open the Document Properties window as shown in Figure 13.3, and type a meaningful and descriptive name into the Title box. The phrase “VistaNations Country Report” is the name that would display in the list of templates; for an example of this, refer to Figure 13.9 later in this chapter.

Figure 13.3. Document Properties
The Document Properties dialog also includes a text field where you can enter the name of the template being used for the current report. This additional box labeled “Template” is for informational purposes only; it is not used by Crystal Reports to identify the template. This is a free-form text area and you have no obligation to fill it out, but it is a good place to make a comment as to which template is in use by the currently open report.
There are three approaches to creating new templates:
-
Modify a prebuilt template and save it with a new template name.
-
Create a new blank template without a data source and use template fields.
-
Save an existing report as a template with a new name.
Modifying a Prebuilt Template
If you want to modify one of the built-in templates, simply change the component you don’t like and resave the template to the same location under the same name or a new name. For instance, you can delete the Crystal Decisions logo and embed a logo for your organization. Since the templates are report files themselves, the full complement of report-formatting options is available to you.
Using Templates and Data Sources
A traditional report file contains a data source and the formatting required to make the fields from the data source look good. A template, however, doesn’t require a data source. Since it is a structure that will be applied to other reports (which contain their own data source), having a template without a data source is an appealing approach to report design. A data source–less template is created using a blank report. To get started, here’s what you do:
-
Create a new report by choosing File > New.
-
From the Crystal Reports Gallery, choose to create a report with the As A Blank Report radio button.
-
On the Database Expert, click the Cancel button.
The effect of these three steps is to open a blank report in Design mode with a Report Header, Page Header, Details section, Report Footer, and Page Footer and without any data source identified or fields in the report. Clicking the Cancel button on the Database Expert leaves the report without a data source.
Now that you have a blank report and no data source, the next step is to place template fields in the report. Template fields are report objects that do not reference a database field or contain any data; essentially, they are placeholders for field data that will be filled in when the template is applied to a report. The net effect is to display the report’s data items with the formatting specified in the template field.
To create a template field on a blank report with no data source, choose Insert > Template Field Object. A gray rectangle appears to help you position and drop the field in the section of your choice. In Figure 13.4, a template field has been dropped into position in the Details section; a placeholder for the field name has been added to the Page Header as the column title.
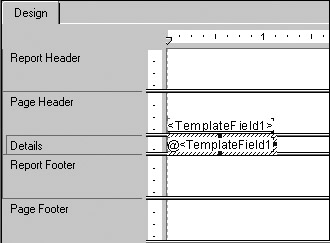
Figure 13.4. Template field placement
To format the template field placeholder, right-click the field to display the formatting menu shown in Figure 13.5.
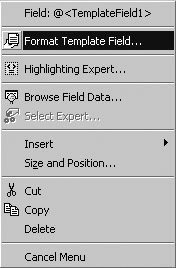
Figure 13.5. Template menu
The Format Template Field option, shown in the above menu, opens the Format Editor shown in Figure 13.6, which provides access to the full set of field formatting options that were described in Chapter 3, “Formatting Fields and Objects.”
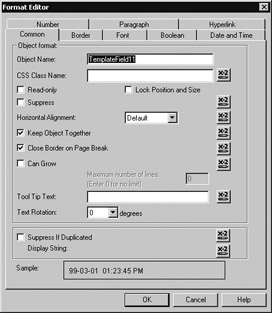
Figure 13.6. Format Editor
Since you cannot know what kind of data will be displayed using the template, the concept here is that you set the formatting options in anticipation of handling any data types. For example, perhaps you want to format the numbers in the first column of a report to have two decimal places and the numbers in the fourth column to have four decimal places. Formatting is applied positionally, top to bottom and left to right, based on field placement. You can apply any formatting that is valid at the field level to a template field.
If the data in the report field is a number, the formatting specified on the Number tab will be applied; for instance, you can determine whether to display the currency operator, set it as fixed or floating, or create a customized number style. The formatting tabs call out Number, Boolean, and Date and Time values. Note also that a CSS Class Name can be set on the Common tab to enable the use of HTML and XML with Crystal Reports data.
| Tip | You can select multiple template fields simultaneously and use the Format Editor to format attributes that appear on every field. |
The following types of report fields, known as result fields, are mapped positionally by a template field; fields not of the following types are skipped by template formatting:
-
Database fields
-
Formula fields
-
Parameter fields
-
SQL Expression Fields
After you add a template field to a report, it appears in the Field Explorer as a formula field. From here, you can edit it in the Formula Workshop, as shown in Figure 13.7.
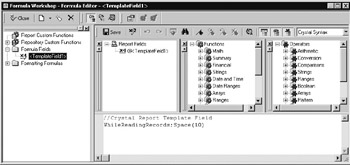
Figure 13.7. Formula Workshop
Reusing Existing Reports As Templates
Do you have the perfect report already written and want to use it over and over again? No problem. From the menu of the report, choose File > Save As to save a new version of the report to the Program Files > Crystal Decisions > Crystal Reports > Templates subdirectory. This preserves the original report and does not modify it. Once saved to this directory, the file can be used as a Crystal Reports template.
| Tip | After saving the report, go to the Document Properties by choosing File > Summary Info and set the Title field to an appropriate name for the template file. |
Although any report can be used as a template, not every design element that you used in the report will be valid for use as a template element. If you choose to use an existing report as a template rather than creating a template using template field objects, the following design elements are not valid and will not be applied to your report:
-
Cross-tab grids
-
Custom-created groups (specified order)
-
Detail charts
-
Embedded OLE objects
-
Fields that contain audio, video, images, or other rich text or binary large object (BLOB) data
-
Maps
-
OLAP grids
-
Percentage summaries
-
Running total summaries
-
Subreports
-
Top N summaries
So which design elements are actually able to be included in a template when an existing report is the starting point? In general, all field-level, group-level, and summarization information carries over from a template to an existing report. The following report objects can be defined in a template and applied to a separate report file:
-
Bitmaps
-
Fields
-
Group charts
-
Groups
-
Hyperlinks
-
Lines, boxes, and borders
-
Static OLE objects
-
Summary fields
| Use of content on this site is expressly subject to the restrictions set forth in the Membership Agreement | |
| Conello © 2000-2003 Feedback | |
EAN: 2147483647
Pages: 217