Sharpening the Details with the Unsharp Mask Filter
Sharpening the Details with the Unsharp Mask Filter
No matter how good an image looked before you scanned it, chances are that it appears a little out of focus on-screen. The image in Figure 11-3 is a good example of a typical photo snapped at the beach. It was probably taken pretty quickly and the camera was a little out of focus.

Figure 11-3: A typical snapshot taken at the beach can be improved with the Unsharp Mask filter.
You can eradicate this kind of blurriness using the Unsharp Mask filter.
To use the Unsharp Mask command, choose Filter→Sharpen→Unsharp Mask. The Unsharp Mask dialog box appears, as shown in Figure 11-4.
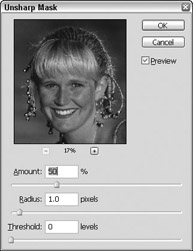
Figure 11-4: Experts agree that the Unsharp Mask dialog box really should be called the Supersharpen dialog box.
Inside the Unsharp Mask dialog box
The Unsharp Mask dialog box enables you to preview what happens when you change the values in three important text boxes. You can preview the filter inside the dialog box and in the main image window. To sharpen an image, use the three slider bars like so:
-
Amount: To control the amount of sharpening, adjust the Amount value from 1% to 500%. Higher Amount values produce more sharpening.
-
Radius: To control the width of the edges you want to sharpen, adjust the Radius value. If the image is in pretty good shape, use a Radius of 0.5. If the edges are soft, like the ones in Figure 11-1, use a Radius of 1.0. And if the edges are almost nonexistent, go with 2.0.
Tip Generally, you don’t want to set the Radius any lower than 0.5 or any higher than 2.0 (although 250.0 is the maximum). Another method you can use to determine the Radius value is to divide the resolution of your image by 200. So for example, if your image is 150 dpi, the radius would be .75 pixels.
-
Threshold: To control the amount of contrast an area should have before it is modified, adjust the Threshold option. The default value of 0 tells Photoshop to sharpen the entire image. By raising the value, you tell Photoshop not to sharpen low-contrast pixels. A Threshold setting between 8 and 20 usually works very well for skin tones.
Some sharpening scenarios
Figure 11-5 demonstrates the effects of several different Amount value (shown as a percentage) and Radius value (shown as a number) on the same image from Figure 11-3. Throughout Figure 11-5, the Threshold value is 0.
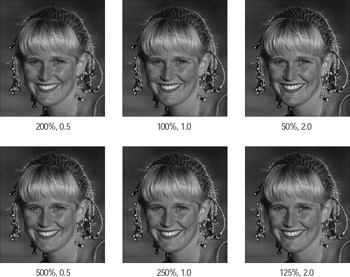
Figure 11-5: Adjusting the Amount and Radius values produces different sharpening results.
To create the images in the top row of Figure 11-6, I started with an Amount value of 200% and a Radius value of 0.5. Then I halved the Amount value and doubled the Radius value in each of the next two images. Although the effect is similar from one image to the next, you can see that the top-right image has thicker edges than the top-left image. (The differences are subtle; you may have to look closely.)
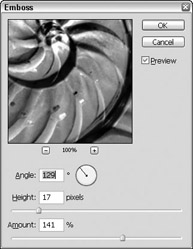
Figure 11-6: Use the Angle, Height, and Amount settings to create the look of embossed metal.
The bottom row of the figure features more pronounced sharpening effects. I started with one set of Amount and Radius values — 500% and 0.5 — and progressively halved the Amount value and doubled the Radius value.
EAN: 2147483647
Pages: 221
- Assessing Business-IT Alignment Maturity
- A View on Knowledge Management: Utilizing a Balanced Scorecard Methodology for Analyzing Knowledge Metrics
- Technical Issues Related to IT Governance Tactics: Product Metrics, Measurements and Process Control
- Managing IT Functions
- Governance in IT Outsourcing Partnerships