Creating Great Text Effects
The following sections show you how to create some interesting text with type. You may have seen some of these effects on posters or in brochures. Following these directions, you can create these special effects and add them to your own projects.
Tracing outlines around your letters
Using the Horizontal Type Mask or Vertical Type Mask tool, you’ll create a type-shaped selection and then choose the Stroke command to create outlined type. Figure 17-16 shows an example of outlined type created using the steps below.

Figure 17-16: Creating outlined type is easy using a selection made with the Horizontal Type Mask tool or Vertical Type Mask tool.
The area inside the letters is transparent and the letter contours are stroked with various colors. Using these directions you can make the borders as thick as you please.
-
Create a new layer.
You don’t have to put your text on its own layer, but doing so makes the text simpler to edit later on. To create a new layer, click the Create New Layer button at the bottom of the Layers palette. (Turn to Chapter 8 for more about layers.)
-
Select the Horizontal Type Mask tool or Vertical Type Mask tool from the Toolbox.
-
Use the Character and Paragraph palettes to set formatting for the type-shaped selection you are going to create.
To find out more about formatting type, take a look at “Working with Type” earlier in this chapter.
-
Click in the image window.
Photoshop automatically goes into Quick Mask mode. A pink overlay appears over the image window. When you type text, the text will appear white.
-
 Type your text.
 -
Click the Commit button on the Options bar to turn the text into a selection.
-
If you need to move the type-shaped selection, use one of the selection tools or nudge the selection using the arrow keys.
-
Set the Foreground color to white.
Tip You can quickly switch the Foreground color to white by pressing D and then pressing X.
-
Make sure that the Lock transparent pixels check box in the Layers palette is not selected.
In the next step, a stroke is applied to the center of the selection outline (half the stroke appears on the inside of the outline and half appears on the outside). If you don’t deselect the Lock Transparent Pixels check box, Photoshop won’t let you paint on the transparent layer.
-
Choose Edit→Stroke, select the Center radio button, enter 12 as the Width value, and click OK.
You now have a 12-pixel thick, white outline around your type-shaped selection.
-
Select black or another dark color as the Foreground color.
-
Choose Edit→Stroke and enter 4 as the Width value, leave the Location at Center, and Click OK.
Congratulations! You get the effect shown in Figure 17-16. If you created the text on a new layer, as recommended back in Step 1, you can use the Move tool to reposition the text. You can also play with the blend modes and Opacity slider in the Layers palette to change how the text blends with the underlying image.
Adding drop shadows to letters
In these steps, you create letters with shadows, as shown in Figure 17-17. These kinds of shadows are commonly called drop shadows because they don’t extend away from the letters; instead, they rest behind the letters. The automated layer styles feature makes applying shadows quick and easy. Take a look at Chapter 8 for complete directions on using layer styles.
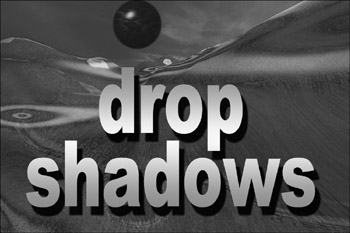
Figure 17-17: Drop shadows help to set off text from the background and make it look way cool.
-
Select a Foreground color.
-
The Foreground color will be the color of the type that you create. You can use the Color picker, Color palette, or Swatches palette to select a color. (To find out how to select a Foreground color, turn to Chapter 4.)
-
Use the Character and Paragraph palettes to set formatting for the type-shaped selection you are going to create.
-
To find out more about formatting type, take a look at “Working with Type” earlier in this chapter.
-
 Select the Horizontal Type tool or Vertical Type tool from the Toolbox.
 -
Click in the image window and type your text.
- Click the Commit button on the Options bar.
-
The type appears on its own type layer in the Layers palette.
-
 Use the Move tool to reposition the text, if you need to.
 -
Click the Add Layer Style button at the bottom of the Layers palette, and then choose Drop Shadow from the menu.
The Layer Style dialog box opens with the Drop Shadow style checked and highlighted, as shown in Figure 17-18.
Figure 17-18: Use the Drop Shadow settings in the Layer Style dialog box to set the opacity, size, spread, distance, and angle of the drop shadow.
Make sure that the Preview check box is selected. That way, you can view the drop shadow in the image window as you create it.
| Tip | I recommend leaving the Blend Mode setting at the default of Multiply. If you want your drop shadow to be a different color than gray (the default), click the color box next to the Blending Mode drop-down list to select a new color using the Color picker. |
Use the Opacity slider to set how dark or light the shadow will be. The higher the setting, the darker the shadow.
-
Rotate the line on the Angle dial or type a value to set the desired angle.
The Angle setting lets you determine where your light source is coming from to create the shadow.
Tip The Distance setting determines how far the shadow offsets from the type. Keeping the shadow fairly close to the type usually results in a better effect. The Spread and Size settings affect the softness, intensity, and size of the shadow.
-
Click OK when you’re satisfied with the shadow’s appearance.
Tip Try out some of the other styles in the Layer Styles dialog box. Use the Gradient Overlay or Pattern Overlay style to fill the type with a nifty gradient or pattern. Quickly add a stroke around the type using the Stroke style. Or add a beveled edge to the type using the Bevel and Emboss style. Play with the Layer Styles dialog box and see what kind of effects you can come up with. There’s so much that you can do with just a few clicks of the mouse!
Creating transparent letters
You can create transparent letters using the Horizontal Type tool or Vertical Type tool. Transparent letters are great for creating tinted text, as shown in Figure 17-19. These effects look like they require a lot of effort, but you can achieve fantastic results by performing these simple steps:
Figure 17-19: Transparent text lets the background image partially show through the letters.
-
Open an image that will become the background behind the translucent type.
Or create a new image and fill the Background layer with a color of your choice using the Paint Bucket tool. If you use a dark background, you’ll want to use light colored type for this effect. If you use a light background, you’ll want to use dark colored type. The contrast between the type and the background is really important. If the background and type colors are very similar, you won’t be able to see the type.
-
Select a Foreground color.
The Foreground color will be used to color the type.
- Select the Horizontal Type or Vertical Type tool from the Toolbox.
-
Click in the image window, and type your text.
- Click the Commit button on the Options bar.
Photoshop creates type in the Foreground color and places it on a new type layer.
- Use the Move tool to reposition the text, if you need to.
-
In the Layers palette, use the Opacity slider to lower the opacity setting.
As you lower the opacity, notice that the type becomes more translucent. If you move the slider low enough, the type disappears altogether (it’s still there, but the pixels are so translucent that you can’t see the type). Move the slider until you’re happy with the way the translucent text looks.
EAN: 2147483647
Pages: 221