Working with Shape Layers
After you create a shape layer you can modify it in many ways. For instance, you can move the shape in the image window, rotate and skew the shape, change the shapes outline, and change its fill. Here’s a smattering of ideas of what you can accomplish with shape layers:
-
 To move a shape that’s saved on a vector mask: Select the shape layer in the Layers palette, select the Move tool from the Toolbox, and then drag the shape to its new position in the image window.
 -
 To transform a shape (scale, rotate, skew, distort, or add perspective): Select the Direct Selection tool from the Toolbox, and then click on the shape in the image window. Choose any of the transformation commands from the Edit→Transform Path menu. Perform the transformation. (I discuss transformations in detail in Chapter 7.)
 -
To reshape a shape (shape shifting!): Select the Direct Selection tool from the Toolbox and select the shape layer you want to modify in the Layers palette. Next, click on the edge of the shape in the image window. The edge displays its anchor points. Anchor points are the tiny squares along the path that control how the path is shaped. Drag an anchor point to change the contour of the shape. To find out more about anchor points and reshaping paths, turn to “Resshaping and Transforming Paths,” later in this chapter.
-
To change the shape layer’s fill: Double-click the layer’s thumbnail to open the Color picker and select a solid fill, or double-click the vector mask to open the Layer Style dialog box. Using the Layer Style dialog box, you can add drop shadows, gradients, glows, bevels, and much more to the shape layer. For complete details on using the Layer Style dialog box, turn to Chapter 8.
Rasterizing a shape layer
In order to edit a shape layer with Photoshop’s pixel-based commands and tools (for instance, applying a filter or painting with the Brush tool), the shape layer must be rasterized (converted from a vector object into a pixel-based image).
-
Open an image and select the shape layer in the Layers palette that you want to rasterize.
-
Choose a rasterize command from the Layer→Rasterize menu.
There are four options to choose from (their results are shown in Figure 16-8):
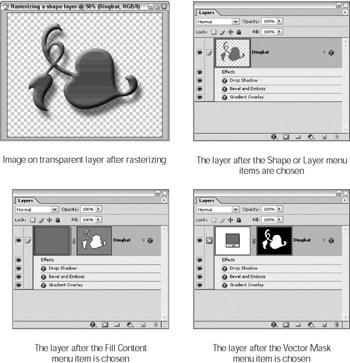
Figure 16-8: When you rasterize a shape layer, there are four options to choose from.-
The Shape or Layer options both create the same results. If you select one of these options, the shape layer is converted into a pixel shape on a transparent layer.
-
The Fill Content option converts the shape layer’s fill to cover the entire layer. The vector mask retains the exact outline of the shape layer’s vector mask and acts as a mask cutout (like a layer mask), revealing only that portion of the layer. If there is no layer underneath, the masked (protected) areas reveal transparency.
-
The Vector Mask option converts the vector mask into a layer mask with the same shape as the vector mask. This option also converts the shape layer’s fill to cover the entire layer. If there is no layer underneath, the masked (protected) areas reveal transparency.
The shape layer is rasterized in the manner that you select. That’s all there is to it.
-
EAN: 2147483647
Pages: 221