Making Shapes
There are three kinds of shapes: those that are drawn on a layer, those that are saved in a vector mask as a shape layer, and those that are drawn as paths.
Shapes saved in a vector mask can be reshaped and transformed; you can change their fills at any time to include layer effects such as gradients, textures, and patterns. All the usual layer attributes, such as opacity and blending modes, can be applied to a shape saved in a vector mask.
Shapes that are drawn as paths appear as temporary outlines on the Paths palette. You can fill these shape paths with the Foreground color, load them into images as selections, and stroked with a brush to create outlines.
Both the shapes saved in a vector mask and the shapes drawn as paths are created using mathematical formulas. These shapes are vector objects.
| Remember | Shapes that are drawn on a layer are not as versatile. Although you can refill them with other colors, when you apply any layer effects to them you modify the entire layer (not just the shapes). Shapes that are drawn on a layer are called rasterized shapes — shapes that are created using pixels, not mathematical formulas. |
Using the Shape tools
All of the shape tools are located on one flyout menu in the Toolbox, as shown in Figure 16-3. The shape tools work in conjunction with the Options bar, where you can select whether the shape will become a shape layer, a path, or a regular filled shape on a layer. The Options bar changes depending upon the type of shape you decide to draw: a shape layer, a path, or a filled shape. Figure 16-4 shows the Options bar with each of these types selected.
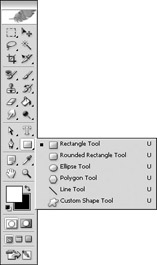
Figure 16-3: The shape tools are all located on a flyout menu in the Toolbox.
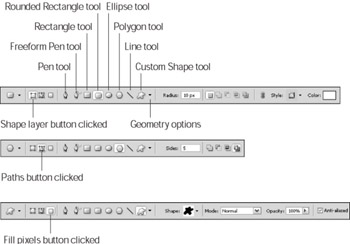
Figure 16-4: Depending on the type of shape you draw the Options bar changes to provide settings.
Creating a filled shape on a layer
Filled, rasterized shapes that are created on a layer are the least versatile shapes. After you create such a shape, it becomes part of the layer and is a rasterized, pixel-based shape, not the more versatile vector shapes. You might want to use a filled shape to quickly add a heart or star to an image.
To create a rasterized shape on a layer, follow these steps:
-
Open an image with layers, and in the Layers palette, select the layer on which you want to draw the shape or create a new layer.
-
To find out how to select layers or create new ones, turn to Chapter 8.
-
Select a Foreground color.
For details on how to do this turn to Chapter 5.
-
Select a shape tool from the Toolbox.
After you select a shape tool, you can change tools using the shape tool buttons on the Options bar.
-
Click the Fill Pixels button on the Options bar.
The available settings on the Options bar change to those shown in the third Options bar (refer to Figure 16-4).
-
Select settings for the shape tool you selected.
-
If you are using the Rounded Rectangle tool: Set the Radius value to change how much the corners of the rectangle are rounded. The higher the value, the rounder the corners.
-
If you are using the Polygon tool: Set how many sides the shape will have, 3 for a triangle, 5 for a pentagon, and so on.
-
If you are using the Line tool: Set the width of the line by typing an amount into the Weight text box. By default, the Weight setting is in pixels. If you want to enter a width in a different measurement scale, such as inches or centimeters, just type in 1 inch or 1 cm.
-
If you are using the Custom shape tool: Select a shape using the Custom Shape picker.
-
For any shape tool: Click the Geometry Options button to access shape options for the shape tool you selected. For instance, if you want to create a star and you selected the Polygon tool, click the Geometry Options button, and then check Star in the Polygon Options box that appears.
-
-
Drag across the image window to draw a shape.
When you release the mouse button, the shape is filled with the Fore-ground color. You can now edit it with any of the brushes, editing tools, filters, and more to modify the shape’s pixels (because it is a rasterized or pixel-based shape). Figure 16-5 shows some filled pixel shapes on a layer.
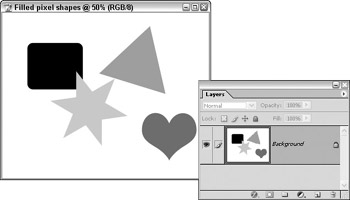
Figure 16-5: Shapes drawn on a layer are pixel-based and can be modified with any Photoshop tool or command.
Creating a shape layer
A shape layer is a shape outline that is saved in a vector mask and linked to a layer. You can modify the contour of the shape, fill the layer with a color or pattern, and use layer effects on the shape without affecting the rest of the layer the shape is linked. You can quickly add cool effects, such as drop shadows, contours, and bevels to shape layers using shape layers.
To create a shape layer, follow these steps:
-
Open an image with layers, and in the Layers palette, select a layer.
The new shape layer is created above this layer. (To find out how to select layers, turn to Chapter 8.)
-
Select a Foreground color.
You can fill a shape layer with a pattern or gradient, as well. For details on how to do this, turn to “Working with Shape Layers” later in this chapter.
-
Select a shape tool from the Toolbox.
After you select a shape tool, you can change tools using the shape tool buttons on the Options bar.
-
Click the Shape Layers button on the Options bar.
The available settings on the Options bar will change to those shown in the first Options bar in Figure 16-4.
-
Select settings for the shape tool you selected.
If you’re not sure which settings to apply, see Step 5 in the previous section “Creating a filled shape on a layer” for details.
-
Drag the mouse across the image window to draw a shape.
When you release the mouse button, the shape is filled with the Foreground color. A new shape layer appears in the Layers palette with a vector mask linked to it. Figure 16-6 shows some shape layers.
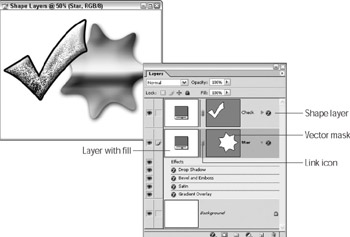
Figure 16-6: These layer shapes are saved in a vector mask and linked to a layer.
Creating a path using a shape tool
Shapes that are drawn as paths appear as temporary outlines on the Paths palette. These shape paths can be filled with the Foreground color, loaded into the image as a selection, and stroked with a brush to create an outline. To find out how to work with paths, turn to the “Paths” section later in this chapter. To create a path using a shape tool, follow these steps:
-
Open an image with layers, and in the Layers palette, select a layer.
The new shape layer is created above this layer. (To find out how to select layers, turn to Chapter 8.)
-
Select a shape tool from the Toolbox.
After you select a shape tool, you can change tools using the shape tool buttons on the Options bar.
-
Click the Paths button on the Options bar.
The available settings on the Options bar change to those shown in the middle Options bar (refer to Figure 16-4).
-
Select settings for the shape tool you selected.
If you’re not sure which settings to apply, see Step 5 in the previous section “Creating a filled shape on a layer” for details.
-
Drag the mouse across the image window to draw a shape.
When you release the mouse button, the work path appears in the image window and in the Paths palette. Figure 16-7 shows a rectangular work path.
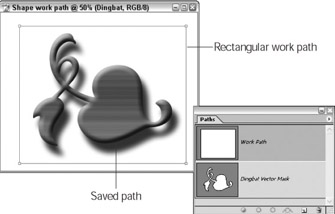
Figure 16-7: A rectan-gular work path drawn around a shape saved as a shape layer.Warning A work path is a temporary path and is not saved. If you use a shape tool with the Paths button selected again, the path is automatically replaced. To save the work path so it cannot be replaced, double-click on Work Path in the Paths palette. Enter a descriptive name for the path in the Save Path dialog box, and then click OK.
EAN: 2147483647
Pages: 221