Introducing Layer Masks
A layer mask, like a saved selection, is a saved as a grayscale alpha channel. But, that’s where the similarity ends. Although selections are used to protect areas of an image from editing, layer masks control where a layer is visible or hidden. When you add a layer mask to a layer, the layer mask appears in the Layers palette next to the layer thumbnail as shown in Figure 15-10. (Because the layer mask is a channel, you can also see it at the bottom of the Channels palette.)
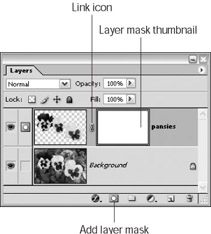
Figure 15-10: A layer mask can hide or reveal portions of a layer.
| Tip | Notice the tiny link icon between the layer and the layer mask in Figure 15-1. This indicates that the layer and layer mask are linked (by default). If you use the Move tool to move a layer or a layer mask, both the layer and the layer mask move together. If you want to move a layer or layer mask independently, click the link icon to unlink them. |
You can use layer masks to create fade in effects and hide portions of a layer from view. What’s great about layer masks is that areas of a layer aren’t permanently deleted; they’re just hidden.
To see some layer masks in action, take a look at Color Plate 8-1 and Color Plate 15-1. The composition in Color Plate 8-1 is made up of four layers (this is also called a composite image). Look at the layer masks attached to each layer in the Layers palette. If you look carefully at the layer mask thumbnails, you’ll notice that areas of the layer mask are black and other areas are white. These black and white areas correspond to the area of each layer that is visible (white) or hidden (black).
Color Plate 15-1 uses the same layer mask techniques to show and hide parts of layers. Notice how the layer mask on the Morning Glory layer shows the center of the layer but hides the edges. Then, look at the Leaves layer and see how the layer mask hides the center of the layer and shows the edges.
Because a layer mask is a grayscale channel, you can only paint on it with black, white, and gray. If you paint on a layer mask with black, the layer attached to the layer mask is hidden, revealing the layer beneath. If you paint on a layer mask with white, the layer is revealed, obscuring the layer beneath. And, if you paint on a layer mask with gray, the layer becomes translucent revealing some of the layer beneath (using gray is great for creating fade-outs).
Figure 15-11 shows an image with several layers and their attached layer masks. Notice how the white and black in the upper layer mask reveals and hides the layer. Also, take a look at the gradient that’s been applied to the other two layers, creating fade-out effects.
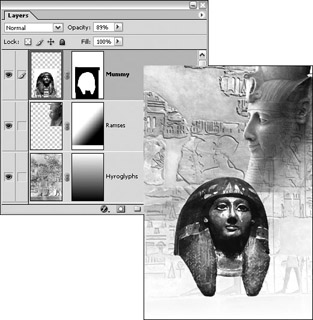
Figure 15-11: The white and black areas of a layer mask reveal and hide the layer. Gradients create fade-out effects.
Adding a layer mask to a layer
When you create a layer mask there are four basic types to choose from:
-
A white mask reveals the entire layer
-
A black mask that hides the layer
-
A combination black-and-white mask reveals the selected areas of the layer
-
A combination black-and-white mask that hides the selected areas of the layer
To add a layer mask to a layer, open an image with multiple layers and follow these steps:
-
In the Layers palette, select the layer you want to add the mask to.
To create a black-and-white mask that reveals or hides selected areas of the layer, use any of the selection tools to create the selections.
-
Create the layer mask you need.
-
Choose Layer→Add Layer Mask→Reveal All to create a white layer mask that is transparent and reveals the entire layer. Or, you can click the Add layer mask button on the Layers palette.
-
Choose Layer→Add Layer Mask→Hide All to create a black layer mask that is opaque and hides the entire layer. Or, you can Alt+click (Option+click on the Mac) the Add layer mask button on the Layers palette.
-
Choose Layer→Add Layer Mask→Reveal Selection to create a black-and-white layer mask that reveals selected areas of the layer.
-
Choose Layer→Add Layer Mask→Hide Selection to create a black-and-white layer mask that hides selected areas of the layer.
-
| Tip | You can’t add a layer mask to the Background layer. If you want to add a layer mask to the Background, you’ll have to convert it to a regular layer first, by selecting it, and then choosing Layer→New Layer from Background. |
Reshaping a layer mask
After you add a layer mask to a layer, you can reshape it to hide or reveal various areas of the layer.
| Remember | Painting with white makes the layer visible, painting with black hides the layer, and painting with gray partially hides the layer, creating a translucent effect. |
To reshape a layer mask to hide or show areas of the layer that it’s linked to, follow these steps:
-
Select the Brush tool or Pencil tool from the Toolbox and select the tool’s settings using the Options bar.
To find out how to select Brush tool of Pencil tool options, turn to Chapter 12.
-
Set how you want to view the layer mask while reshaping it.
-
To reshape the layer mask while viewing only the layer (not the layer mask itself): Click the layer mask thumbnail in the Layers palette (don’t click the layer’s name). A thick border appears around the layer mask and the layer mask icon appears in the column to the left of the layer’ thumbnail as shown in Figure 15-12.
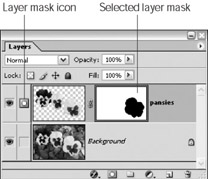
Figure 15-12: When you select a layer mask, a dark border appears around the layer mask thumbnail and a layer mask icon appears to the left of the layer’s thumbnail. -
To view only the layer mask while reshaping it: Alt+click (Option+ click on a Mac) the layer mask thumbnail in the Layers palette.
-
To view the layer mask as a colored overlay on the layer: Alt+Shift+click (Option+Shift+click on a Mac) the layer mask thumbnail in the Layers palette.
-
-
Reshape the layer mask by painting with black, white, or gray.
To hide the layer, paint with black. To reveal the layer, paint with white. To partially reveal the layer, paint with gray. Figure 15-13 shows a layer mask being reshaped with these three colors.
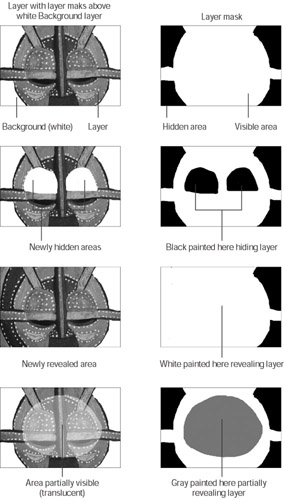
Figure 15-13: Use black, white, and gray to reshape a layer mask to hide or reveal a layer.You can quickly select black and white in the Toolbox by clicking the Default Foreground and Background Colors button, and then switch between black and white by clicking the Switch Foreground and Background Colors button (refer to Figure 15-8).
-
When you’re finished reshaping the layer mask, click the layer thumbnail to return to normal display mode.
More about layer masks
There are a few more things you can do to layer masks to help with the image editing and creation process, disabling a layer mask in order to hide the effects of the layer mask, duplicating a layer mask, applying a layer mask to a layer, and discarding a layer mask altogether.
-
To deactivate a layer mask: Shift+click the layer mask thumbnail in the Layers palette. A large red X appears over the thumbnail and the entire layer becomes visible. To reactivate the layer mask, Shift+click the layer mask thumbnail again.
-
To duplicate a layer mask and add it to a new layer: In the Layers palette choose the layer you want the duplicate layer to appear in. Drag the thumbnail of the layer mask you want to duplicate over the Add layer mask button at the bottom of the Layers palette.
-
To apply a layer mask to a layer: Right-click (Control+click on a Mac) the layer mask thumbnail and choose Apply Layer Mask from the context-sensitive menu.
-
To discard a layer mask: Right-click (Control+click on a Mac) the layer mask thumbnail and choose Discard Layer Mask from the context- sensitive menu.
EAN: 2147483647
Pages: 221