Heightening Focus and Contrast
If you've ever tried to improve a digital or scanned snapshot in Photoshop, you've no doubt had your way with many of the commands in the Filter Sharpen sub- menu. By increasing the contrast between neighboring pixels, the sharpening filters enable you to compensate for image elements that were photographed or scanned slightly out of focus.
The Sharpen, Sharpen More, and Sharpen Edges commands are easy to use and immediate in their effect. However, you can achieve better results and widen your range of sharpening options if you learn how to use the Unsharp Mask command, which is covered at length in the following pages.
Using the Unsharp Mask filter
The first thing you need to know about the Unsharp Mask filter is that it has a weird name . The filter has nothing to do with unsharpening ” whatever that is ” nor is it tied into Photoshop's masking capabilities. Unsharp Mask is named after a traditional film compositing technique (which is itself oddly named) that highlights the edges in an image by combining a blurred film negative with the original film positive.
To understand Unsharp Mask ” or Photoshop's other sharpening filters, for that matter ” you first need to understand some basic terminology. When you apply one of the sharpening filters, Photoshop increases the contrast between neighboring pixels. The effect is similar to what you see when you adjust a camera to bring a scene into sharper focus.
Two of Photoshop's sharpening filters, Sharpen and Sharpen More, affect whatever area of your image is selected. The Sharpen Edges filter, however, performs its sharpening operations only on the edges in the image ” those areas that feature the highest amount of contrast.
Unsharp Mask gives you both sharpening options. It can sharpen only the edges in an image or it can sharpen any portion of an image according to your exact specifications, whether it finds an edge or not. It fulfills the exact same purposes as the Sharpen, Sharpen Edges, and Sharpen More commands, but it's much more versatile. Simply put, the Unsharp Mask tool may be the only sharpening filter you'll ever need. You can also check out the new Smart Sharpen tool, covered in the next section of this chapter; another intuitive, powerful feature, you may find it to be nearly as effective as this one.
When you choose Filter Sharpen Unsharp Mask, Photoshop displays the Unsharp Mask dialog box, shown in Figure 8-5, which offers the following options:
-
Amount: Enter a value between 1 and 500 percent to specify the degree to which you want to sharpen the selected image. Higher values produce more pronounced effects.
-
Radius: This option determines the thickness of the sharpened edge. Low values produce crisp edges. High values produce thicker edges with more contrast throughout the image.
-
Threshold: Enter a value between 0 and 255 to control how Photoshop recognizes edges in an image. The value indicates the numerical difference between the brightness values of two neighboring pixels that must occur if Photoshop is to sharpen those pixels. A low value sharpens lots of pixels; a high value excludes most pixels from the running.
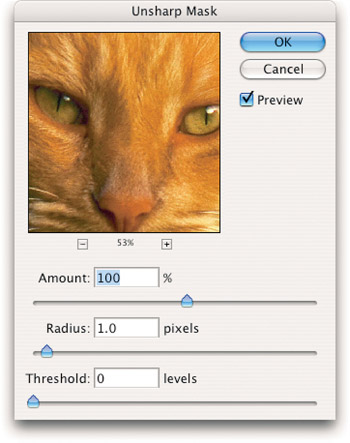
Figure 8-5: Despite the confusing name, the Unsharp Mask filter sharpens images according to your specifications in this dialog box.
The preview options offered by the Unsharp Mask dialog box are absolutely essential visual aids that you're likely to find tremendously useful throughout your Photoshop career. Just the same, you'll be better prepared to experiment with the Amount, Radius, and Threshold options and less surprised by the results if you read the following sections, which explain these options in detail and demonstrate the effects of each.
Specifying the amount of sharpening
If Amount were the only Unsharp Mask option, no one would have any problems understanding this filter. If you want to sharpen an image ever so slightly, enter a low percentage value. Values between 25 and 50 percent are ideal for producing subtle effects. If you want to sharpen an image beyond the point of good taste, enter a value somewhere in the 300 to 500 percent range. And if you're looking for moderate sharpening, try out some value between 50 and 300 percent. Figure 8-6 shows the results of applying different Amount values. For purposes of demonstration, the Radius and Threshold values are fixed at 2.0 pixels and 0 level, respectively.
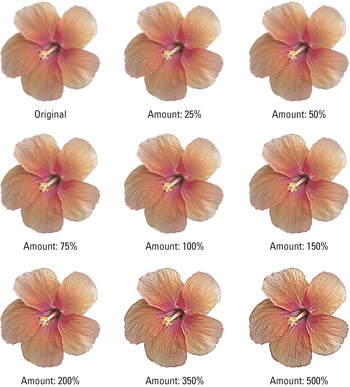
Figure 8-6: The results of sharpening an image with the Unsharp Mask filter using eight different Amount values. The Radius and Threshold values used for all images were 2.0 and 0, respectively.
If you're not sure how much you want to sharpen an image, try out a small value in the 25 to 50 percent range. Then reapply that setting repeatedly by pressing Ctrl+F ( z +F on the Mac). As you can see in Figure 8-7, repeatedly applying the filter at a low setting produces a very nearly identical result to applying the filter once at a higher setting. For example, you can achieve the effect shown in the middle image in the figure by applying the Unsharp Mask filter three times at 50 percent or once at 238 percent. (The math is a bit complicated ” 1.5 cubed minus 1 = 2.375, or roughly 238 percent ” but don't worry about that. The point is, you can work incrementally.)
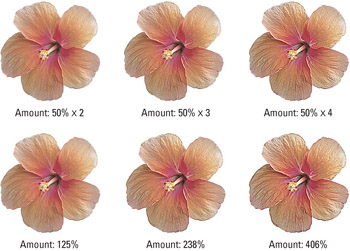
Figure 8-7: Repeatedly applying the Unsharp Mask filter at 50 percent (top row) is nearly equivalent on a pixel-by-pixel basis to applying the filter once at higher settings (bottom row).
The benefit of using small values is that they enable you to experiment with sharpening incrementally. As the figure demonstrates , you can add sharpening bit by bit to increase the focus of an image. You can't, however, reduce sharpening incrementally if you apply too high a value; you must press Ctrl+Z ( z +Z on the Mac) and start again.
Just for fun, Figure 8-8 shows the results of applying the Unsharp Mask filter to each of the color channels in an RGB image independently, as well as in pairs. (To switch between channels, press Ctrl or z plus a number key, 1 through 3.) In each case, the Amount value was set to 350 percent and the Radius and Threshold set to 2.0 and 0, respectively. You can see how the filter creates a crisp halo of color, especially around the outside edge of the lion's head. Sharpening the red channel creates a red halo on the head and brings out blue-green details in the lion's face; sharpening the red and green channels together creates a yellow halo on the lion's face and emphasizes bluish details; and so on. Applying the filter to one or both of the red and green channels produced the most noticeable effects because these channels contain the majority of the image detail. The blue channel contained the least detail ” as is typical ” so sharpening this channel produced the least dramatic results.
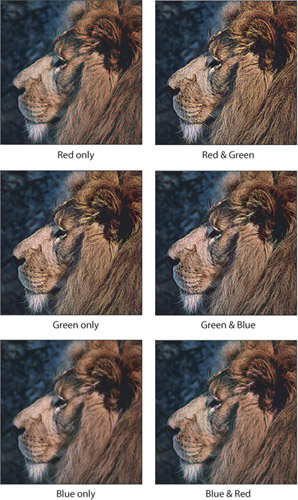
Figure 8-8: Applying Unsharp Mask to a single channel or to a pair of channels creates predictable results, once you get the hang of it. For example, applying the filter to the red channel only makes the edges appear red where they're light, and makes dark turquoise (the inverse of red) wherever the image is dark.
| |
Note that Photoshop applies filters to images one channel at a time, so when you apply the Unsharp Mask command to a full-color image, it actually applies the command in a separate pass to each of the color channels.
Therefore, the command always results in the color halos shown in Figure 8-8; however, sometimes the halos get mixed together, which can minimize the halo effect. To avoid any haloing whatsoever, convert the image to the Lab mode (Image Mode Lab Color) and apply Unsharp Mask to only the Lightness channel in the Channels palette. (Do not filter the a and b channels.) This sharpens the brightness values in the image and leaves the colors untouched.
| |
Setting the thickness of the edges
The Unsharp Mask filter works by identifying edges and increasing the contrast around those edges. The Radius value tells Photoshop how thick you want your edges. Large values produce thicker edges than small values. The ideal Radius value depends on the resolution of your image and the quality of its edges:
-
When creating screen images ” such as Web graphics ” use a very low Radius value, such as 0.5. This results in terrific hairline edges that look so crisp, you'll think you washed your bifocals.
-
If a low Radius value brings out weird little imperfections ” such as grain, scan lines, or JPEG compression artifacts ” raise the value to 1.0 or higher. If that doesn't help, don't fret. There are two surefire image-fixing techniques revealed later in this chapter, one designed to sharpen grainy old photos, and another that accommodates compressed images.
-
When printing an image at a moderate resolution ” anywhere from 120 to 180 ppi ” use a Radius value of 1.0. The edges may look a little thick on-screen, but they print fine.
-
For high-resolution images ” around 300 ppi ” try a Radius of 2.0. Because Photoshop is printing more pixels per inch, the edges have to be thicker to remain nice and visible.
Tip If you're looking for a simple formula, try 0.1 of Radius for every 15 ppi of final image resolution. That means 75 ppi warrants a Radius of 0.5, 120 ppi warrants 0.8, 180 ppi warrants 1.2, and so on. If you have a calculator, just divide the intended resolution by 150 to get the ideal Radius value.
You can of course enter higher Radius values, as high as 250, in fact. Higher values produce heightened contrast effects, almost as if the image had been photocopied too many times, generally useful for producing special effects.
But don't take anyone else's word for it; you be the judge. Figure 8-9 demonstrates the results of specific Radius values combined with Amount and Threshold values of 200 percent and 0 levels, respectively.
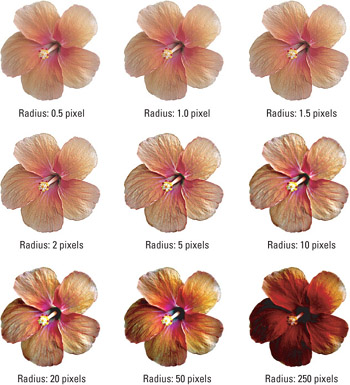
Figure 8-9: The results of applying nine different Radius values, ranging from precise edges to imprecise.
Figure 8-10 shows the results of combining different Amount and Radius values. You can see that a large Amount value helps to offset the softening of a high Radius value. For example, when the Amount value is set to 75 percent, as in the first row, the Radius value appears to smooth out the sharpening effect when raised from 0.5 pixel to 2.0 pixels and higher. But when the Amount is raised to 300 percent, as in the last row, the higher Radius values genuinely enhance contrast.
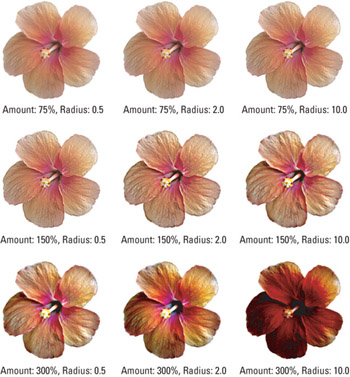
Figure 8-10: The effects of combining different Amount and Radius settings. The Threshold value for each image was 0 levels, the default setting.
Recognizing edges
By default, the Unsharp Mask filter sharpens every pixel in a selection. However, you can instruct the filter to sharpen only the edges in an image by raising the Threshold value from 0 to some other number. The Threshold value represents the difference between two neighboring pixels ” as measured in brightness levels ” that must occur for Photoshop to recognize them as an edge.
Suppose that the brightness values of neighboring pixels are 10 and 20. If you set the Threshold value to 5, Photoshop reads both pixels, notes that the difference between their brightness values is more than 5, and treats them as an edge. If you set the Threshold value to 20, however, Photoshop passes them by. A low Threshold value, therefore, causes the Unsharp Mask filter to affect a high number of pixels and vice versa.
In the top row of images in Figure 8-11, the high Threshold values result in tiny slivers of sharpness that outline only the most substantial edges of the flower. As the Threshold value is lowered incrementally in the second and third rows, the sharpening effect takes over more and more of the flower, ultimately sharpening all details uniformly in the lower-right example.
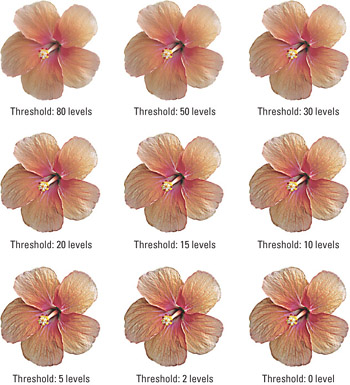
Figure 8-11: The results of applying nine different Threshold values. To best show off the differences between each image, the Amount and Radius values were set to 500 percent and 4.0 pixels, respectively.
Sharpening grainy photographs
Having completed a neutral discussion of Unsharp Mask, possibly the King of the Sharpen Filters, here's a little bit of commentary , along with a helpful solution to a common sharpening problem.
Although Amount and Radius are the kinds of superior options that will serve you well throughout the foreseeable future, it's a good idea to be very reserved in your use of Threshold. The idea is fine; anyone can see that you need some way to draw a dividing line between those pixels that you want to sharpen and those that you want to leave unchanged. But the Threshold setting can be nothing more than a glorified on/off switch that results in harsh transitions between sharpened and unsharpened pixels.
These abrupt transitions are quite out of keeping with Photoshop's normal approach. Paintbrushes have anti-aliased edges, selections can be feathered, the Color Range command offers Fuzziness; in short, everything mimics the softness found in real life. Yet right here, inside what is indisputably Photoshop's most essential filter, you find no mechanism for softness whatsoever.
Consider the image in Figure 8-12. This photo, as shown on the left, is quite soft, and almost blurry. If you apply a large helping of Unsharp Mask ” as in the second example in the figure ” you bring out as much film grain as image detail. The official Photoshop solution is to raise the Threshold value, but the option's intrinsic harshness creates more unpleasant results, as shown in the photo on the right. Photoshop has simply replaced one kind of grain with another.
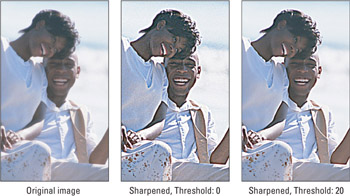
Figure 8-12: The original photograph is a bit soft (left), a condition you can remedy with Unsharp Mask. Leaving the Threshold value set to 0 brings out the film grain(middle), but raising the value results in equally unattractive artifacts (right).
While we continue to wait for Photoshop to give us a better Threshold ” one with a Fuzziness slider or similar control ” you can create a better Threshold using a very simple masking technique. Using a few filters that are explored at greater length throughout this chapter and the next, you can devise a selection outline that traces the essential edges in the image ” complete with fuzzy transitions ” and leaves the non-edges unmolested. So get out your favorite old vintage photograph and follow along with these steps.
STEPS: Creating and Using an Edge Mask
-
Duplicate one of the color channels. Bring up the Channels palette and drag one of the color channels onto the little page icon. The subject is colorized from a grayscale image, so it really doesn't matter which channel you duplicate ” they're all roughly the same.
-
Choose Filter Stylize Find Edges. As explained in Chapter 9, the Find Edges filter automatically traces the edges of your image with thick outlines that are ideal for creating edge masks.
-
Press Ctrl+I ( z +I on the Mac). Or choose Image Adjustments Invert. Find Edges produces black lines against a white background, but in order to select your edges, you need white lines against a black background. The Invert command reverses the lights and darks in the mask, as in the first example in Figure 8-13.
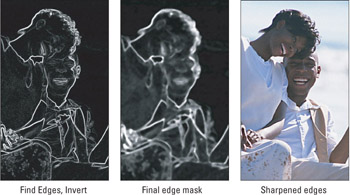
Figure 8-13: To sharpen edges, copy a channel, find the edges, and invert (left). Apply filters to expand and soften the edges (middle). Convert the mask to a selection outline, and reapply Unsharp Mask (right). -
Choose Filter Other Maximum. The next step is to thicken up the edges. The Maximum filter expands the white areas in the image, serving much the same function in a mask as Select Modify Expand serves when editing a selection outline. Enter a Radius value and press Enter or Return. In this case, a Radius of 4 pixels worked nicely , but for best results you should experiment with different values based on the resolution of your image.
-
Choose Filter Noise Median. You need fat, gooey edges, and the current ones are a bit tenuous. To firm up the edges, choose the Median filter, enter the same Radius value you did for the Maximum filter, in this case 4, and press Enter or Return.
-
Choose Filter Blur Gaussian Blur. Unfortunately, the Maximum filter results in a bunch of little squares that don't do much for the cause. You can merge the squares into a seamless line by choosing the Gaussian Blur command and entering 4, the same radius you entered for Maximum. Then press Enter or Return.
The completed mask is pictured in the second example of Figure 8-13. Though hardly an impressive sight to the uninitiated eye, you're looking at the perfect edge mask ” soft, natural, and extremely accurate.
-
Return to the standard composite view. Press Ctrl+tilde (Win) or z +tilde (Mac) in a color image. In a grayscale image, press Ctrl+1 (Win) or z +1 (Mac).
-
Convert the mask to a selection outline. Ctrl+click (Win) or z +click (Mac) the mask name in the Channels palette. Photoshop selects the most essential edges in the image without selecting the grain.
-
Choose Filter Sharpen Unsharp Mask. In the last example in Figure 8-13, the highest permitted Amount value was applied ” 500 percent, and a Radius of 2.0.
-
Whatever values you use, make sure the Threshold is set to 0. And always leave it at 0 from this day forward.
In case Figures 8-12 and 8-13 are a little too subtle, consider the enlarged views in Figure 8-14. The left image shows the result of using the Threshold value; the right- hand image was created using the edge mask. Which one appears sharper and less grainy to you?
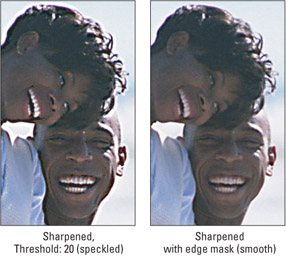
Figure 8-14: Enlarged views of the last examples from Figures 8-12 (left) and 8-13 (right). A good edge mask beats the Threshold value every time.
Using the High Pass filter
The High Pass filter falls more or less in the same camp as the sharpening filters but is not located under the Filter Sharpen submenu. This frequently overlooked gem enables you to isolate high-contrast image areas from their low-contrast counterparts.
When you choose Filter Other High Pass, Photoshop offers a single option: the familiar Radius value, which can vary from 0.1 to 250.0. High Radius values distinguish areas of high and low contrast only slightly. Low values change all high- contrast areas to dark gray and low-contrast areas to a slightly lighter gray. A value of 0.1 changes all pixels in an image to a single gray value and is therefore useless.
The High Pass filter is especially useful as a precursor to Image Adjustments Threshold, which converts all pixels in an image to black and white. As illustrated in Figure 8-15, the Threshold command produces entirely different effects on an image depending on the setting you apply with the High Pass filter. In fact, applying the High Pass filter with a low Radius value and then issuing the Threshold command converts your image into a line drawing.
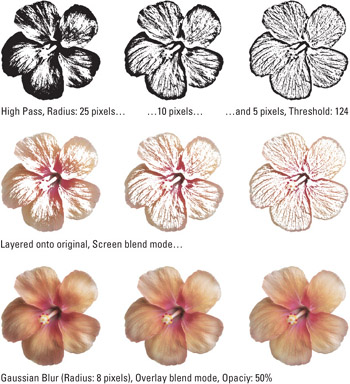
Figure 8-15: The High Pass filter applied to layers , with blend modes and subsequent filters applied, produces a variety of useful and interesting effects.
As shown in Figure 8-15, after sending three copies of the image to separate layers and applying different High Pass values, Image Adjustments Threshold was applied, and then the Screen blend mode was used to drop out the black pixels, resulting in colored line drawings (see middle). Finally, Filter Blur Gaussian Blur, was used, and the blend mode changed to Overlay, and reducing the Opacity to 50 percent (see bottom).
In the first row of Figure 8-15, you see three applications of the High Pass filter, with Radius settings of 25, 10, and 5 pixels, respectively. The Threshold command with a Threshold Levels value of 124 was applied, meaning that all colors darker than 124 ” a bit darker than medium gray ” become black and all values lighter than 124 became white. (For more information on brightness values, see the Levels discussion in Chapter 12.) In the second row, the black-and-white drawings were layered in front of original versions of the image and the Screen mode applied, so that colors from the image filled in the black lines.
Why else might you want to change your image to a bunch of unsightly gray values and then apply Threshold or the like? One reason is to build a mask from an image, as discussed at length in Chapter 4. (As you may remember, the Levels command was used there instead of Threshold, but both commands are variations on a common theme.)
Or you might simply want to bolster the edges in an image, as illustrated in the final row of Figure 8-15. Here, the Filter Blur Gaussian Blur (the subject of the next section) was applied with a Radius value of 8 pixels. Like the Threshold option in the Unsharp Mask dialog box, Image Adjustments Threshold results in harsh, jagged transitions. Gaussian Blur softens them to produce more gradual transitions. Then the Overlay mode was applied and the Opacity setting reduced to 50 percent. The result is a glowing image with thicker, more defined edges, great for smoothing away blemishes and generally toning down an otherwise severe or unkind image.
It should be mentioned that Photoshop provides several automated edge-tracing filters ” including Find Edges, Trace Contour, and the Filter Gallery's Glowing Edges, many of which are covered in Chapter 9. High Pass, however, affords more control than any of these commands and enables you to explore a wider range of alternatives. Also worth noting, several Filter Gallery filters ” most obviously Sketch Photocopy ” lift much of their code directly from High Pass. Although it may seem at first glance a strange effect, High Pass is one of the seminal filters in Photoshop.
EAN: 2147483647
Pages: 95