A First Look at Filters
You access Photoshop's special effects filters by choosing commands from the Filter menu. These commands fall into two general camps ” corrective and destructive .
Corrective filters
Corrective filters are everyday tools that you use to modify scanned or otherwise captured images and prepare an image for printing or screen display. In many cases, the effects are subtle enough that the viewer won't even notice that you applied a corrective filter. As demonstrated in Figure 8-1, these filters include those that change the focus of an image, enhance color transitions, and average the colors of neighboring pixels. Find these filters in the Filter Blur, Noise, Sharpen, and Other submenus.
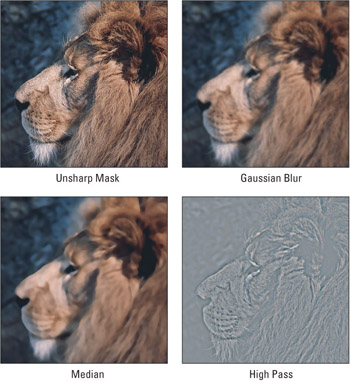
Figure 8-1: A lion subjected to four corrective filters, including one each from the Sharpen, Blur, Noise, and Other submenus (clockwise from upper left).
Many corrective filters have direct opposites. Blur is the opposite of Sharpen, Add Noise is the opposite of Median, and so on. This is not to say that one filter entirely removes the effect of the other; only reversion functions such as the History palette provide that capability. Instead, two opposite filters produce contrasting effects.
Corrective filters are the subject of this chapter. Although they number fewer than their destructive counterparts, this book devotes more time to them because they represent the functions you're most likely to use on a day-to-day basis.
Destructive filters
The destructive filters produce effects so dramatic that they can, if used improperly, completely overwhelm your artwork, making the filter more important than the image itself. For the most part, destructive filters reside in the Filter Distort, Pixelate, Render, and Stylize submenus. A few examples of overwhelmed images appear in Figure 8-2.
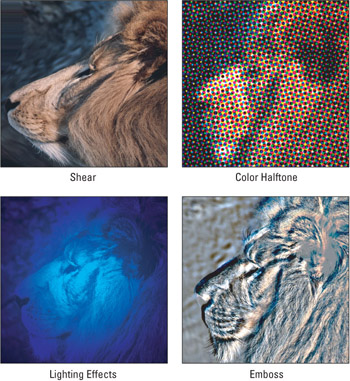
Figure 8-2: The effects of applying four destructive filters, one each from the Distort, Pixelate, Stylize, and Render submenus (clockwise from upper left). Note that Lighting Effects is applicable to color images only.
Destructive filters can also produce very cool effects, and many people gravitate toward them when first experimenting with Photoshop. These filters invariably destroy the original clarity, however, and can also change the composition of the image. These results are fine if they're what you need in order to achieve a certain look. Technically, every Photoshop function is destructive to a certain extent, but destructive filters can change your image so extensively that you can't easily disguise the changes later by applying other filters or editing techniques.
Destructive filters are the subject of Chapters 9 and 10. Rather than explaining every one of these filters in detail, a general overview is provided.
Effects filters
Photoshop also provides a subset of 47 destructive filters called the effects filters. These filters originally appear in the Gallery Effects collection, and when selected from the Filter menu's various submenus, the Filter Gallery opens.
The Filter Gallery enables you to access all of the effects filters from within one convenient dialog box. The Filter Gallery also lets you stack as many of these filters as you want on top of one another, and even reorder them to achieve different effects, previewing their cumulative results from within the Gallery before applying them to your image. It's a very snazzy addition to the program (it arrived in Photoshop CS), and one that is discussed in more detail in Chapter 9.
In addition to the Filter Gallery dialog box, most of the effects filters also reside in the Filter Artistic, Brush Strokes, Sketch, and Texture submenus (see Figure 8-3 for some examples). A few have trickled out into other submenus, including Filter Distort Diffuse Glow, Glass, and Ocean Ripple; and Filter Stylize Glowing Edges.
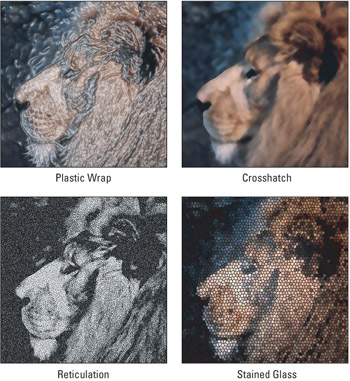
Figure 8-3: The effects filters come from Gallery Effects, a little toy surprise that Adobe accidentally acquired when it purchased Aldus Corporation. Here we see the impact of one filter each from the Filter Artistic, Brush Strokes, Texture, and Sketch submenus (clockwise from upper left).
Fading a filter
In many cases, you apply filters to a selection or image at full intensity ” meaning that you marquee an area using a selection tool if desired, choose a filter command, enter whatever settings you deem appropriate if a dialog box appears, and sit back and watch the fireworks.
What's so full intensity about that? Sounds normal, right? Well, the fact is, you can reduce the intensity of the last filter applied by choosing Edit Fade or pressing Ctrl+Shift+F ( z +Shift+F on the Mac) immediately after applying a filter. This command enables you to mix the filtered image with the original, unfiltered one.
As shown in Figure 8-4, the Fade dialog box provides you with the basic tools of image mixing ” an Opacity value and a blend mode pop-up menu. To demonstrate the wonders of Edit Fade, two particularly destructive filters from the Filter Gallery have been applied to the lion ” Stylize Glowing Edges and Sketch Bas Relief. The right-hand images show the effects of pressing Ctrl+Shift+F and applying two blend modes, Screen and Vivid Light, with the Opacity value set to 100 and 65 percent, respectively.
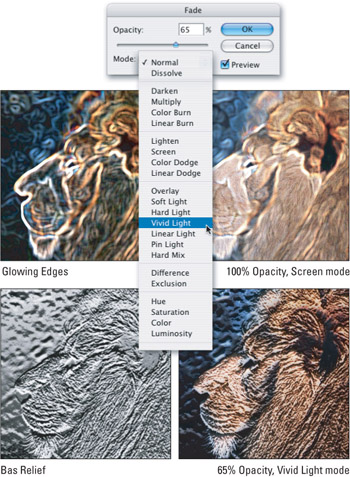
Figure 8-4: Press Ctrl+Shift+F ( z +Shift+F on the Mac) to mix the filtered image with the unfiltered original.
Creating layered effects
The drawback of the Fade command is that it's only available immediately after you apply a filter (or other applicable edit). If you so much as modify a selection outline after applying the filter, the Fade command dims, only to return when you apply the next filter. Therefore, you may find it more helpful to copy a selection to a separate layer (by pressing Ctrl+J on the PC or z +J on the Mac) before applying a filter. This way, you can perform other operations, and even apply many filters in a row, before mixing the filtered image with the underlying original.
| Tip | And here's another reason to layer before you filter: If your image has a border around it, you don't want Photoshop to factor the border into the filtering operation. To avoid this, select the image inside the border and press Ctrl+J ( z +J on the Mac) prior to applying the filter. The reason is that most filters take neighboring pixels into consideration even if they are not selected. By contrast, when a selection floats, it has no neighboring pixels, and therefore the filter utilizes the selected pixels only. |
Even if the area outside the selection is not a border per se ” perhaps it's just a comparatively dark or light area that serves as a visual frame ” layering comes in handy. You should always layer the selection unless you specifically want the filter to calculate edge pixels.
Undoing a sequence of filters
Okay, here's one last reason to layer before you filter: Copying an image to a layer protects the underlying image. If you just want to experiment a little, pressing Ctrl+J ( z +J on the Mac) is often more convenient than restoring a state in the History palette. After applying four or five effects to a layer, you can undo all that automated abuse by Alt+clicking (Option+clicking) the Trash icon at the bottom of the Layers palette, which deletes the selected layer with no fuss. The underlying original remains unharmed.
EAN: 2147483647
Pages: 95
- Linking the IT Balanced Scorecard to the Business Objectives at a Major Canadian Financial Group
- A View on Knowledge Management: Utilizing a Balanced Scorecard Methodology for Analyzing Knowledge Metrics
- Measuring ROI in E-Commerce Applications: Analysis to Action
- Governance in IT Outsourcing Partnerships
- Governance Structures for IT in the Health Care Industry