Applying Transformations
Photoshop treats some kinds of edits differently from others. Edits that affect the geometry of a selection or a layer are known collectively as transformations . These transformations include scaling, rotating, flipping, slanting, distorting, changing perspective, and warping. Technically, moving is a transformation as well. Transformations are a special breed of edits inside Photoshop because they can affect a selection, a layer, multiple layers , or an entire image at a time, and can be done by eye (with the mouse, you deciding how much or how far to drag the layer or its handles, until the desired transformation is achieved), or by entering numeric values into the options bar that appears while you're in Transformation mode. Photoshop CS2's Smart Guides, which you'll learn about shortly, make many transformations, especially moving and resizing, much easier.
Transforming the entire image
Photoshop has two varieties of transformations. Transformation commands that affect the entire image ” including all layers, paths, channels, and so on ” are listed in the Image menu. Those that affect layers and selected portions of layers are in the Edit menu, or in the case of selection outlines, in the Select menu.
The following list explains how to apply transformations to every pixel in an image, regardless of whether the image is selected or not:
-
Scale: To resize the image, use Image Image Size and enter new Width and Height values as desired. Make sure that the Resample Image check box is turned on. The default resampling method, Bicubic, used to be pretty much the only way to go. But Photoshop CS2 gives you two excellent methods : Bicubic Smoother and Bicubic Sharper.
-
Bicubic Smoother: When you're enlarging images, Bicubic Smoother is your best bet; it tries to reinterpret your image with the smoothest pixel transitions possible.
-
Bicubic Sharper: This is recommended for preserving the sharpness of an image that you're reducing. You can also enter new Width and Height values as desired.
-
-
Rotate: To rotate the entire image, choose a command from the Image Rotate Canvas submenu. To rotate an image scanned on its side, choose the 90 ° CW or 90 ° CCW command. (That's clockwise and counterclockwise, respectively.) Choose 180 ° to spin the image on its head. To enter some other specific value, choose Image Rotate Canvas Arbitrary.
Tip You can use the Arbitrary command in combination with the Measure tool to fix a crooked scanned image. Here's how: Select the measure tool from the Eyedropper flyout in the Toolbox (or press I and then Shift+I twice). Drag along what should be a vertical or horizontal edge in the image. Then choose Image Rotate Canvas Arbitrary. As you can see, the Angle value is preset to the angle you just measured. That Photoshop, it's one sharp cookie. Press Enter or Return, and the job's done.
Whenever you apply the Arbitrary command, Photoshop has to expand the canvas size to avoid clipping any of your image. This results in background- colored wedges at each of the four corners of the image. You need to either clone with the Clone Stamp tool to fill in the wedges or clip them away with the Crop tool.
-
Flip: Choose Image Rotate Canvas Flip Horizontal to flip the image so left is right and right is left ” a function of reflecting the image through its own center axis. To flip the image upside down, choose Image Rotate Canvas Flip Vertical.
No command is specifically designed to slant or distort the entire image. In the unlikely event you're keen to do this, you have to link all layers and apply one of the commands under the Edit Transform submenu, as explained in the next section.
Transforming layers and selected pixels
To transform a selection, a layer, or a collection of linked layers, you can apply one of the commands in the Edit Transform submenu. Nearly a dozen commands are here, all of which you can explore on your own. Nobody's skipping them arbitrarily or giving you less-than - extensive coverage. Rather, because you may not use many of them regularly, there are better ways for you to spend your time. And it's not that there's anything wrong with the Transform submenu commands; they aren't bad, but one command ” Free Transform ” is infinitely better.
With Free Transform, you can scale, flip, rotate, slant, distort, and move a selection or layer in one continuous operation. This one command lets you get all your transformations exactly right before pressing Enter or Return to apply the final changes.
The command is demonstrated on the image shown in Figure 5-21. Each of the elements in this image resides on an independent layer. The blossom layer is active, and the shadow is linked to this layer. Therefore, both blossom and shadow will transform together.
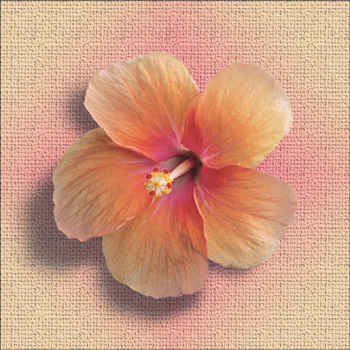
Figure 5-21: This blossom and its shadow reside on separate layers. But because they are linked together, they will transform as one.
Here's how it works: To initiate the command, press Ctrl+T ( z +T on the Mac) or choose Edit Free Transform. Photoshop surrounds the selection, layer, or linked layers with an eight-handle marquee. You are now in the Free Transform mode, which prevents you from doing anything except transforming the image or canceling the operation.
| Note | Neither Free Transform nor any of the commands in the Edit Transform submenu are available when you lock a layer or linked layer, either with the Lock Position or Lock All button. If a transformation command appears dimmed, therefore, the Lock buttons are very likely your culprits. |
Here's how to work in Free Transform mode:
-
Scale: Drag one of the eight square handles to scale the image inside the marquee. To scale proportionally, Shift+drag a corner handle. To scale about the central transformation origin ), Alt+drag (or Option+drag) a corner handle.
Tip By default, the origin is located in the center of the layer or selection. But you can move it to any place inside the image ” even outside of the transformation box ” by dragging it. The origin snaps to the grid and guides as well as to the center or any corner of the layer.
-
Flip: You can flip the image by dragging one handle past its opposite handle. For example, dragging the left side handle past the right side handle flips the image horizontally.
Tip If you want to perform a simple flip, it's generally easier to choose Edit Transform Flip Horizontal or Flip Vertical. Better yet, right-click (on the Mac, Control+click) in the image window and choose one of the Flip commands from the shortcut menu. Quite surprisingly, you can choose any of the shortcut menu commands while working in the Free Transform mode.
-
Rotate: To rotate the image, press Ctrl+T ( z +T on the Mac) to initiate the Free Transform command. Then, drag outside the marquee, as demonstrated in Figure 5-22. Shift+drag to rotate in 15-degree increments .
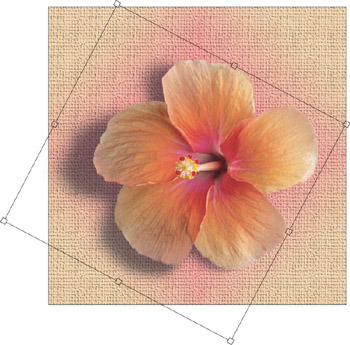
Figure 5-22: Rotating an image. -
Skew: Ctrl+drag ( z +drag) a side handle (including the top or bottom handle) to skew (slant) the image. To constrain the skew to a particular angle, which is useful for producing perspective effects, Ctrl+Shift+drag ( z +Shift+drag) a side handle.
-
Distort: You can distort the image by Ctrl+dragging ( z +dragging) a corner handle. You can tug the image to stretch it in any of four directions.
Tip To tug two opposite corner handles in symmetrical directions, Ctrl+Alt+drag ( z +Option+drag) either of the handles. The technique is applied to the blossom in Figure 5-23.
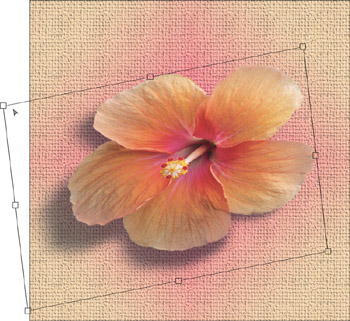
Figure 5-23: A free-form skew. -
Perspective: For a one-point perspective effect, Ctrl+Shift+drag ( z +Shift+drag) a corner handle. To move two points in unison , Ctrl+Shift+Alt+drag ( z +Shift+ Option+drag) a corner handle.
-
Move: Drag inside the marquee to move the image. This is useful when you're trying to align the selection or layer with a background image and you want to make sure the transformations match up properly.
-
Undo: To undo the last modification without leaving the Free Transform mode altogether, press Ctrl+Z ( z +Z on the Mac).
-
Zoom: You can change the view size by choosing one of the commands in the View menu. You can also use the keyboard zoom shortcuts: Ctrl+spacebar+ click, Alt+spacebar+click, Ctrl+plus, or Ctrl+minus (on the Mac, that's z +spacebar+click, Option+spacebar+click, z +plus, or z +minus).
-
Apply: Press Enter or Return to apply the final transformation and interpolate the new pixels. You can also double-click inside the marquee or click the check mark button in the Options bar.
-
Cancel: To cancel the Free Transform operation, press Escape, click the "no" symbol button in the Options bar, or press Ctrl+period ( z +period).
The dreaded jagged edge If the finished effect looks jagged after you've applied the transformation, it's probably because you selected Nearest Neighbor from the Image Interpolation pop-up menu in the Preferences dialog box. To correct this problem, press Ctrl+Z ( z +Z on the Mac) to undo the transformation and then press Ctrl+K ( z +K). Selecting Bicubic from the Image Interpolation menu is your best all-around choice for a default. (This preference sets the default interpolation method in the Image Size dialog box, too.) Then press Ctrl+Shift+T ( z +Shift+T) to reapply the transformation.
Tip To transform a clone of a layer or selected area, press Alt (Option) when choosing the Free Transform command or press Ctrl+Alt+T ( z +Option+T).
If no part of the image is selected, you can transform multiple layers at a time by first linking them, as described in the "Linking layers" section earlier in this chapter.
To replay the last transformation on any layer or selection, choose Edit Transform Again or press Ctrl+Shift+T ( z +Shift+T on the Mac). This technique is great to use if you forgot to link all the layers that you wanted to transform. You can even transform a path or selection outline to match a transformed layer. It's a handy feature. In fact, throw the Alt (or Option) key in there, and the transformation can be repeated on a clone of the selected layer.
Warping Layers
When it comes to transforming with that submenu of Edit Transform commands, there is one that's worth going into in detail ” and it's new to Photoshop CS2. The Warp command allows you to totally disfigure your image.
| Photoshop CS2 | Distort is too mild a term for what this feature does, and there's already a Transform Distort command, anyway. No, Warp lets you tug on, stretch, rip, and twist the content of a layer using a grid and bounding box to drag not just the sides and corners but the entire layer, in all different directions. |
The process of warping the blossom used for demonstration throughout this coverage of transformations is shown in Figure 5-24.
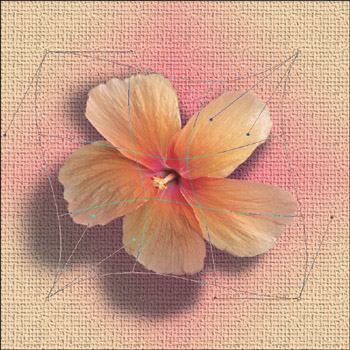
Figure 5-24: Grab any grid intersection, corner, or bounding box handle, and pull, stretch, twist, and generally abuse the selected layer.
When you grab the edges where the gridlines meet the bounding box, dragging creates the sort of handles you see when drawing Bezier curves with the Pen tool. Also shown in Figure 5-24, these handles let you change the direction and curve of the stretched sides of the grid (and the layer within it, being dragged right along with the grid), pulling it up, down, in, and out.
After you've finished tormenting the layer, all you have to do is press Enter to commit to the transformation, or press Esc to abandon it and send the layer back to its pre-Warp state.
To really go to town on a layer and get some help in shaping the layer at the same time, you can click the Warp menu, shown on the Options bar that appears when you activate the Warp command (Figure 5-25). After you apply a Warp preset(selected from a list of presets very similar to those available when you choose to warp text, while using the Type tool), you can resize the Warp effect and drag from the single handle (which looks like a little box along the perimeter of the bounding box) and flip the layer's content by dragging back through the layer itself.
Figure 5-25: Use the Warp tool's Options bar to apply a preset Warp to the layer, and then drag the lone grid handle to resize the layer and change the scale of the layer's distortion.
The Warp command's Options bar also offers numerical fields into which you can enter the Bend (as a percentage of increase or decrease) or a Horizontal or Vertical percentage change, which will change the perspective of the preset Warp. For more about using such numerical transformation tools, keep reading ” that's what the next section is all about.
Numerical transformations
To track your transformations numerically , display the Info palette (F8) before you apply the Free Transform command. Even after you initiate Free Transform, you can access the Info palette by choosing Window Info. You can also track the numerical equivalents of your transformations in the Options bar, which appears as soon as you enter Free Transform mode by pressing Ctrl+T (or z +T on the Mac). Shown in Figure 5-26, the Options bar contains a series of numerical transformation controls anytime you enter the Free Transform mode or make a selection from theEdit Transform submenu. These values not only reflect the changes you've made so far, but also enable you to further transform the selection or layer numerically ” making major changes or minor tweaks to make sure that an exact size or specific angle is achieved.
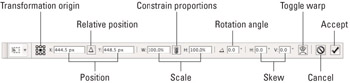
Figure 5-26: Normally, the options in the Options bar change only when you select a different tool, but choosing Free Transform adds a series of controls that transform a selection or layer numerically.
For the most part, the controls in the Options bar are straightforward. Click in the grid of nine squares to reposition the transformation origin. Use the X and Y values to change the location of the origin numerically. (This is another opportunity to utilize Photoshop CS's new scrubbing function, described in detail in Chapter 1.) Click the triangular delta symbol to measure the movement relative to the transformation origin. Use the W and H values to scale the selection or layer. Click the link button to constrain the W and H values and resize the selection or layer proportionally. The angle value rotates, and the H and V values skew.
Intelligent alignment with Smart Guides
So now that you've transformed your layers, you may want to reposition them by hand, dragging them into position with your mouse. You could always use the guides dragged in from the rulers to help you, but thanks to the advent of Smart Guides (new in Photoshop CS2), aligning and distributing layers has become a whole lot easier. Not that it was difficult before, but sometimes, unless you're zoomed in very tight on your image, you can't tell if you're really lined up with the guide, or if all the items you've lined up against the guide really are where you want them.
| Photoshop CS2 | Smart Guides (shown in action in Figure 5-27) flash on the image when your layer- in-motion is lined up against the items above, below, and beside it. Depending on the Smart Guides that appear ” straight lines pointing toward the items against which the active layer is being aligned ” you know if your layer is where you need it to be.  Figure 5-27: When those hot Magenta lines flash you know you're lined up properly. Smart Guides are a big help when aligning both horizontally and vertically, with or without ruler-derived guides in use. |
EAN: 2147483647
Pages: 95