Masking and Layers
Masking and Layers
Layers offer special masking options unto themselves . You can paint inside the confines of a layer as if it were a selection mask; you can add a special mask for a single layer; or you can group multiple layers and have the bottom layer in the group serve as the mask. Quite honestly, these are the kinds of thoughtful and useful functions we have all come to expect from Photoshop. Although they're fairly complicated to use ” you must be on your toes after you start juggling layer masks ” these functions provide new realms of opportunities.
Preserving transparency
As you may recall, it was mentioned that there would be more talk about the Lock Transparency button, first mentioned in the "Locking layers" section and labeled in Figure 5-28. Well, sure enough, the time has come to do exactly that. When selected, this button prevents you from painting inside the transparent portions of the layer. And although that may sound like a small thing, it is in fact the most useful Lock option of them all.
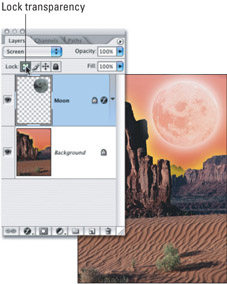
Figure 5-28: The Lock Transparency button enables you to paint inside the layer's transparency mask without harming the transparent pixels.
Suppose I want to paint inside the moon shown in Figure 5-28. If this were a flat, nonlayered image, you'd have to draw a selection outline carefully around that part of the image. But there's no need to do this when using layers. Because the moon lies on a different layer than its background, a permanent selection outline tells Photoshop which pixels are transparent and which are opaque . This is called the layer's transparency mask .
The first example in Figure 5-29 shows the moon with the background hidden. The transparent areas outside the mask appear in the checkerboard pattern. When the Lock Transparency button is turned off, you can paint anywhere you want inside the layer. Selecting the Lock Transparency button activates the transparency mask and places the checkerboard area off-limits.
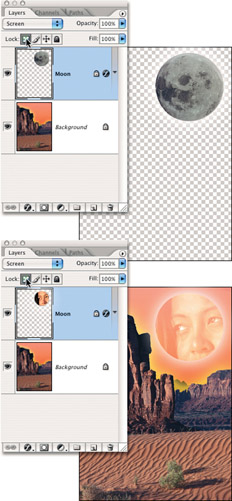
Figure 5-29: The layered moon as it appears on its own (top) and when the woman 's face has been CloneStamped in with the Lock Transparency button turned on (bottom).
The bottom image in Figure 5-29 shows what happens after selecting Lock Transparency and using the Clone Stamp tool to paint in the woman's face from Figure 5-1. Notice that no matter how much is painted , it never leaks out onto the transparent areas of the layer.
Although this enlightening discussion pretty well covers it, here are a few additional words about Lock Transparency:
-
You can turn Lock Transparency on and off from the keyboard by pressing the standard slash character (/), the one leaning to the right.
-
The Lock Transparency option is dimmed when the background layer is active because this layer is entirely opaque. There's no transparency to lock, eh?
And finally, here's a question for all you people who think you may have Photoshop mastered. Which of the brush modes (explained in Chapter 1) is the exact opposite of Lock Transparency? The answer is Behind. To see this in practice, turn off Lock Transparency. Then select the Brush tool and choose the Behind brush mode in the Options bar. Now paint. Photoshop applies the foreground color exclusively outside the transparency mask, thus protecting the opaque pixels. So it follows , when Lock Transparency is turned on, the Behind brush mode is dimmed.
Creating layer-specific masks
In addition to the transparency mask that accompanies every layer (except the background), you can add a mask to a layer to make certain pixels in the layer transparent. Now, you might ask, "Won't simply erasing portions of a layer make those portions transparent?" The answer, of course, is yes. But when you erase, you delete pixels permanently. By creating a layer mask, you instead make pixels temporarily transparent. You can return several months later and bring those pixels back to life again simply by adjusting the mask. So layer masks add yet another level of flexibility to a program that's already a veritable image-editing contortionist.
To create a layer mask, select the layer you want to mask and choose Layer Add Layer Mask Reveal All. Or more simply, click the layer mask icon at the bottom of the Layers palette, as labeled in Figure 5-30. A second thumbnail preview appears to the left of the layer name , also labeled in the figure. A second outline around the preview shows the layer mask is active.
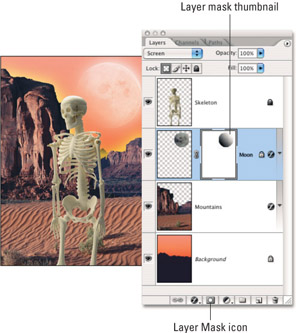
Figure 5-30: The black areas of the gradient in the layer mask (visible in the thumbnail view in the Layers palette) translate to transparent pixels in the layer, making the moon appear to fade out along its bottom left-hand side.
To edit the mask, simply paint in the image window. Paint with black to make pixels transparent. Because black represents deselected pixels in an image, painting with black makes these pixels transparent in a layer. Paint with white to make pixels opaque.
Thankfully, Photoshop is smart enough to make the default foreground color in a layer mask white, and the default background color black. This ensures that painting with the brush makes pixels opaque, whereas painting with the eraser makes them transparent, just as you would expect.
In Figure 5-30, a layer mask is attached to the moon layer. The moon is then loaded as a selection, and the selection area filled with a radial gradient. The result is a progressive radial fading of the moon's edge along its lower left side.
Photoshop goes nuts in the layer mask department, adding lots of bells and whistles to make the function both convenient and powerful. Here's everything you need to know:
-
Reveal Selection: If you select some portion of your layer, Photoshop automatically converts the selection to a layer mask when you click the layer mask icon at the bottom of the palette. The area outside the selection becomes transparent. (The corresponding command is Layer Add Layer Mask Reveal Selection.)
-
Hide Selection: You can also choose to reverse the prospective mask, making the area inside the selection transparent and the area outside opaque. To do this, choose Layer Add Layer Mask Hide Selection. Or better yet, Alt+click (Win) or Option+click (Mac) the layer mask icon in the Layers palette.
-
Hide everything: To begin with a black mask that hides everything, choose Layer Add Layer Mask Hide All. Or press Ctrl+D ( z +D on the Mac) to deselect everything and then Alt+click (Option+click) the layer mask icon.
-
View the mask: Photoshop regards a layer mask as a layer-specific channel. You can actually see it listed in italics in the Channels palette. To view the mask on its own ” as a black-and-white image ” Alt+click (Option+click) the layer mask thumbnail in the Layers palette. Alt+click (Option+click) again to view the image instead.
-
Layer mask rubylith: To view the mask as a red overlay, Shift+Alt+click (or Shift+Option+click) the layer mask icon. Or simply press the backslash key (\).
Tip After you have both layer and mask visible at once, you can hide the mask by pressing \, or you can hide the layer and view only the mask by pressing the tilde key(~). So many alternatives!
-
Change the overlay color: Double-click the layer mask thumbnail to access the Layer Mask Display Options dialog box, which enables you to change the color and opacity of the rubylith.
-
Turn off the mask: You can temporarily disable the mask by Shift+clicking on the mask thumbnail. A red X covers the thumbnail when it's disabled, and all masked pixels in the layer appear opaque. Click the thumbnail to put the mask back in working order.
-
Switch between layer and mask: As you become more familiar with layer masks, you'll switch back and forth between layer and mask quite frequently, editing the layer one minute and editing the mask the next . You can switch between layer and mask by clicking on their respective thumbnails. As stated, look to the icon to the right of the Eye icon to see whether the layer or the mask is active.
Tip You can also switch between layer and mask from the keyboard. Press Ctrl+tilde ( z +tilde on the Mac) to make the layer active. Press Ctrl+\ ( z +\) to switch to the mask.
-
Link layer and mask: A little link icon appears at the foot of the Layers palette (far left corner). When the link icon is visible, you can move or transform the mask and layer as one. If you click the link icon to unlink the selected layer, the layer and mask move independently. (You can always move a selected region of the mask or layer independently of the other.)
-
Convert mask to selection: As with all masks, you can convert a layer mask to a selection. To do so, Ctrl+click (on the Mac, z +click) the layer mask icon. Throw in the Shift and Alt (or Option) keys if you want to add or subtract the layer mask with an existing selection outline.
-
Apply mask to group: You can also apply a mask to a group of layers. Just select the group and click the layer mask icon. The mask affects all layers in the group. If a layer in the group contains its own mask, no worries: Photoshop's smart enough to figure out how to mix them together.
Cross-Reference For another method of masking multiple layers, see the section "Masking groups of layers," coming up soon.
When and if you finish using the mask ” you can leave it in force as long as you like ” you can choose Layer Remove Layer Mask, or just drag the layer mask thumbnail to the trash can icon. Either way, an alert box asks whether you want to discard the mask or permanently apply it to the layer. Click the button that corresponds to your innermost desires.
Pasting inside a selection outline
One command, Edit Paste Into (Ctrl+Shift+V or z +Shift+V), creates a layer mask automatically. Choose the Paste Into command to paste the contents of the Clipboard into the current selection, so that the selection acts as a mask. Because Photoshop pastes to a new layer, it converts the selection into a layer mask. But here's the interesting part: By default, Photoshop turns off the link between the layer and the mask. This way, you can Ctrl+drag (or z +drag) the layer inside a fixed mask to position the pasted image.
| Tip | Once upon a time in Photoshop, there was a command named Edit Paste Behind. The command pasted a copied image in back of a selection. Although the command is gone, its spirit still lives. Now you press Alt (Win) or Option (Mac) when choosing Edit Paste Into. Or just press Ctrl+Shift+Alt+V ( z +Shift+Option+V on the Mac). Photoshop creates a new layer with an inverted layer mask, masking away the selected area. |
Masking groups of layers
About now, you may be growing fatigued with the topic of layer masking, but one more option requires your immediate attention. You can group multiple layers into something called a clipping mask , in which the lowest layer in the group masks the others. Where the lowest layer is transparent, the other layers are hidden; where the lowest layer is opaque, the contents of the other layers are visible.
There are two ways to create a clipping mask:
-
Alt+click (or Option+click) the horizontal line between any two layers to group them into a single unit. Your cursor changes to the mask cursor labeled in Figure 5-31 when you press Alt (Option on the Mac). To break the layers apart again, Alt+click (or Option+click) the line.
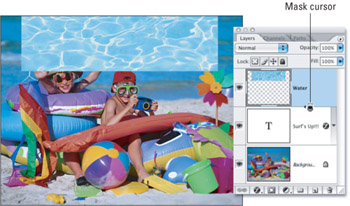
Figure 5-31: Alt+click (Win) or Option+click (Mac) the horizontal line between two layers to group them. -
Select the higher of the two layers you want to combine into a clipping mask. Then choose Layer Create Clipping Mask or press Ctrl+Alt+G( z +Option+G). To make the layers independent again, choose Layer Release Clipping Mask or press Ctrl+Alt+G ( z +Option+G).
Figures 5-31 and 5-32 demonstrate two steps in the creation of a simple clipping mask. Figure 5-31 shows three layers: the main image contents of the children and their beach toys on the background layer, a type layer above that, and a swatch of pool water on the topmost layer. Figure 5-32 shows the result of combining the text and pool layers into a clipping mask. Because the text was beneath the water, Photoshop masked the topmost layer according to the transparency mask assigned to the text. The result is a water pattern that exactly fills the type.
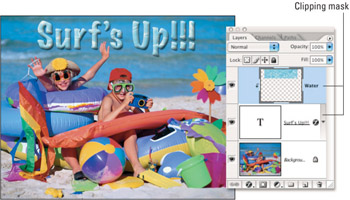
Figure 5-32: After combining the pool water and type layers into a single clipping mask, Photoshop applies the type layer's transparency mask to the pool layer.
| Note | If you're familiar with Illustrator, you may recognize this clipping mask metaphor as a relative to Illustrator's clipping mask. One object in the illustration acts as a mask for a collection of additional objects. In Illustrator, however, the topmost object in the group is the mask, not the bottom one. So much for consistency. |
EAN: 2147483647
Pages: 95