Basic Techniques
You don't need to be a Rembrandt or Vermeer to use Photoshop's painting tools effectively. If you have some artistic sensibility and a tad of hand-eye coordination, you're well on your way. Although we may not be able to improve your artistic sensibilities in this chapter, we can show you how the tools work, demonstrate a few useful tricks, and show you how to potentially sidestep the eye-hand coordination issues.
Painting a straight line
You could use Photoshop's Line tool to make straight lines, but that wouldn't be painting, would it? Besides, covering the Line tool here would leave a gaping hole in Chapter 7. To make any of the tools introduced in this chapter paint or edit in straight lines, you simply need to incorporate the Shift key.
Give this a try: Grab the Brush tool, and click somewhere in your image. Now press the Shift key and click somewhere else. Photoshop strokes a straight line between those two points. Figure 1-4 gives you an idea of what you can do with this little trick ” in this case, the lines have been drawn on a photo of some Adirondack chairs, sitting on a porch. You can draw straight lines on a photo, as shown in Figure 1-4 (using the edges of the photo's content for guidance), or you can draw them to create any kind of original image content, with or without photographic accompaniment.
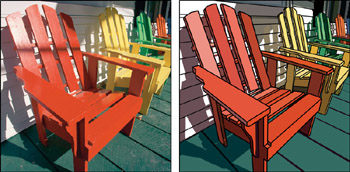
Figure 1-4: Using the left image as our starting point, you can create a stylized tracing by clicking and Shift-clicking with the Brush tool on a separate layer.
First, you can create a separate layer to paint on ( layers are specifically discussed in Chapter 5). This way, you don't mess up your original. Then, experimenting with different brush sizes (discussed later in this chapter) and nabbing different colors from the image using that eyedropper technique discussed previously (Alt-clicking for Windows users, Option-clicking on the Mac), you can create a simple tracing that's not too shabby without once having to rely on a steady hand.
Painting a perpendicular line
If you begin with the Shift key held down, Photoshop draws a straight line either horizontally or vertically ” whichever direction you start clicking. You cursor doesn't even have to stay on the line. No matter where you ultimately move your cursor, the line stays straight until you release the Shift key. Then something interesting happens: the minute you release the Shift key, Photoshop snaps a perpendicular line straight to the cursor's current location and returns the brush to freehand control. Press Shift again and the line jumps back to the original axis it was painting on.
So, the question is: "What can I do with that?" Take a look at Figure 1-5. The rib cage of our skeleton was created with just such a technique.

Figure 1-5: To create the basic structure for a bony pal, periodically press and released Shift while dragging with the Brush tool (left).
STEPS: Making a Skeleton
To create this kind of effect:
-
After activating the Brush tool, begin a straight vertical line by holding the Shift key.
-
Move your cursor out to where you want a rib to end while slowly moving down the screen.
-
Released the Shift key where you want the line to jump to the horizontal.
-
Next, return the cursor to your starting line, just a fraction below the horizontal line.
-
Shift-click to create an angled straight line back to the spine. This creates the triangular shape of the ribs.
After you finish one side, merely copy the layer and flip it over to complete the rib cage (middle). In Figure 1-5, the rest of the basic skeletal system was created and given depth and texture using the Emboss, Film Grain, and Lighting Effects filters(see right side of figure). The cheesy drop shadow is courtesy of the Layer Style dialog box.
Painting with the Smudge tool
Many first-time Photoshop artists misuse the Smudge tool to soften color transitions, which is actually the job of the Blur tool. The Smudge tool is designed to smear colors by shoving them into each other. Think finger painting ” without the mess.
The performance of the Smudge tool depends in part on the settings of the Strength and Finger Painting controls in the Options bar. Here's what you need to know about these options:
-
Strength: The Strength value determines the intensity of each stamping. Higher values push colors the farthest. A Strength setting of 100 percent equates to infinity, meaning the Smudge tool pushes a color from the beginning of your drag until you release your mouse button. Figure 1-6 shows a few examples.
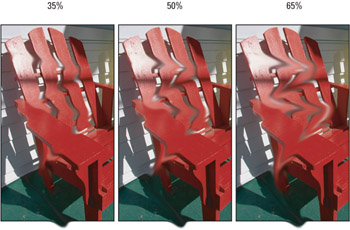
Figure 1-6: Three identical drags with the Smudge tool, subject to different Strength settings. Each example's stroke begins at the same point, and drags for the same duration. -
Finger Painting: In old versions of Photoshop, Adobe called this effect dipping . When you select Finger Painting from the Options bar, the Smudge tool initially applies a drop of foreground color and blends it in with the colors in the image ” as if you dipped your finger in a color and then dragged it through an oil painting. The Strength setting specifies the amount of foreground color applied. Setting the Strength to 100 percent essentially turns the Smudge tool into the Brush tool, painting with the foreground color. Figure 1-7 shows examples of finger painting with the Smudge tool when the foreground color is set to white.
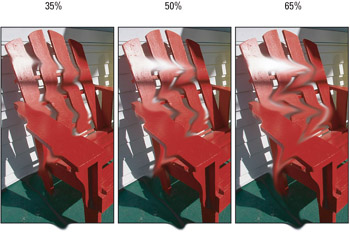
Figure 1-7: The same three drags pictured in Figure 1-6, this time with the Finger Painting option turned on and the foreground color set to white.Tip Reverse the Finger Painting setting by pressing the Alt key (Option on the Mac) and dragging. If the option is off, Alt-dragging dips the tool into the foreground color. If Finger Painting is turned on, Alt-dragging smudges normally.
-
Sample All Layers : As you can see in Figure 1-8, this option instructs the Smudge tool to grab colors in all visible layers and smudge them into the current layer. Whether the option is on or off, only the current layer is affected; the background and other layers remain intact.
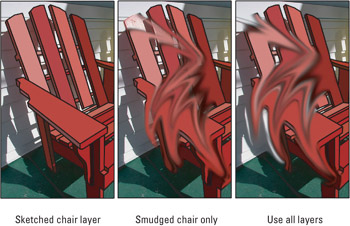
Figure 1-8: The "before" image (left) features the red chair on an independent layer in front of the original photograph. The middle example shows the smudged chair with the default setting. The right example shows the chair with the Use All Layers option on.Tip A great way to smudge without harming a single pixel in your image is to create a new, empty layer, then select the Smudge tool and turn the Use All Layers option on. Now smudge to your heart's content. Even though the active layer is initially empty, Photoshop draws the colors from the other layers. Meanwhile, the colors in your original underlying layers remain pristine.
Mopping up with the Sponge tool
The Sponge tool modifies two things: color saturation in color images, and contrast in grayscale images. You can choose Saturate or Desaturate from the Mode pop-up menu in the Options bar, which produces the following effects:
-
Desaturate: When set to Desaturate, the tool reduces the saturation of the colors over which you drag. When you're editing a grayscale image, the tool reduces contrast.
-
Saturate: If you select Saturate, the Sponge tool increases the saturation of the colors over which you drag, or increases contrast in a grayscale image.
To quickly switch between the Desaturate and Saturate modes, press Shift+Alt+D (Shift-Option-D on the Mac) to select the Desaturate option. Press Shift+Alt+S (Shift- Option-S on the Mac) for Saturate. No matter which mode you choose, higher Flow settings produce more dramatic results.
STEPS: Sponging Color In and Out
Figure 1-9 gives you an inkling of what you can do with the Sponge tool. Starting with a headshot of a man destined for toothpaste commercial fame, a virtual face- paint mask has been added around his eyes, using the Pen tool to make a selection, and the Burn and Sponge tools to create the effect of the mask. The following steps explain the process.
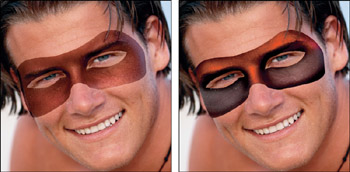
Figure 1-9: Painting with the Burn tool creates a mask when applied within a selection (left). The Sponge tool is used to fine-tune the color effects (right).
-
Draw the mask. Draw the mask outline using the Pen tool set to the Paths mode. (If proficient use of the Pen tool is not currently part of your skill set, check out Chapter 8 of the standard Photoshop CS2 Bible .)
-
Convert the path to a selection outline. After drawing the mask outline and eyeholes, convert the path to a selection outline by Ctrl-clicking on it in the Paths palette (Mac users can z + click). You can also right-click (Control + click on the Mac) to select Make Selection from a pop-up menu.
Tip If you're intimidated by the Pen tool and Paths palette, you can create a similar selection using the Lasso tool, though it won't look as smooth.
-
Jump the selection to a layer. Next, press Ctrl+J ( z -J on the Mac) to copy the selection to an independent layer. This protected the image so that any edits you apply to the mask do not harm the face.
-
Burn the mask. Thus far, mask and face were the same colors. To set the mask apart, you can darken it with the Burn tool. This involved multiple drags with the Strength set to 50 percent, focusing primarily on the outer edges.
-
Sponge away saturation. The mask had a nice tone to it. But to get more of a Mardi Gras effect, you can introduce some difference in saturation values. Begin by painting around the eyes inside the mask. Because the Mode option in the Options bar was set to Desaturate, this sucked away the color around the eyes, leaving mostly gray.
-
Sponge in saturation. Still armed with the Sponge tool, change the Mode setting to Saturate and paint along the forehead of the mask and bridge of the nose. This draws out some vivid oranges.
-
Dodge the eyes. Bright eyes make a person look healthier ” thus the adage "bright eyed and bushy-tailed." Just a click or two on each eye brightens the irises and gives the person an almost hypnotic stare.
Tip You may find it very helpful to turn on the airbrush setting in the Options bar when using the Sponge tool (as well as the other toning tools, Dodge and Burn). This way, you can gradually build up effects on the fly. When you find a section of an image that needs more sponging than most, hold your cursor in place, watch Photoshop airbrush in the effect, and then move the cursor when you've had enough.
Undoing your damage
Ahhh, the advantages of an electronic medium! The moment you botch a part of your current masterpiece, simply stop and choose Edit Undo, or press Ctrl+Z ( z -Z on the Mac). Press Ctrl+Alt+Z ( z -Option-Z on the Mac) to step back through a sequence of paint strokes.
| Cross-Reference | You can also undo a brushstroke by selecting a previous state in the History palette. As explained in Chapter 3, the History palette lists brushstrokes and other changes according to the tool you used to create them. |
If you like the basic look of a brushstroke, but you want to fade it back a bit, choose Edit Fade or press Ctrl+Shift+F ( z -Shift-F on the Mac). The Fade command lets you reduce the Opacity or change the blend mode of the brushstroke you just finished painting. (If you have since clicked with another tool, the command may appear dimmed, indicating that you've lost your chance.) The Fade command is applicable to all paint and edit tools, as well as other operations inside Photoshop, so you see a lot of it throughout this book.
| Tip | Better yet, when using the Brush tool or an edit tool that offers the Use All Layers option, create a new layer by pressing Ctrl+Shift+N ( z -Shift-N on the Mac) before you paint a single line. Then you can refine your lines and erase them without harming the original appearance of your image. |
EAN: 2147483647
Pages: 95