Choosing and Using a Shell
| The shell is perhaps the most underappreciated feature of a modern Linux system. New users try to avoid it, preferring the GUI tools that they are used to. Old-timers are wedded to the shell they learned at school. There's no real reason to give the shell a second thought, is there? Of course there is! By default, SUSE Linux (and pretty much all the other Linux distributions) installs the bash (Bourne Again SHell) shell as the standard command-line interface. There's certainly no reason not to take this fine choice and run with it. But this is Linux, and there's absolutely no reason not to explore some or all of the alternatives to bash included in SUSE Linux. This section will introduce you to these options, tell you how to change shells temporarily and permanently, and then offer pointers on how to use a shell productively. Note Learn even more about using shells, including writing shell scripts to automate tasks, in Chapter 8, "Shaking Hands with Your Shell." Cool Stuff That All Shells Have in CommonThe shell is not just a keyboard-based program launcher. It is a powerful tool you can use to get lots of things done quickly if you know how to use it. Some shells are designed for running scripts to automate tasks, and others work best interacting with its favorite user you! Following are some of the things that all shells have in common:
These are just some of the advantages of most all shells. But how does one shell differ from another? We will look at the three most popular shells bash, tcsh, and zsh in some detail, and then look at Midnight Commander (mc), a specialized shell for managing files and directories. Finally, there is a very brief introduction to the Korn (ksh) and the Almquist (ash) shells. Running bashJust about every Linux user has used bash at least once. As one of the original GNU projects, it has been in development since 1987. Version 3.0 was released in July 2004 and is included in SUSE Linux Professional 9.2. As you might guess from the name, bash (Bourne Again Shell) is the logical successor to the venerable Unix shell (sh) written by Steve Bourne. This is a shell best adapted for running scripts to automate tasks. You can tweak bash's performance by editing the .bashrc configuration file. Root can edit the systemwide .bashrc, and each user on the system may have his or her own configuration file, although a user cannot override the system configuration. Looking at a configuration file provides both a sample of the kinds of things you can do with a shell and offers a glimpse at the syntax each shell uses to perform its tasks. The default system configuration in SUSE Linux, bash.bashrc, is located, like other configuration files, in the /etc directory. Let's look at some of the settings defined here. This section lets you display directory listings in different colors. The colors are set in another file, DIR_COLORS. In this setting, bash looks for DIR_COLORS first in the home directory, then in /etc. # # Colored file listings # if test -x /usr/bin/dircolors ; then # # set up the color-ls environment variables: # if test -f $HOME/.dir_colors ; then eval `dircolors -b $HOME/.dir_colors` elif test -f /etc/DIR_COLORS ; then eval 'dircolors -b /etc/DIR_COLORS' fi fi Note the hash mark (#) in front of some of the lines. This indicates a comment line. The line is not processed by the shell, but usually describes what the next batch of code is supposed to do. This next section defines some aliases. As mentioned before, aliases are command-line shortcuts that allow you to substitute one command for another. # # Set some generic aliases # alias rd=rmdir alias md='mkdir -p' alias which='type -p' alias rehash='hash -r' alias you='yast2 online_update' This alias is a nice one. If you often mistype a command, you can specify a little reminder. You may think that the opposite of the mount command to display a drive or partition is unmount, but really it's umount (no N). This alias tells bash to remind you of the right command every time you add the extra N. Sure, you could just have unmount replace umount on your system, but what if you are working on someone else's system that does not have this alias? You may just forget the real command. With this method, you might train your fingers to type the right thing after a few gentle nudges. alias unmount='echo "Error: Try the command: umount" 1>&2; false' test -s $HOME/.alias && . $HOME/.alias fi This section modifies how the command history is handled, by making sure the History file doesn't get too big with many duplicate listings of the same file. # Do not save dupes and lines starting by space in the bash history file HISTCONTROL=ignoreboth if test "$is" = "ksh" ; then # Use a ksh specific history file and enable # emacs line editor HISTFILE=$HOME/.kshrc_history VISUAL=emacs fi ;; esac SUSE recommends not editing this default system file, because it can be overwritten in a system update. With this bit of code, bash checks for a local configuration file edited by the system administrator, saved as /etc/bash.bashrc.local. if test "$is" != "ash" ; then # # And now let's see if there is a local bash.bashrc # (for options defined by your sysadmin, not SuSE Linux) # test -s /etc/bash.bashrc.local && . /etc/bash.bashrc.local fi As noted at the beginning of this section, bash is a shell environment for scripting. Other shells are designed to be more interactive. Let's look at the leading example: the C shell. Running tcshBill Joy (later to become a founder of Sun Microsystems) wrote the original C shell in college. He aimed to provide a more interactive work environment, with a syntax more like the C programming language. Interactive shells are focused on directly processing commands you type in, rather than running scripts or files. Script-oriented shells such as bash can be used interactively, but it is rarely a good idea to make a C shell run scripts. The version of the C shell included in SUSE Linux is called tcsh, a tribute to the TENEX mainframe operating system. It has programmable command completion and a referable command history. The best thing about tcsh, though, is its command spell checker. If you type frotune at a tcsh prompt, it will ask if you mean fortune. A yes answer gives you a fortune cookie. Running zshThe Z shell strives to be the best of both worlds, enabling you to safely write scripts or use it interactively. It is based on the Korn shell (ksh) written by David Korn, with tons of extra features. Many folks love zsh to bits for its power and flexibility, but with great power comes great complexity. This shell's Info file has 21,530 lines of documentation in 11 subnodes. We won't cover all of that here. zsh has virtually all the neat features previously listed and works quite well with the default configuration file (etc/zshrc). Some features, such as command spell check, are not set by default, but it is a fairly easy task to edit them. This shell also checks your default text editor, and if it is emacs or vim, it will adopt that editor's key bindings (aka keyboard shortcuts) in addition to its own. Managing Files with Midnight CommanderWhatever shell you choose for your everyday use, you may find the Midnight Commander a handy in-between tool for moving files around. In between? Suppose you don't need to load a full GUI desktop to move a batch of files, but even all the wildcards and completion shortcuts offered by your shell won't let you easily copy a set of files from different directories into one other directory. You need something else something that will display two directories side by side and let you drag or move things from one place to another. You need Midnight Commander! To open Midnight Commander, type mc at the shell prompt. Figure 5.1 shows the initial default display of your home directory on both sides of the screen. Use the arrow keys to navigate in the left pane. Use the Tab key to move from one side to the other, and then move around. Select a file or folder and press Enter to open that item. Mouse support is excellent; click any menu at the top to see your choices. Along the bottom are the F-key bindings: pressing F1 brings up the Help file, F2 displays a context-sensitive menu of choices for the selected file or directory, and so on. Figure 5.1. The Midnight Commander shell.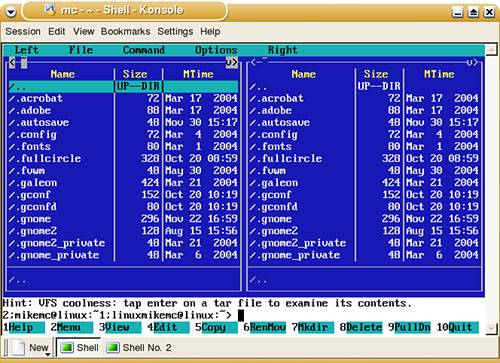 To copy a set of documents with the .sxw extension from ~/documents to a directory on a remote server called /backup/mikemc, follow these steps:
Midnight Commander is a program ripe for exploration. The first few times you work with it, play around a little. Go to a menu, or press an F key to see what a command does. The help files are indeed helpful! This is a full-featured file manager: View hidden files if you like, access FTP sites, and upload or download files (at the same time, if you want to), run executables, and change permissions (if you can) and owners with the ChMod and ChOwn commands. In short, just about everything you can do with a file in a shell, you can do with Midnight Commander. It even has a command history. Tip The KDE Konsole lets you open a new Midnight Commander session from the Session menu. Choose regular or Root (with your password). ksh and ashThe other shell choices may be less popular, but are still valid. Here's a quick overview:
Choosing a ShellYou now know a little bit about each shell. How do you decide which to use? The easiest thing is, of course, to stick with what you know. If you have used a shell before, there should be some compelling reason to switch. Similarly, if you don't ever intend to do anything fancy with your shell, you might as well stick with bash. You can certainly do very fancy things with bash, but why change from the default? Bash is also a great tool to learn scripting from. Resources abound on the Net to help you do that, and you'll learn more about that in Chapter 8 as well. If you don't want to write scripts, use an interactive shell such as tcsh, pd-ksh, or zsh. If you are a lousy typist, you should certainly consider one of the shells with a spell checker. tcsh spell checks by default; zsh spell checks with a very quick configuration file edit. The fancier you want to get with file and command completion, the more you'll probably want zsh. As recommended at the beginning of this section, try out all the shells, at least once. All you have to do is type the name of the shell at any other shell prompt. When you're done and want to return to bash, type exit. Look over the documentation. All the shells have extensive man or info pages. After you've settled on a shell, run the Change Shell (chsh) program to identify your choice. Then take some time to read those docs thoroughly. Now that you've settled one of the interminable Linux wars to your satisfaction, you can choose a text editor.
|
EAN: 2147483647
Pages: 332