Dynamic Host Configuration Protocol (DHCP)
| As you might guess, DHCP allows a network administrator to configure TCP/IP parameters for each host on the network when the host connects to the network. The network administrator can assign an IP address to a NIC, set DNS entries, and configure default routing and gateway information for each host. In this section, you'll learn how to use DHCP to assign an IP address, and how to set up a DHCP server with YaST. How DHCP WorksDHCP basically holds identifying information for each client that might connect to the network, and so offers persistent storage of network parameters. This information typically includes Subnet, hostnames and addresses, and specific hardware addresses. DHCP also allocates temporary and permanent IP addresses to clients and hosts. A temporary assignment is called a lease. When a lease elapses, a client can ask for an extension or return it to the server. DHCP can also allocate infinite leases for permanent connections, assuming it has enough addresses to spare. For the network administrator, DHCP simplifies life immensely because it automates the allocation of IP addresses. No more accidentally assigning duplicate addresses or worrying about managing a limited number of available addresses. DHCP Software Installation and ConfigurationDuring installation, YaST will set up DHCP for your system when it configures the NIC. This actually puts an entry into your /etc/sysconfig/network file. You can access and change some settings in the DNS and Host Name module in YaST Network Services. Note YaST uses a DHCP client called dhcpcd. You have the option to install the DHCP-client package from the Internet Systems Consortium as well, which gives you some command-line options. Setting Up a DHCP ServerYou can set up a DHCP server on the system in YaST Network Services as well. Click the module to begin the process. This module sets up the /etc/dhcpd.conf file. If you don't already have the DHCP Server package installed, you'll be prompted to insert the SUSE Linux installation media to install the package. Then the Configuration Wizard begins. In the first screen, you'll be asked which network interface to use for your server. Select one and click Next. Figure 25.4 will appear. Figure 25.4. Enter your addressing information here. The essential information to be entered here is the domain name this server will administer, the IP addresses for the DNS server(s) you're using, and the default gateway. As you see here, the default lease time for each host is 4 hours. This is adjustable here. If you want DHCP to handle addressing for your print server, enter its information here, too. Click Next to continue. This screen (Figure 25.5) gives the server the address block it has to work with. Enter the first and last addresses it can assign. You can also adjust the default lease time and set a maximum time beyond which extensions cannot be granted. Click Next to continue. Figure 25.5. Enter the range of IP addresses the DHCP server can assign here.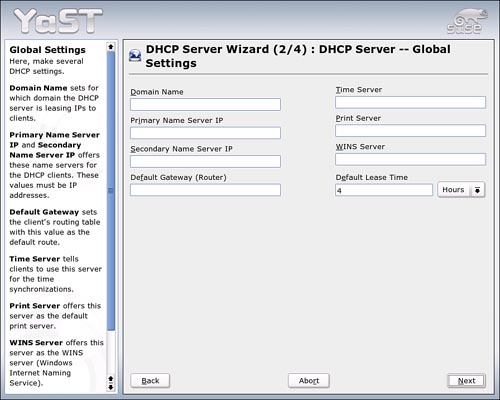 In the last wizard screen, you'll be asked whether to start the server on boot or only when you ask it to start. To start the server, click Detailed Settings and then click Start DHCP Server Now. Click Finish to exit the wizard. |
EAN: 2147483647
Pages: 332