Finding Files
| From time to time, you will need to locate a particular file in your file system. With SUSE Linux, you have a variety of tools available to do this. We'll discuss how to use the find, locate, which, and whereis commands, as well as several graphical utilities to track down files. Using findThe findutility does just what its name implies. It's used to find files in your computer's file system. The syntax for using find is as follows: find path search_pattern One of the advantages of find is that you can use a variety of search patterns. You can search for a filename, for a specific file type, for files of a particular size, for files that were modified at a certain time, and for files owned by a particular user or group. These search patterns are created using the following command-line options:
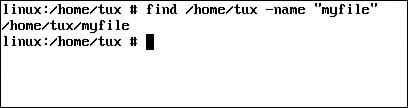
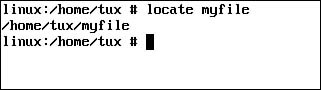
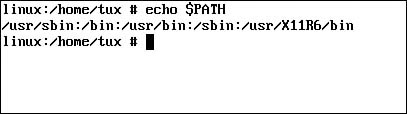
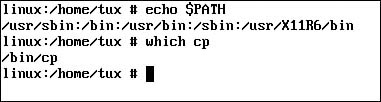
For example, suppose you wanted to find a file named myfiles that you think resides in the /home/tux directory on your system. You could enter find /home/tux -name "myfiles" at the shell prompt. The find utility will then search the /home/tux path for any file named myfiles, as shown in Figure 18.5. Figure 18.5. Using find to search for files. The find utility, by default, searches all subdirectories beneath the path specified. In the preceding example, you could also enter find / -name "myfiles" at the shell prompt and it would find the /home/tux/myfiles file (although it will take much longer). For more information about how to use find, enter man find at the shell prompt. In addition to find, you can also use the locate utility to search for files. Let's look at this utility next. Using locateThe find utility works great for locating files in the file system. However, it has one drawback. It finds files by searching through each and every directory beneath the path specified in the command line. This process can be quite slow. For example, if you were to use find to create a search that searched for a specific file from the top of the file system, it may take 10 to 15 minutes (possibly longer) to complete. As an alternative, you can use the locate utility to search for files. The locate utility operates using an entirely different search mechanism. Instead of searching through directories, it looks for the specified file within its own database of files that are stored in the system. The locate utility is part of the findutils-locate package. Before you can use locate, you must use YaST to install this package on your system, as shown in Figure 18.6. Figure 18.6. Installing locate packages.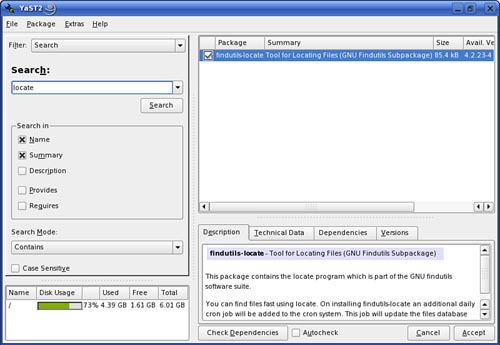 After these packages are installed, a database is created in /var/lib called locatedb. A listing of files in your file system is stored in this database. This database is automatically updated every day. If necessary, you can also manually update it by running the updatedb utility from the shell prompt. With the database updated, you can use the locate utility to search for files within it. The syntax for using locate is relatively simple. You simply run locate and specify the name of the file you want to search for, as shown next: locate file_name For example, if you wanted to search for the myfiles file, you would enter locate myfiles, as shown in Figure 18.7. Figure 18.7. Using locate to find files. As with find, you can view the man page for the locate utility to learn more. In addition to find and locate, you can also use the which command to search for files. Let's review this command next. Using whichThe whichutility is a handy command for finding the executable files used by system commands. The which utility searches for files in a manner similar to the find utility. However, which searches for files only in the directories contained in the PATH variable. At this point, you've probably noticed that you can run system commands, such as which, locate, find, cp, rm, and cd, regardless of what your current directory in the file system is. That's because the executable files for these commands reside in directories that are included in the PATH variable. You can see a listing of these directories by entering echo $PATH at the shell prompt, as shown in Figure 18.8. Figure 18.8. Viewing directories in the PATH variable. The which utility is used to generate a search that is limited to the directories in the PATH variable. For example, if you wanted to find out where the cp executable resides, you would enter the following: which cp The which utility then returns the path where cp is located, as shown in Figure 18.9. Figure 18.9. Using which. When working with system commands, you can also use the whereis utility. Let's explore this command next. Using whereisLike which, the whereis utility is used to find the location in the file system where system commands reside. However, it can return much more information about the file than which can. It not only returns the location of the file, it also returns the location of the man page file and of the source code file (if it exists). The syntax for using whereis is relatively straightforward. Enter whereis command For example, if you wanted to get information about the rm command, you would enter the following: whereis rm The whereis utility then returns the relevant data, as shown in Figure 18.10. Figure 18.10. Using whereis. If you want to limit the output provided by whereis, you can use the following syntax: whereis option command The options you can use include the following:
In addition to these command-line utilities, SUSE Linux also includes graphical utilities that can be used to search for files. Let's look at these next. Using kfindThe first utility we will explore is kfind, which is a graphical version of find that runs within the KDE shell. To use KFind, select K Menu, Find Files/Folders. The screen in Figure 18.11 is displayed. Figure 18.11. The kfind interface.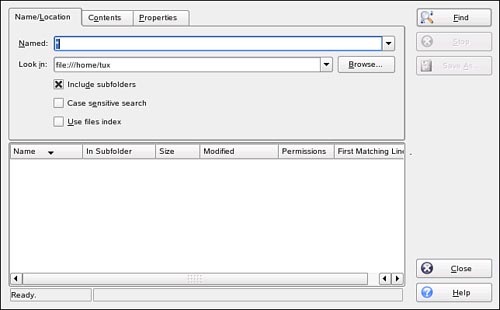 Within this interface, you can configure and execute complex search operations. To do this, complete the following:
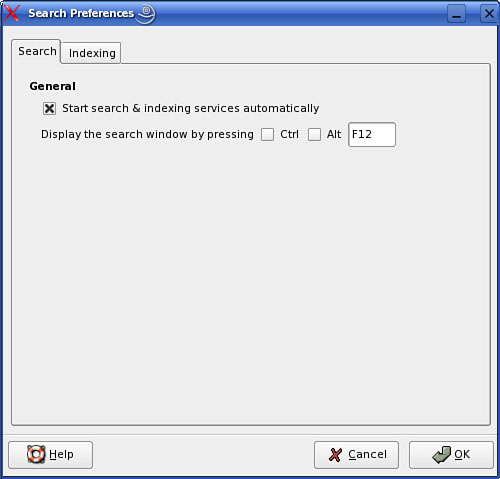
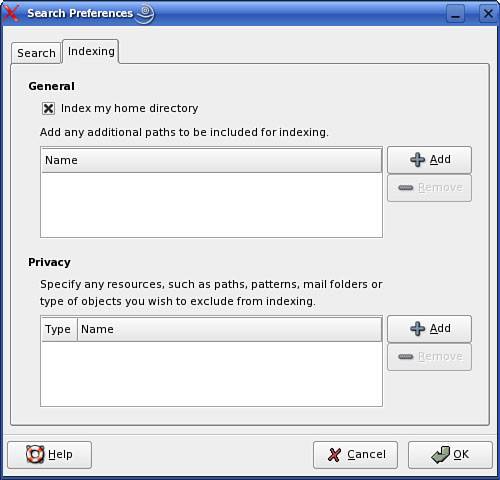
In addition to kfind, you can also use a new, more advanced graphical search tool on SUSE Linux: Beagle. Using BeagleBeagle is a search tool that can be used to find different types of information from a variety of data sources associated with your user account. Beagle can search your personal documents, text files (including source code), email, browser history, instant messages, web pages on the Internet, man pages, help files, and media files. To use Beagle, you must first install the beagle package on your system using YaST, as shown in Figure 18.13. Figure 18.13. Installing Beagle.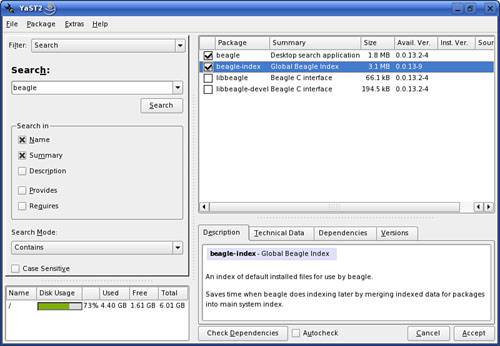 Be warned; the Beagle package has a number of dependencies that will need to be installed along with it. When you select Accept in YaST, a screen will be displayed listing the additional packages that must be modified or installed to support Beagle, as shown in Figure 18.14. Figure 18.14. Installing Beagle dependencies.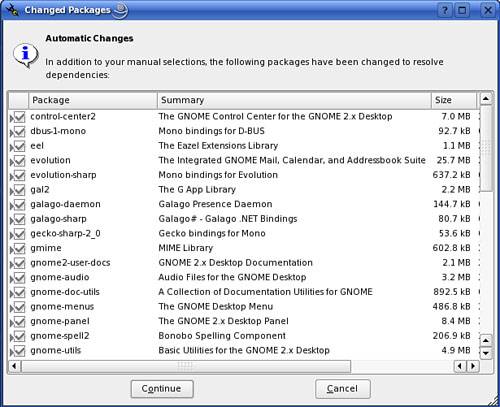 After you have Beagle installed, the next thing you need to do is start the daemon. It's important that you understand that the Beagle daemon operates in a different manner from other system daemons you may be familiar with. Most other daemons run as either your root user or another specialized user account. The Beagle daemon, on the other hand, is run from within your individual user account. This is because Beagle searches for data that exists within your own user "space." To start the Beagle daemon, open a terminal session and enter beagled at the shell prompt. The daemon will run in the background and begin automatically indexing content available to your user account. If you want to customize how the daemon behaves, you can run the Beagle configuration utility by entering beagle-settings from the shell prompt. When you do, the screen shown in Figure 18.15 is displayed. Figure 18.15. Configuring Beagle indexing and search behavior. Under the Search tab, you can configure whether beagled automatically starts searches and indexing as well as the hotkey sequence required to open the search window. You can configure what beagled will index by selecting the Indexing tab, shown in Figure 18.16. Figure 18.16. Configuring content to be indexed. Under this tab, you can configure specific directories that should be indexed and other directories that should not be indexed. By default, all subdirectories of the directories specified are included. As the daemon is running, you can see the content it has indexed by entering beagle-index-info at the shell prompt. Beagle will conduct its searching and indexing operations in the background and run with a low priority so that it doesn't take up excessive amounts of CPU time or hard disk bandwidth. In this mode, the indexing operation could take many hours to complete. However, you can force beagled to run at a higher priority and complete the index process much faster. This is done by stopping the daemon, entering export BEAGLE_EXERCISE_THE_DOG=1 at the shell prompt, and then restarting the daemon. After your indexing is complete, you can use the Bleeding Edge Search Tool (BEST) to search for data. At the shell prompt, enter best show-window. The screen in Figure 18.17 is displayed. Figure 18.17. Using BEST to search with Beagle.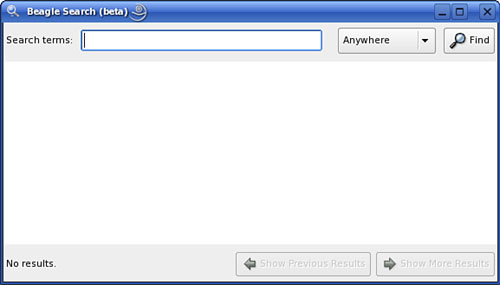 In the Search Terms field, you can enter the text you want to search for. In the drop-down list, select the data source you want to search, and then select Find. You can also use a web browser to compose and execute searches. The Beagle daemon includes a small web server application that is enabled by default on port 8888. To access the beagled daemon through a browser window, navigate to http://localhost:8888/beagle/search.aspx. With this in mind, let's now discuss some more advanced tasks you can perform with your Linux file system. |

EAN: 2147483647
Pages: 332
- ERP System Acquisition: A Process Model and Results From an Austrian Survey
- The Second Wave ERP Market: An Australian Viewpoint
- The Effects of an Enterprise Resource Planning System (ERP) Implementation on Job Characteristics – A Study using the Hackman and Oldham Job Characteristics Model
- Distributed Data Warehouse for Geo-spatial Services
- Relevance and Micro-Relevance for the Professional as Determinants of IT-Diffusion and IT-Use in Healthcare