Configuring a Digital Subscriber Line (DSL) Connection
| SUSE Linux supports all flavors of DSL connections, and they can all be set up in the YaST DSL configuration dialog boxes. DSL service generally provides 128KBps to 1.0MBps transfer speeds, transmitting over copper phone lines from a Central Office (CO) to individual subscribers, like you. Many DSL services offer asymmetric speeds, usually offering higher download speeds than upload. DSL connections require you to have an Ethernet network interface card (NIC) in your computer. If you have multiple computers on a LAN that want to share the connection, you'll need to have at least one other NIC on the machine managing the connection. Depending on your ISP, you may have a static IP address or use DHCP to assign a new IP address; it also uses a slightly different protocol called PPP Over Ethernet (PPPoE). This is difficult to configure manually through the shell, but YaST greatly simplifies this task. Using YaST to Set Up Your DSL ConnectionSetting up a DSL connection in YaST is very similar to setting up a modem connection. Begin by opening YaST. In KDE, go to the Kicker menu and choose System, then YaST. You'll be asked for the Root password and YaST will load. Click Network Devices. Click DSL to set up your connection. The hardware devices involved in a DSL connection are a DSL modem and a network card (usually Ethernet). YaST handles configuring both of these in a DSL Devices page. When you open the DSL configuration page, YaST should have detected your devices during the install, but you can easily do this if it hasn't. Click Add under the top screen to launch the DSL Device Wizard. The first screen should look like Figure 12.5. Figure 12.5. The first DSL configuration screen lets you identify the type of connection and the Ethernet card. Note To check or edit your existing DSL settings, select the device and click Edit. It will display the same options as the Add screen. By default, YaST selects PPP Over Ethernet as the default PPP Mode. If your Ethernet card is not listed, you will need to set it up. Click Configure Network Cards to do so. At first, you will see the overview screen. Figure 12.6 shows you this dialog box. If your card is not listed, click Add to open the configuration dialog box. Figure 12.6. Use the Edit button on the Network Cards Configuration Overview page to change the existing settings for your DSL card, or use Add to define a new or undetected card.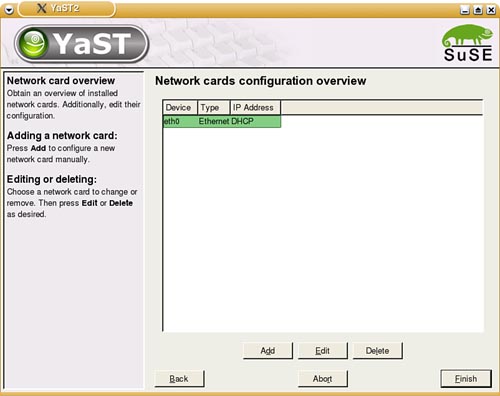 The configuration dialog box (see Figure 12.7) sets up your DSL card. It should be labeled as either eth0 or eth1, depending on whether you have an Ethernet LAN card installed in addition to the DSL card. Figure 12.7. Configure your DSL Ethernet Card with this dialog box.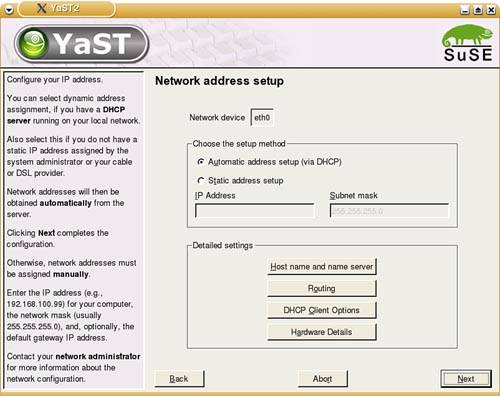 Setting up for a static IP address is easy. Click the appropriate option button and enter your primary address and subnet mask. If your ISP uses DHCP to set addresses on bootup, you will need to configure other items on this screen. Click DHCP Client Options and confirm that Host Name to Send is set to AUTO unless your ISP has specified a hostname. If your card is acting as a router, you may also want to look at the Routing page. You want to enable IP forwarding in this case. Click Next to save your settings and return to the Network Card overview page, and click Finish to return to the DSL Setup page. When you're finished setting up your hardware, click Next to set up your ISP. YaST pulls up a much smaller list of DSL Providers in several countries that you may select from in a screen like the one shown in Figure 12.2. If your provider is not listed, click New to add it. Click Next to set your username and password. Figure 12.8 shows the ISP configuration screen. Enter your username and password. A DSL connection is always on, but when you reboot, the connection is dropped. If you want to enter your ISP password each time you connect, check the Always Ask for Password box. Click Next to configure your connection. Figure 12.8. Enter your username and password on this screen.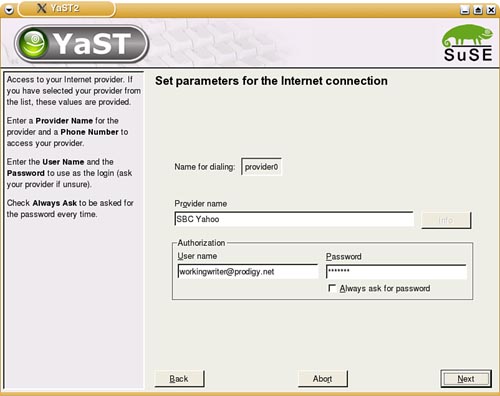 The final DSL provider configuration screen, which is identical to Figure 12.4, defines how you want to manage your connection. There is no real need to set up Dial on Demand, as you are always on. Similarly, you need not worry about the Idle Timeout setting. Do check the Activate Firewall box to prevent all incoming connections from attacking your computer. If you have a static IP address, click the IP Details button to configure this. Uncheck the Dynamic IP box and enter the static IP address in the Local IP Address box. Click OK to return to the previous screen. Click Next to complete the setup. Note For static addresses, make sure the PPP Mode is set for standard PPP, not PPPoE. When you click Finish, your new settings will be saved and you'll be asked to set up your mail account. See Chapter 15 for the details of this setup. |
EAN: 2147483647
Pages: 332