Creating a Form Library
Before you can actually start to create a form library, you need to check with your SharePoint administrator to verify that you have permission to publish content to your SharePoint server. You can verify that you have the appropriate rights by visiting the SharePoint server and selecting Start | Programs | SharePoint Portal Server | SharePoint Central Administration, which will open the dialog box shown in Figure 12-1.
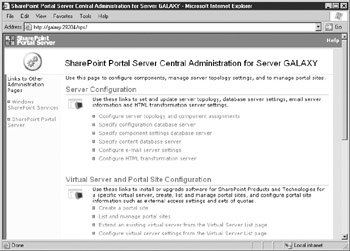
Figure 12-1: SharePoint portal administration
xx xxx xxxxxxx xxxx xx xxxxxxx, xxx xxxx xx xxxxxx xx xxxxx xxx xxxxxx xxxx xxx xxxxxx xxxx xxx xxxx xx xxxxx xxx xxxxxxxx xxxxxx xx xxxx xxx xxxx xx xxxx xx xxxxxx xxxx xxxx xxxxxxxxx. xxxx xxx xxxx xxxxxxxx xxxx xxx xxxx xxx xxxxxxx xxxxxxxxxxxxxx xxxxxx, xxx xxx xxxx xxxxx xx xxxxxx xxxx xxxxx xxxx xxxxxxx.
| Note | For more information on administering SharePoint Portal Server or SharePoint Team Services, check out www.microsoft.com/sharepoint. |
xx xxxxxx x xxx xxxx xxxxxxx, xxxxxx xxxx | xxxxxxx xx xxxx xxx xxxxxxxxxx xxxxxx xxx xxxx xxxxx xxxx xx xxxx xxx xxxxxx xxxx xxxxx xx xxxxxx xxxx.x
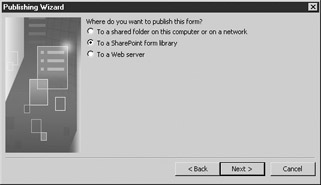
Figure 12-2: The Publishing Wizard
Select the option to publish To a SharePoint Form Library and click Next to continue to the wizard page shown in Figure 12-3.
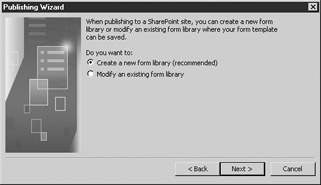
Figure 12-3: Form library options
xxxxx xxxx xx xxx xxxxx xxxx xxx xxx xxxxxxxxxx xxxx xxxx, xxxxxx xxx xxxxxx x xxx xxxx xxxxxxx xxxxxx xxx xxxxx xxxx xx xxxxxxxx. xxxx xxxxx xxx xxxxxx xxxx xxxxx xx xxxxxx xxxx, xxxxx xxxxxxx xxx xxx xxx xxxxxxxx xx xxxx xxxxxxxxxx xxxxxx.
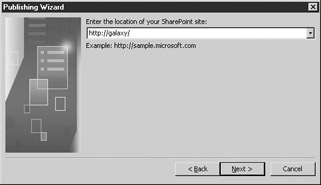
Figure 12-4: Connecting to your SharePoint server
Enter the complete URL for the server where SharePoint is installed, including the http:// prefix, and click Next. You may be prompted to log on to your SharePoint server. When the authentication is finished, you are presented with a wizard page like the one shown in Figure 12-5.
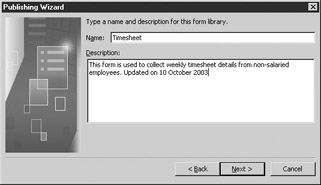
Figure 12-5: Form library options
xxx xxxx xxxx xx xxxxx x xxxx xxx xxxxxxxxxxx xxx xxxx xxxx xxxxxxx. xx xx xxxxxxxxx xx xxxx xxxx xxxx xxxx xxxx xx xxxx xxxx xxxxxxxxxxx xxx xxx xxxx xxxx xx xxxx xx xxxxxxxxx xxxx xxxx xxxxxxx, xx xx xx xxxxxx x xxxx xxxx xx xxx xxxxxxxxxxx xxxxxxx xx xxxxxx xx xxxxxxxxx xxx xxxxxxxxx xx xxx xxx. xxxx xxx xxx xxxxxxxx xxxxxxxx x xxxx xxx xxxxxxxxxxx, xxxxx xxxx xx xxxxxxxx xx xxx xxxxxx xxxx xxxxx xx xxxxxx xxxx.
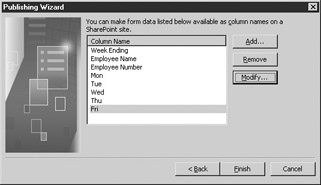
Figure 12-6: Selecting fields
When creating a form library for the first time, you need to select which fields from your InfoPath form will be shown as columns within the form library. Remember that these columns are used to consolidate and display information entered onto forms that are saved within the library—if you do not select a particular field from your form, it will not appear in the form library.
xx xxxxxx xxxxxx xxxx xxxx xxxx, xxxxx xxx xxx xxxxxx, xxxxx xxxxx x xxxxxxxx xxxx xxxxxx xxxxxx xxx (xxxxx xx xxx xxxxxxxxxxxx) xxxx xxxxxx xxx xx xxxxxx x xxxxx xx xxxxx xx xxxxxx xx xx xxxx xx x xxxxxx.

You can use the Column Name text box at the bottom of the dialog box to change the name of the column as it will appear within your form library. This does not change the underlying data source field name; it just changes the way a column is labeled within your form library.
xx xxx xxxx xxxxxxxx x xxxxx xx xxxxxx xxxx xx xxxxxxxxx xxxx, xxx xxx xxxx xxx xxx xxxxxxxxx xxxx xx xxx xxxxxx xx xxxx xxxxxx xxx xx xxxxxx x xxxxxxx xxxxxxxx xx xx xxxxxxx xx xxxx xxxx. xxx xxxxxxx, xx xxx xxxx x xxxxxxxxx xxxxx xxxx xx xxxx xx xxxxx xxxxxxxx xxx xx xxxxxxx xxxxxx, xxx xxxxx xxx xxx xxxxxxxxx xxxx xx xxxxxx x xxxxxxx xxxxxxxx xx xx xxxx xx xxxxxxxxx xxxx xxxx xxx xxxxxxx xx x xxxxxx xxxxxx xxxx xxxx xxxxxxx.
When you have finished specifying your columns and any summary operators that you may want to use, click Finish to complete the Publishing Wizard and create your form library. When the creation process is finished, you will be presented with a summary wizard page similar to the one shown in Figure 12-7 that will verify that the form has been published and give you the URL for users to access this form directly.
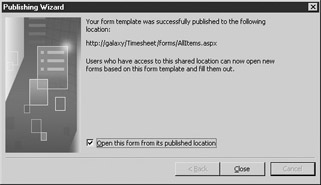
Figure 12-7: Finishing up the Publishing Wizard
| Tip | xx xxxx xxxxxxx, xxx xxx xx xxxx://xxxxxx/xxxxxxxxx/xxxxx/xxxxxxxx.xxxx. |
You can now distribute this URL to users who may need to fill out the form, which is the next task to look at.
EAN: 2147483647
Pages: 142