Server Security Enhancements
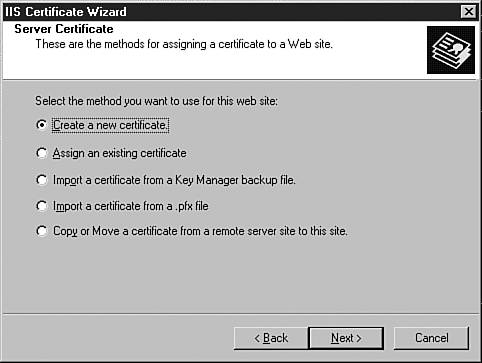
| One of the key areas where security administrators can really make a difference when working with Exchange is with the security of the servers. Aside from the normal security concerns (physical access, passwords, and so on), several security concerns are specific to deploying Exchange servers. The following sections examine some of the enhancements in Exchange 2003 that make it easier to secure your messaging and collaboration platform. Operating SystemA good place to start looking at server security is with the underlying operating system. Although Exchange 2003 can run on Windows 2000 servers, security enhancements have been made in Windows 2003 Server that benefit Exchange administrators. These benefits aren't necessarily specific to Exchange, but Exchange administrators will leverage them to provide a secure server platform. When you're installing Exchange 2003 on Windows 2003 Server, you can be assured that all the security enhancements made with this operating system release are filtered through to Exchange. By default, Windows 2003 Server provides a secure, scalable platform for Exchange through Microsoft's new mantra of "secure by design." Microsoft's mantra ensures that only required features are enabled when you first install and configure the operating system. For Exchange administrators, this means less avenues for attack or exploitation of Exchange servers. This includes direct attacks against the servers as well as attacks using applications that run on the servers, including Outlook Web Access (OWA). SECURITY FEATURES IN WINDOWS 2003 SERVER For more information on the security features in Windows 2003 Server, pick up a copy of the Windows Server 2003 Delta Guide (ISBN 0-7897-2849-4), also from Sams Publishing. SSL SecurityWith previous versions of Exchange, administrators had a decision to make when it came to deploying OWA, the Web-based client for Exchange. Although the ability to access email remotely was appealing, the functionality that was provided was far below what was offered in the full Outlook client, and there were serious security concerns about deploying a Web-based client for Exchange. With the introduction of a newly updated version of OWA that is on a rough parity with the full Outlook 2003 client, mail administrators will want to take a second look at deploying this Web-based client for Exchange. OWA Because this chapter is dedicated to Exchange security, it doesn't cover the features included in OWA. For more information on that, check out Chapter 10, "Other Exchange Clients," page 127. Because OWA is installed and configured by default with Exchange 2003, administrators now have a robust Web client for Exchange that is easy to deploy and use. Although the updated OWA provides a host of new features for Exchange users, some of the same security concerns have persisted from previous versions. If you are thinking about deploying OWA, the configuration and use of Secure Sockets Layer (SSL) encryption should be at the top of your security checklist. This security measure was also available for Exchange 2000 and its implementation of OWA; however, if you chose not to deploy OWA within your organization, you probably haven't run across it as an administrator. As a user, you have probably been to numerous Web sites or e-commerce sites that were secured using SSL, where the padlock appears in the bottom-right corner of your browser or the address is prefixed by HTTPS:// (instead of HTTP://), indicating that the Web site or store is secure. Because OWA is installed by default with Exchange 2003, you will want to configure SSL to provide a secure interface to OWA and secure communications between front-end servers that connect to the other servers in your Exchange topology. This section looks at some of the steps required to use SSL in your Exchange implementation. First, you need to have a Server Certificate to enable SSL. A Server Certificate is a virtual document that is available from a Certification Authority (CA). You can use a commercial CA, such as Thawte or VeriSign, or you can use an internal CA that your company maintains. This CA collects information from you, including details about your organization, and issues a certificate that serves as verification that you are who you say you are. This same certificate makes it possible to create a secure connection between two computers, using encryption keys to ensure that the information being sent across the wire is confidential and hasn't been tampered with. To obtain a certificate, it's easiest to request one from a commercial CA. You could create your own certificate, but most browsers are already programmed to trust certificates that are issued by commercial CAs, eliminating those annoying pop-up messages every time you want to access a Web site. Luckily, the process of requesting a server certificate from a CA has been streamlined through the use of a wizard. This wizard collects information about your organization and submits it to the CA. To obtain a server certificate, follow these steps:
After you have created this request, you can send it on to a CA (http://www.verisign.com, http://www.thawte.com, and so on), who will then check your credentials and, upon the payment of a fee, issue you a server certificate. (The timeframe for this could be anywhere from the same day to a few weeks' time.) With your certificate in hand, it is time to do a little more configuration work to make Exchange secure. To use your Server Certificate to secure Exchange, follow these steps:
Now whenever users want to access OWA or other Exchange client applications that are exposed through IIS, they will use the HTTPS:// prefix, which provides a secure SSL connection. Kerberos AuthenticationExchange 2003 now also supports Kerberos authentication, which allows information sent between Exchange servers to be secured. If you worked with a multiserver architecture in previous versions of Exchange, you are probably already aware of the inherent security issues, including the passing of user credentials between front-end and back-end servers using Basic authentication. This authentication method posed a severe security risk for Exchange. Hackers could "sniff" the connection between the servers and work out the credentials from there. This meant that for previous Exchange implementations, you also had to apply IPSec security to the communications between servers to encrypt the information being sent between them. Often, administrators overlooked this security concern, leaving many organizations unaware that there was a potential security risk. With the introduction of Exchange 2000, NTLM was used as the default authentication protocol between servers. The primary reason for not using Kerberos was the lack of support for the protocol when using clustered servers. Since Windows 2000 Server SP3, Kerberos authentication is now fully supported for single and clustered servers, meaning that any information or credentials that are passed between servers are secure. This eliminates the vulnerability of "sniffing" or "listening" in on the traffic between the two servers. By default, Kerberos is enabled whenever you add multiple servers to your Exchange topology. KERBEROS AUTHENTICATION For more information on how Kerberos authentication works, check out http://www.microsoft.com/security. RPC Over HTTPAs email has grown to be one of the primary methods of business communication, enabling users to access their email remotely has become a priority. With an updated version of OWA, users have a rich email client that is approaching the full set of features and functionality found in Outlook 2003. However, some features are available only in the full Outlook client. The good news is that with Exchange 2003 and RPC over HTTP, you can allow remote users to use the full Outlook 2003 client to access their email without setting up a VPN or other facility. Remote Procedure Call (RPC) is one of the protocols that Exchange supports for client connections. To use RPC over HTTP, you need to configure one of your Exchange front-end servers to act as an RPC proxy server. You can then expose this server to the outside world and allow users to connect through it. Alternatively, you can use Microsoft ISA Server to route requests through your firewall or perimeter network. MICROSOFT ISA SERVER For more information on installing and configuring Microsoft ISA Server, check out http://www.microsoft.com/isa. Outlook 2003 supports RPC over HTTP. However, you need to upgrade your user's operating system to Windows XP, SP1 and apply Windows Update 331320 (available from http://windowsupdate.microsoft.com) to use this feature. To configure RPC over HTTP using your existing Exchange front-end servers, follow these steps:
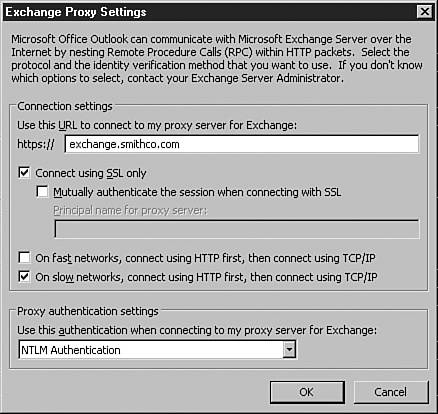
To configure Outlook 2003 to communicate via RPC over HTTP, follow these steps:
Your Outlook client is now ready to communicate with Exchange using RPC over HTTP. WORKING WITH MICROSOFT ISA SERVER There are two critical areas where Microsoft ISA Server can be implemented alongside Exchange to increase security. The first is RPC over HTTP, which was already examined. You can place an ISA Server within the demilitarized zone (DMZ) or outside your firewall to handle RPC requests and route these requests back to your Exchange front-end servers. Second, for securing OWA implementations, you can configure ISA as a proxy to an Exchange front-end server, eliminating the need to expose a front-end server to the rest of the world. Using ISA Server, you can use a special publishing wizard for OWA to configure a proxy to your Exchange front-end servers. This eliminates the need to open multiple ports to the outside world and provides a more secure implementation method for OWA. Cross-Forest SMTP AuthenticationAnother real security concern is the process called spoofing, in which a hacker or other user who has malicious intent pretends to be a valid Exchange user and sends email messages as if they were from that user. Identity theft is on the rise, and spoofing provides an easy method for hackers to obtain sensitive information from users within and outside of your organization. Most people don't look at the email address when they reply to a message. If the email appears to have come from a trusted source, users are likely to use the Reply button to respond to it. This address is usually not the correct reply email address either. To ensure that malicious users do not spoof emails or send emails that appear to be from someone within your organization, Exchange 2003 provides tools and methods for combating this security risk. First, Exchange 2003 requires authentication before it verifies a sender's name. In this scenario, a malicious user could try to send an email with a fake From address, but this email message would not go through until the user had been authenticated on Exchange and the name presented was checked against the global address list. Although this provides an end to spoofed email messages, it can also cause problems when you have an Exchange topology that spans multiple forests. Remember from the architecture discussions in Chapter 2, "Architecture," that an Exchange organization can only span a single forest. If you have multiple Exchange organizations running in multiple forests, there is no authentication of the user and no way to check the sender address before sending an email message. To make this particular security feature work in a multiple-forest topology, you need to configure all the forests involved so that you can authenticate the user and check the sender address before sending an email message. This works through cross-forest SMTP authentication. The basic premise behind this setup is that you will configure an SMTP connector between each of the forests that is used to authenticate and check the user that is sending the email message against the appropriate global address list.
For detailed instructions on configuring cross-forest SMTP authentication, go to the Delta Guide series Web site at http://www.deltaguideseries.com and enter article ID A030801. |

EAN: 2147483647
Pages: 109