Using ASP.NET Controls
| The ASP.NET libraries include a number of prebuilt reusable controls that make developing Web applications easier. They fall into two categories: HTML controls and server controls. HTML controls were included in ASP.NET to help with legacy ASP application conversion to the .NET platform. They target normal HTML directly, yet can be referenced with ASP.NET code, which also eases migration. Server controls expose a much richer interface for ASP.NET application development. They provide a high-level object-oriented interface, which helps them fit the C# coding model more easily. The high-level interface gives server controls the capability to target multiple platforms, that is, they may render differently depending on browser or HTML version supported. For new ASP.NET development, it's recommended that server controls be used because of their inherent benefits over HTML controls. As always, there are exceptions such as the File Upload control, which is only available as an HTML control. HTML ControlsIf you are familiar with normal HTML form controls, you already know what is available with ASP.NET HTML controls. Table 11.4 shows what is available. The HTML controls are objects that can be dropped on the designer surface, configured through the Object Inspector, and accessed via the code-behind file.
Server ControlsServer controls expose a rich object-oriented interface and encapsulate much functionality at a very high level. There are three data-related controls (Repeater, DataList, and DataGrid) that, because of their complexity and huge feature set, will be covered in more detail in a later chapter. I'll simply introduce them here and refer you to the more detailed coverage. Table 11.5 describes each of the ASP.NET server controls.
Building a Web Form with Server ControlsThe next example uses ASP.NET server controls and shows how to handle a postback on the same page. The following steps describe how to build a simple page. After the steps, there will be an explanation of how to handle the postback code. Here's how to build the Web Form:
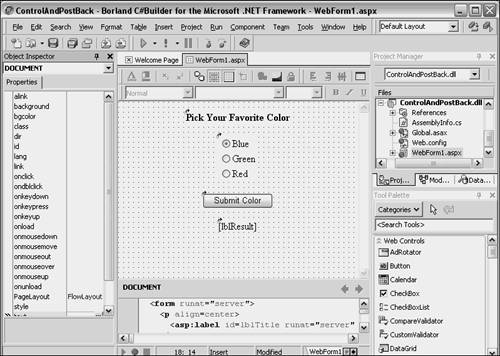
The Web Form GUI is now complete. Figure 11.7 shows what the completed Web Form should look like and Listing 11.3 shows the code that was automatically created in the HTML editor. To find the Web Form code, select the tab at the bottom of the designer surface labeled WebForm1.aspx. Listing 11.3 ASP.NET Server Control Code on a Web Form Page (WebForm1.aspx)<%@ Page language="c#" Debug="true" Codebehind="WebForm1.aspx.cs" AutoEventWireup="false" Inherits="ControlAndPostBack.WebForm1" %> <!DOCTYPE HTML PUBLIC "-//W3C//DTD HTML 4.0 Transitional//EN"> <html> <head> <title></title> <meta name="GENERATOR" content= "Borland ASP.NET Designer for c# Package Library 7.1"> </head> <body ms_positioning="FlowLayout"> <form runat="server"> <p align=center> <asp:label id=lblTitle runat="server" font-bold="True"> Pick Your Favorite Color</asp:label> </p> <p align=center> <asp:radiobuttonlist id=rblColor runat="server"> <asp:listitem value="Blue" selected="True">Blue</asp:listitem> <asp:listitem value="Green">Green</asp:listitem> <asp:listitem value="Red">Red</asp:listitem> </asp:radiobuttonlist> </p> <p align=center> <asp:button id=btnSubmitColor runat="server" text="Submit Color"></asp:button> </p> <p align=center> <asp:label id=lblResult runat="server"></asp:label> </p> </form> </body> </html> Figure 11.7. A Web Form with ASP.NET server controls.
Listing 11.3 shows how HTML code would appear in the default configuration. If you would like to customize the appearance yourself, select Tools, Options, HTML Designer Options. For more advanced control, C#Builder supports HTML Tidy, which you can find by choosing Tools, Options, HTML Tidy Options. The code in Listing 11.3 reveals the changes made to each control in the Object Inspector. Each control has a meaningful id attribute, which corresponds to its ID property in the Object Inspector. The id attribute names also correspond to variable names of controls in the code-behind files, which are discussed next. Other attributes, such as font-bold in the label with the id attribute set to lblTitle, are set to true. As the Web Form is being updated on the designer surface, code is being added in both the HTML editor and the C# code editor. The code from the HTML editor was shown in Listing 11.3 and the code from the C# code editor is shown in Listing 11.4. To see code-behind code in C#Builder, click the tab at the bottom of the designer surface named WebForm1.aspx.cs. Listing 11.4 Code-Behind Code with ASP.NET Server Controls (WebForm1.aspx.cs) using System; using System.Collections; using System.ComponentModel; using System.Data; using System.Drawing; using System.Web; using System.Web.SessionState; using System.Web.UI; using System.Web.UI.WebControls; using System.Web.UI.HtmlControls; namespace ControlAndPostBack { /// <summary> /// Summary description for WebForm1. /// </summary> public class WebForm1 : System.Web.UI.Page { protected System.Web.UI.WebControls.RadioButtonList rblColor; protected System.Web.UI.WebControls.Label lblTitle; protected System.Web.UI.WebControls.Button btnSubmitColor; protected System.Web.UI.WebControls.Label lblResult; private void Page_Load(object sender, System.EventArgs e) { if (IsPostBack) { lblResult.Text = "You Selected " + rblColor.SelectedItem; } } #region Web Form Designer generated code override protected void OnInit(EventArgs e) { // // CODEGEN: This call is required by the ASP.NET Web Form Designer. // InitializeComponent(); base.OnInit(e); } /// <summary> /// Required method for Designer support - do not modify /// the contents of this method with the code editor. /// </summary> private void InitializeComponent() { this.Load += new System.EventHandler(this.Page_Load); } #endregion } } As indicated earlier, controls added to the designer surface generate code in the code-behind files. The names of the controls become variable names to their associated object types in the code-behind file. Changes to Object Inspector ID properties also change the variable names of declarations in code-behind. Be careful, though, because Object Inspector ID properties only change variable names in declarations and not the name in the code within methods where they are used. For example, if the ID property for lblResult was changed to lblMessage, the declaration of the control type in the code-behind would change, but where it is used in the Page_Load method would not change, resulting in a compile-time syntax error. Because of its ease of use and simplicity, postback is the favored method of obtaining user input in ASP.NET. With classic ASP, it was common practice to use a two-form method where the submit button loaded a second page, which then extracted parameters out of the query string. Trying to handle a postback was cumbersome and difficult. As shown in Listing 11.4, this problem is now fixed in ASP.NET because it is simple to know whether a page has been posted back and only a single page is required instead of two. The following code is an excerpt that highlights the postback handling technique: if (IsPostBack) { lblResult.Text = "You Selected " + rblColor.SelectedItem; } Postback handling is performed within the Page_Load method by checking the Boolean IsPostBack property of the inherited Page class. If it was a postback, the code populates the Text property of the lblResult label to inform the user that the program recognizes their choice. The lblResult label was initially blank because it didn't make sense to tell the user they selected a color when they first saw the page. The check for IsPostBack helps keep that label blank on the first load and ensures that the logic of the application is correct at startup. |
- Structures, Processes and Relational Mechanisms for IT Governance
- Linking the IT Balanced Scorecard to the Business Objectives at a Major Canadian Financial Group
- Measuring and Managing E-Business Initiatives Through the Balanced Scorecard
- The Evolution of IT Governance at NB Power
- Governance Structures for IT in the Health Care Industry