Project30.Edit with nano
Project 30. Edit with nano"What's the quickest route to take when I want to learn how to edit text files in Unix?" This project introduces the nano text editor. It's very easy to learn and sufficiently powerful for you to use to write shell scripts and as your everyday text editor. Versions of OS X prior to 10.4 (Tiger) did not include nano. Earlier versions of OS X instead included an editor called pico, which lacked some basic features such as search and replace. See the sidebar "Get nano Infoand nano Itself" to learn how to install nano in pre-10.4 versions of Mac OS X. BasicsFire up nano, and we'll take a look at the basics. You should find a file called index.html in the directory Sites in your home directory. Make a copy of it to practice on, or use any other text file. $ cd ~/Sites $ cp index.html index-new.html $ nano index-new.html You'll see a terminal window similar to that shown in Figure 4.1. The top line shows the name of the file being edited; the version of nano is to the left; and to the right, you'll see the word Modified if you have modified the file. The bottom two lines are there to remind you of the basic commands, and the line above them is the status bar, showing important and informational messages. The caret symbol (^) means "press and hold Control," so to see the help screen, for example, press ^g or Control-g. Figure 4.1. The nano text editor displays relevant keystroke options at the bottom of its main window. The status bar just above the command menu provides user feedback.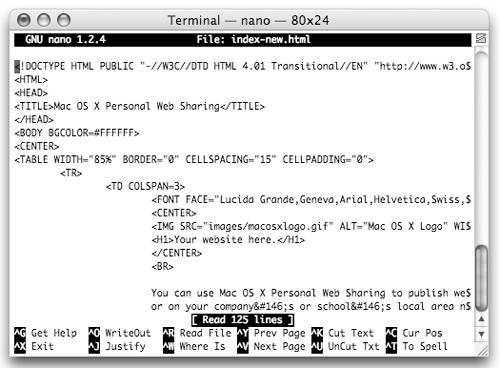 Optional nano features can be toggled on and off to change certain aspects of the editor. To enable a feature, press the Escape key and then press the single letter that represents that feature. (Don't hold down the Escape key, as you would the Control key.) Do the same to disable an enabled feature. The most useful features are covered in later sections. Features in nano are disabled by default, but can also be enabled using the command line: Include a feature's option in a command line that invokes nano, and the feature will be activated when nano launches. Check nano's man page for full details. Tip
Move AroundThe cursor (arrow) keys work in the normal manner in nano and are the most common means of moving the text-insertion point. A nano feature also lets you position the cursor with your mouse, but unfortunately, it works in X11's xterm but not Apple's Terminal application. Even if it won't help you, activate it by typing Escape m; then type Escape m again to turn mouse support off. When you do either, note that the status line displays a message confirming that the setting has changed. If you use Apple's Terminal, you can still get mouse support in nano (and other Unix programs as well). Launch the Terminal Inspector by choosing Terminal > Window Settings; select Emulation from the popup menu, and check Option-Click to Position Cursor. Option-clicking in nano causes Terminal to send nano a series of cursor-movement keystrokes that move the cursor to the point where you clicked. Tip
Get HelpPress Control-g to display a help screen. The help screen uses the caret symbol (^) to mean "press and hold the Control key" and M to mean "press the Escape key" (also referred to as the Meta key). Press Shift-Page Up and Shift-Page Down to move through the help screen, and press Control-x to exit it. Edit File ContentsBasic text addition and removal are straightforward in nano. To insert text, place the cursor at the location where you want your addition to begin. The Delete key (often referred to as the Backspace key) deletes the character behind the cursor. Forward-Delete (the key above the left arrow on full-size Mac keyboards, emulated by pressing Fn-Delete on laptops) deletes the character under the cursor.
Cut and PasteIn nano, cut and paste work on whole lines only. Use
If you use Terminal, you can also employ the usual Mac method of selecting text and pressing Command-c to copy it and Command-v to paste it. It's not possible to cut text by using Command-x, however. Save Your EditsTo save changes to the current file press Control-o and then Return. The status line displays the filename to save to; you may edit it before pressing Return, or type a name for a new file if you invoked nano with no filename. Pressing Control-x exits nano, and if your document has unsaved modifications, you'll be prompted to save or discard the changes first. Tip
Search and ReplaceYou can use nano to search and search and replace. In addition, switching on features can make the search case sensitive, enable regular-expression matching, and reverse the direction of the search. To search the current file for some particular text, press Control-w. You'll see the prompt Search: displayed in the status bar. At the prompt, type the term to search for, press Return to find the first occurrence of the term. Press Control-w and then Return to find subsequent matches. Type Escape c to switch case-sensitive matching on and off. (The feature is off by default when searching is activated.) You'll notice that the status-bar prompt changes to reflect that searches are now case sensitive. It's important to understand that this feature can be toggled only after pressing Control-w to enter search mode and that it remains active across searches until switched off. At other times, you'll recall, typing Escape c toggles the cursor-position display in the nano status bar. Similarly, type Escape b to reverse the direction of the search. Tip
ReplaceTo search and replace, press Control-\. This time, you'll see the prompt Search (to replace): displayed in the status bar. Type the search term and press Return. The prompt changes to Replace with:, at which point type the new string and press Return. The replacement is interactive, so you may accept or reject each occurrence as a candidate for replacement, or have all occurrences replaced. Just follow the instructions displayed on the bottom two lines. You can also activate the replace feature from within search mode (after you press Control-w) by pressing Control-r. Learn More
Use Regular ExpressionsNormally, nano interprets search terms as simple text, not as patterns to match, but enabling its regexp feature lets you use regular expressions as search terms. Type Escape r from within search (or search-and-replace) mode. You'll notice that the status-bar prompt changes to reflect that the search term can now be a regular expression. This feature remains active across searches until switched off. Note that nano implements extended regular expressions, not just basic regular expressions. Match BracketsIt's often useful, especially when writing code, to jump back and forth between pairs of brackets. Bracket-matching is built into nano. Place the cursor on any bracket character( [ { or <and type Escape ]. The cursor will move to the matching closing bracket. Type Escape ] again, and the cursor returns to the matching open bracket. Try it on the mouth of a "smiley":-)to see what happens when a bracket has no match. Edit Multiple FilesType Escape f to enable the multiple-buffers feature, which lets you open many files in a single nano session. You'll see a message in the status bar giving the current setting for this feature. Each file being edited is held in a separate buffer, and nano displays one buffer at a time. To load a second file, press Control-r; then type the name of the file to edit in the status bar and press Return. The old file will vanish, and the new file will be presented in the terminal window. The old file is not lost; it's just no longer displayed. To display a hidden file type Escape > for the next buffer or Escape < for the previous buffer. You need not press the Shift key, so Escape , (comma) and Escape . (period) work too. Note that if the multiple-buffers feature is not enabled, typing Control-r and then a filename reads the new file and inserts its contents into the current file. Tip
Use Tabbed CompletionUse tabbed completion when entering a filename in the status bar, just as you would in the command line. Start typing a filename; then press Tab. If what you have typed is unambiguous, nano will complete the filename for you. If what you have typed is ambiguous, pressing Tab a second time will reveal a list of possible matches in the main window. Use File SearchWhenever you enter a filename in the status bar, press Control-t to reveal a directory listing in the main window. You may now use the cursor keys to select a file to load and press Return to load it. Selecting a directory enters that directory and causes its contents to be displayed. To move to the parent directory, select the .. (dot-dot) entry and press Return. Format TextSeveral nano features help you format code and text. Type
Pressing Control-j tells nano to wrap a series of long lines. All consecutive lines above and below the cursor are considered for wrapping. When a blank line is encountered, wrapping stops. nanorc Configuration FileWhen nano starts up, it reads a configuration file from your home directory. This file, which defines default settings for nano, must be named .nanorc and placed in your home directory. All the features that can be enabled on the command line or by escape sequences within nano can also be enabled in the configuration file. To have multiple-buffers mode enabled by default, for example, add the line set multibufferto ~/.nanorc Other useful settings are
For full details, see the nanorc man page by typing $ man 5 nanorcSyntax HighlightingLike all good text editors, nano is capable of syntax highlighting. We can tell it to display HTML tags such as <head> in blue, for example, and escaped characters such as & in red. Enter the following in your nanorc file. #HTML Syntax Highlighting syntax "HTML" "\.html$" color blue start="<" end=">" color red "&[^; ]*;" Note: On the fourth line, the text between [ and ] includes a space character and a tab character. The first line is a comment and is ignored by nano. The second line says that the HTML syntax is applied to all files whose names end with .html. The third line says that everything between < and > (possibly across multiple lines) is to be colored blue, and the fourth line says that everything between & and ; (when they are not separated by white space or semicolons) is to be colored red. You may specify any of the colors white, black, red, blue, green, yellow, magenta, and cyan, and prefix any color name with the word bright. The string to match-and-color is specified with an extended regular expression. See projects 77 and 78 to learn more about extended regular expressions. Try loading an HTML file, such as ~/Sites/index.html, into nano, and you should see the syntax highlighting described above in action. Download the nano source files (see the sidebar "Get nano Infoand nano Itself"), and you'll find a file called nanorc.sample. This file gives examples of what can be placed in the configuration file and how to write syntax highlighting instructions. |
EAN: 2147483647
Pages: 153