Section 5.2. Castle Rock s SNMPc Enterprise Edition
5.2. Castle Rock's SNMPc Enterprise EditionWe'll end the chapter with a brief discussion of Castle Rock's SNMPc, Version 7.0, which runs on Microsoft Windows.[
Installation of SNMPc is straightforward. The installer asks for the license number and a discovery seed device. The seed device is similar to a seed file for OpenView's netmon. In the case of SNMPc, we recommend giving it the IP address (or hostname) of your gateway since this device can be used to discover other segments of your network. The installer gives you the option (checkbox) of turning on or off the discovery during the initial start. Bigger networks might opt to deactivate the initial discovery to prevent a flood of requests (and maybe auth failures). 5.2.1. SNMPc's MapOnce SNMPc is up and running, you will see any devices it has discovered in the Root map view. Figure 5-8 shows the main button bar. The far-right button (the house) gets you to the highest level on the map. The zooming tools allow you to pan in and out of the map, increasing or decreasing the amount of detail it shows. You can also reach the Root submap by selecting View Figure 5-8. SNMPc main button bar5.2.2. Discovery and FiltersOnce you are done playing around with your maps, it's time to start tuning your polling parameters. Go to Config Figure 5-9. SNMPc Discovery/Polling Agents menu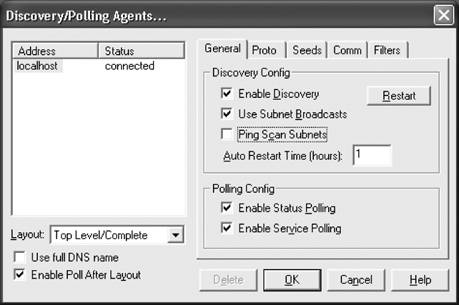 The General tab lets you control SNMPc's polling and discovery behavior. The checkbox for enabling and disabling discovery is self-explanatory. The Enable Status Polling checkbox determines whether SNMPc will ping the nodes on your network periodically to determine whether they are responding. By default, all nodes are polled every 10 to 30 seconds. To change these default values, you can either edit the properties of each device (one by one), select and highlight multiple devices (using your Ctrl key), or use the object selection tool. You can bring up this tool by going to View The Seeds tab allows you to specify SNMP devices that will help the discovery process along. This tab allows you to specify more than one seed IP address. (Remember that you're asked for a seed address device when you install the product.) The Comm tab lets you specify the community strings for your network. You can specify multiple community names; SNMPc will try the different community names when discovering your nodes. Once SNMPc figures out which community is correct for a given device, it inserts the community string in the Get Community attribute for that particular device. This simply means the newly discovered device will be saved with its community string. The final tab, Filters, allows you to exclude certain IP addresses from being discovered. You can specify individual addresses or use an asterisk (*) as a wildcard to specify entire networks. 5.2.3. Discovery Run-ThroughLet's have SNMPc discover a small home network. First, I configure the discovery engine to find non-SNMP devices. Figure 5-10 shows that the Find Non-SNMP (Ping) Nodes checkbox is selected. This setting will find devices on your network that are up but are not running an SNMP agent and can be helpful in getting a general map of your entire network. When you click OK, SNMPc does its thing. After a few moments, SNMPc creates a map that looks like Figure 5-11. In this example, SNMPc has found my small home network, 192.168.1. If I double-click on the icon on the map, I see the actual devices on my home network, as shown in Figure 5-12. I have two machines: a Linux server and a laptop. Figure 5-13 shows a closer view of these discovered devices. Notice that the LinuxServer icon has the word snmp as part of the icon. This means it responded to SNMP polls. The loanera22p icon, however, is not running an SNMP agent, yet the discovery engine found it and placed the word icmp to denote that the machine is up and running but is not responding to SNMP polls. Figure 5-10. Finding non-SNMP devices Figure 5-11. Root network discovered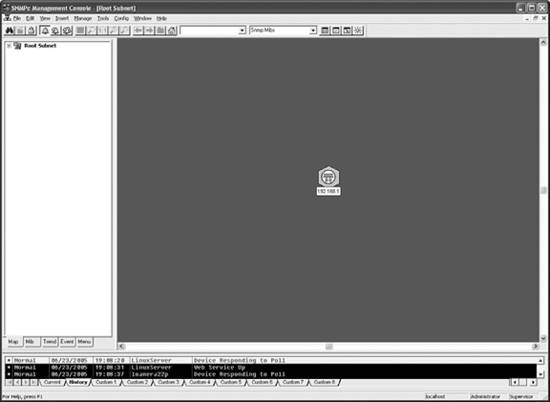 Figure 5-12. The devices on the 192.168.1 network Figure 5-13. Discovered devices 5.2.4. Configuring SNMPv3Not only can SNMPc poll SNMPv1 and SNMPv2 devices, but it can also poll SNMPv3 devices. This is a very nice feature and further shows that Castle Rock is committed to producing a full-featured network management platform. Let's briefly look at how you would configure SNMPv3-specific parameters. Right-click on a device and select Properties to display a window like that shown in Figure 5-14. Figure 5-14. Map Object Properties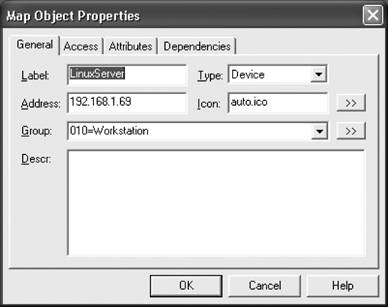 Select the Access tab to see the SNMP configuration parameters, in Figure 5-15. Figure 5-15. SNMP parameters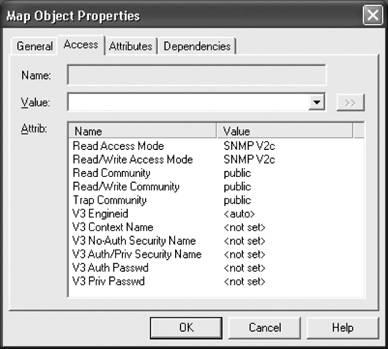 As you can see, there are several attributes to choose from. If you select either Read/Access Mode or Read/Write Access Mode and expand the Value drop-down box, you will see the different modes available to you, as in Figure 5-16. Figure 5-16. Access modes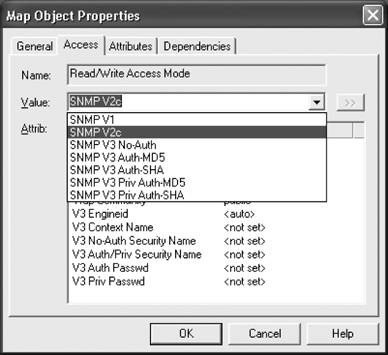 Figure 5-16 shows the various SNMPv1, SNMPv2, and SNMPv3 access modes available to you. SNMPc supports only DES for privacy. If my SNMP agent used MD5 for authentication and DES for privacy, I would configure the map object as shown in Figure 5-17. Note that Read Access Mode and Read/Write Access Mode are both SNMP V3 Priv Auth-MD5. This means SNMPc will use MD5 for authentication. Since SNMPc supports only DES for privacy, it is implied that it will use this protocol for encrypting the data. My SNMPv3 username is kjs, the authentication password is mypassword, and the privacy password is myotherpassword.[*]
5.2.5. Loading MIBs into SNMPcLike any reasonably comprehensive network management product, SNMPc can load new MIBs. According to the SNMPc documentation, you place new MIB source files in the \snmpcnt\mibfiles directory on the server computer. Note that on my system, the full path for the MIB files is C:\Program Files\SNMPc Network Manager\mibfiles, so check both locations. Figure 5-17. SNMPv3 configuration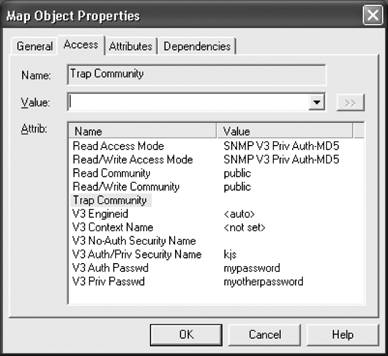 Once you have copied your MIB file to this directory (make sure it has a .mib extension), select Config Figure 5-18. Compile Mibs window Click Add to find the MIB file you want to add. This brings up another window where you can find the MIB you want to add in the list and click OK. You will now be back at the Compile Mibs window. Click Compile to compile all the MIBs, including the one you just added. This may take a little bit of time. Once it's done and there are no errors, you should see a window similar to Figure 5-19. Figure 5-19. Completion of MIB compile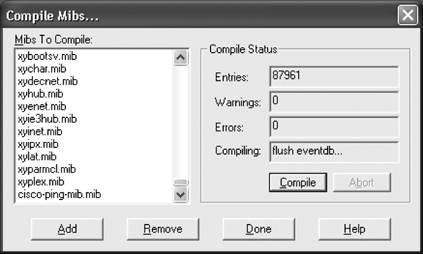 If you want to learn more about adding MIBs, click on the Help button. SNMPc is a compact NMS that provides some added features, such as trend reporting. A thorough treatment of its installation is beyond the scope of this book. The online help system that comes with SNMPc is very good, and we recommend that you take full advantage of it. |
 ] SNMPc is a simpler product than OpenView in many respects. However, even though its simpler, it's far from featureless. It's also cheaper than OpenView, which makes it ideal for shops that don't have a lot of money to spend on an NMS platform but need the support and backing that a commercial product provides.
 ] SNMPc runs on Windows Server 2003, Windows 2000, Windows XP, and Windows NT. The WorkGroup edition and console also run on Windows ME and Windows 98.
 Map View
  Discovery/Polling. This should bring up a menu that looks like Figure 5-9. Looking at the menu tabs, its easy to tell that you will be able to configure your Seeds, Communities, Filters, and TCP service polling (Proto) here. SNMPc filters are equivalent to OpenView filters, but they are much simpler.
EAN: 2147483647
Pages: 165