Chapter 2: Creating,Importing, and Saving Images
Photoshop allows you to organize, sort, search for, preview, and open files on your hard drive or network, as well as to import images from digital scanners and cameras.
Work with Image Types
There are hundreds of different types of computer image files, employing different file formats, color models, and compression schemes. Fortunately, Photoshop will allow you to work with almost any image file in use today.
Understand Bitmaps
Bitmap images (sometimes called raster images) are composed of lots and lots of tiny square dots, called pixels. The larger the image, the more tiny dots it has. A typical piece of desktop wallpaper has a half million to three-quarters of a million pixels. If you open a color photograph in Photoshop and zoom all the way in by pressing ctrl++ ten times, you can clearly see the pixels that make up the photograph.
Most of the different image file formats you’ll encounter—including BMP, PICT, GIF, JPG, TIF, and PNG—are bitmap formats.
| Note | Photoshop supports a pure black-and-white color mode called Bitmap mode. It is not the same thing as a bitmap image. |
Understand Vector Shapes
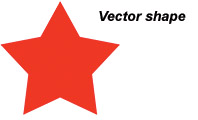
While bitmaps are made up of pixels, vector images are made up of points, lines, and curves. A vector image file doesn’t record the position and color of every pixel; rather, it records the position and color of every curve. Where a bitmap image file is like a drawing or painting, a vector image file is like a description of that drawing or painting.
Because they are composed of shapes, rather than individual pixels, vectors can be scaled up or down as far as you’d like without losing image quality. These two images look identical:

| Note | Your computer’s monitor is a raster device, displaying one little dot of color for every pixel in an image. At a resolution of 800 x 600, your monitor will display 480,000 pixels at a time. |
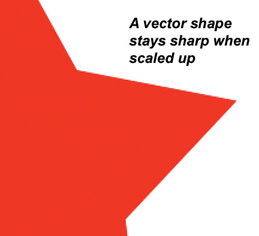
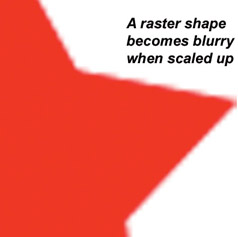
But when you scale them up, the difference becomes apparent:
Vector files are generally much smaller than raster files. If a vector file of a red circle on a white background weighs in at, say, 2000 bytes (2K) in vector format, it will be about the same file size regardless of the image size. A ten-inch circle will be the same file size as a one-inch circle. In contrast, a bitmap of the same circle would grow larger as you increased the dimensions.
Vector files are best suited to graphics such as clip art and logos, bold graphics with relatively large, smooth areas filled with relatively simple colors. Common vector file formats include Adobe Illustrator (AI), Macromedia Flash (SWF), and Encapsulated PostScript (EPS).
Photoshop files can include both vector and raster components. A given Photoshop PSD file might be all vector, all raster, or some combination of the two. Photoshop files can include several forms of vector objects: text, shapes, and paths. You will learn more about these in Chapters 5 and 7.
To mitigate the size of bitmap images, you can compress them. Consider a red circle on a white background.
Imagine recording every pixel in that image, starting at the upper-left and reading from left to right and top to bottom, just as you read a page of text. You would go along writing, “pixel 1: white, pixel 2: white, pixel 3: white …” and so forth, until you finally reached a red pixel, around pixel 198 or so. But suppose, instead, that you wrote “pixel 1 is white and so are the next 197 pixels in this row.” That’s compression. Instead of 198 numbers—the color of each of the first 198 pixels, you have two numbers—the number of pixels of the same color and the color itself. GIFs, JPGs, and PICTs are all compressed file formats.
Compression is a good thing, but there’s a catch. Compression can cause an image to lose information. Once image information is gone, you cannot get it back. JPG (or JPEG) compression is the worst offender. JPG uses what is called a lossy algorithm. It actually throws away information in order to squeeze the image down to a smaller size, and at higher compression settings the degradation becomes quite apparent.
| Tip | When creating JPGs, always keep a version of your image around in an uncompressed format, such as Photoshop PSD. |
Work with Dimension vs. Resolution
The difference between an image’s dimensions and its resolution is the source of some confusion.
Resolution is generally measured in dots or pixels per inch—dpi or ppi. An image’s resolution determines what size the image will be when printed. Consider an image, 300 x 300 pixels.
At a resolution of 72 dots per inch, it will print out a bit larger than four inches square. At a resolution of 150 dpi, it will print out at two inches square. At a resolution of 300 dpi, it will print out at an inch square. But the image dimensions remain unchanged at 300 x 300 pixels.
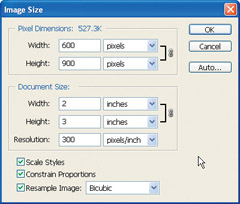
You can examine and change an image’s dimensions, resolution, and printed size by choosing Image | Image Size from the menu.
| Note | The standard resolution for images to be displayed on a computer monitor is 72 dpi. |
Resize an Image
To change the pixel dimensions of an image:
-
Choose Image | Image Size. The Image Size dialog box appears.
-
Under Pixel Dimensions, type in a new Width or Height for the image. The other dimensions automatically update.
-Or-
Under Document Size, type in a new Width or Height for the image. The other dimensions automatically update.
Tip When you create a new image for printing in Photoshop, match the resolution of your image with the resolution at which you’ll be printing it. Even though some new printers support resolutions of 1200 dpi or more, anything beyond 300-400 dpi is probably overkill.
Tip To change the Width and Height of the image independently of each other, deselect Constrain Proportions in the Image Size dialog box.
Change Image Resolution
To change an image’s resolution without changing its pixel dimensions:
-
Choose Image | Image Size. The Image Size dialog box appears.
-
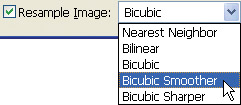
Deselect Resample Image.
-
Type in a new Resolution, and click OK.
To change an image’s resolution and its pixel dimensions:
-
Choose Image | Image Size. The Image Size dialog box appears.
-
Check Resample Image.
-
Type in a new Resolution. The Pixel Width and Height automatically update to reflect the new resolution.
-
Click OK.
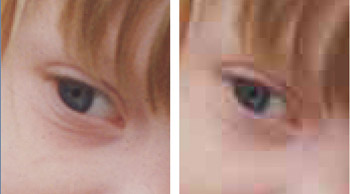
Tip When resizing an image upward (making it larger), choose Resample Smoother from the Resample drop-down list; when resizing an image downward (making it smaller), choose Resample Sharper.
Bit depth refers to the number of bits used to represent each pixel in an image.
-
RGB and indexed color images use one byte each for the red, green, and blue components of a pixel’s color, for a total of three bytes or 24 bits.
-
CMYK images use one byte each for the cyan, magenta, yellow, and black components of a pixel’s color, for a total of four bytes or 32 bits.
-
Grayscale images, having no color, use one byte for each pixel, and have a bit depth of 8 bits.
-
Bitmap mode images are pure black and white and use only one bit per pixel.
-
Photoshop can also work with RGB, CMYK, and grayscale images that have 16 bits per channel, but these are for specialized applications, and you probably won’t encounter them very often.
Use Grayscale
Grayscale images have no color. In photography, grayscale is called black-and-white.
Create a New Grayscale Image
-
Choose File | New. The New dialog box appears.
-
Select a file size from the Preset drop-down list, or enter image dimensions and resolution.
-
Choose Grayscale from the Color Mode.
-
Click OK to create the file.
Convert a Color Image to Grayscale
-
Choose Image | Adjustments | Desaturate. This removes the color, but leaves the image in color mode. You can, for example, paint on it in color with the Brush tool.
-Or-
-
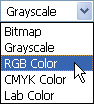
Choose Image | Image Mode | Grayscale. Photoshop prompts you to confirm discarding the color information.
-
Click OK to convert the image to grayscale mode. You can now only paint on the image in shades of gray.
Use RGB
RGB (Red, Green, Blue) is the standard color space for images to be displayed on the computer. Images for web pages and other computer applications should almost always be RGB. Read more about color spaces in Chapter 1.
Create a New RGB Image
-
From the menu, choose File | New. The New dialog box appears.
-
Choose a preset from the Preset drop-down list, or type in values for Width, Height, and Resolution.
-
Choose RGB from the Color Mode drop-down list.
-
Click OK.
Convert an Image to RGB
-
From the menu, choose Image | Mode | RGB Color.
Use CMYK
CMYK (Cyan, Magenta, Yellow, Black) is the standard color space for printers. Images destined to be printed will be more accurately displayed in Photoshop if they are in CMYK mode. Read more about color spaces in Chapter 1.
| Note | In the unlikely event you want to convert an image from Bitmap color mode to RGB or CMYK color, you must first convert it to Grayscale mode, then to RGB or CMYK mode. |
Create a New CMYK Image
-
From the menu, choose File | New. The New dialog box appears.
-
Choose a preset from the Preset drop-down list, or type in values for Width, Height, and Resolution.
-
Choose CMYK from the Color Mode drop-down list.
-
Click OK.
Convert an Image to CMYK
From the menu, choose Image | Mode | CMYK Color.
Use Indexed Color
Indexed color mode is a unique animal. Every pixel in the image is in full RGB color, but there can be, at most, only 256 different colors. RGB images, in contrast, can include any and all of more than 16 million colors. The subset of colors used by an indexed color image is called its palette. Indexed color images can be much smaller than RGB images. GIF is the most common file type that uses indexed color.
You cannot create a new indexed color document in Photoshop or ImageReady, but you can convert an existing RGB image to indexed color, or you can save an RGB or CMYK file as an indexed color GIF via Photoshop’s Save For Web command.
Convert an RGB Image to Indexed Color Mode
-
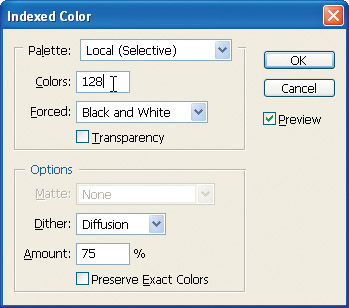
From the menu, choose Image | Image Mode | Indexed Color. The Indexed Color dialog box appears.
-
In the Colors box, type in a number between 2 and 256 to set the number of colors to be used. Photoshop shows you a preview of the image converted to that number of colors.
-
Click OK to accept the conversion.
The other options, Palette, Dither, Transparency, and so forth, are explored in more depth in Chapter 9.
| Note | You cannot convert a CMYK image directly to indexed color mode. To convert an image from CMYK color mode to indexed color mode, you must first convert it to RGB color mode; then convert it to indexed color. |
EAN: 2147483647
Pages: 59