Tablet PC Features in Office 2003
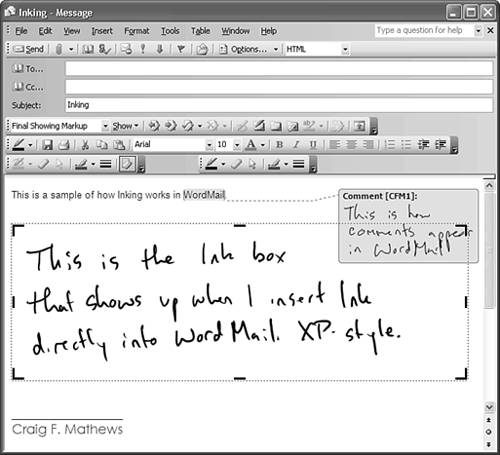
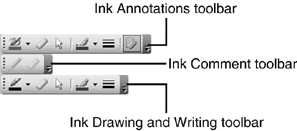
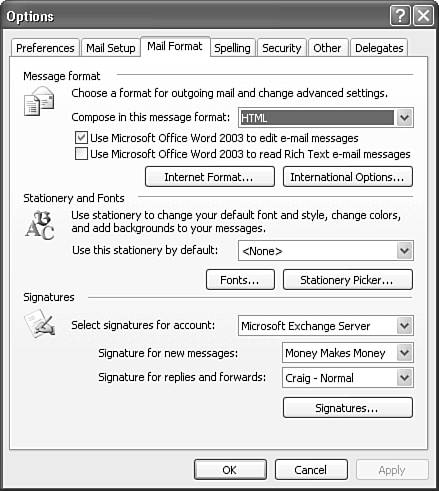
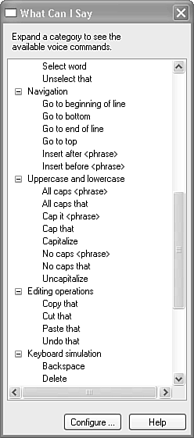
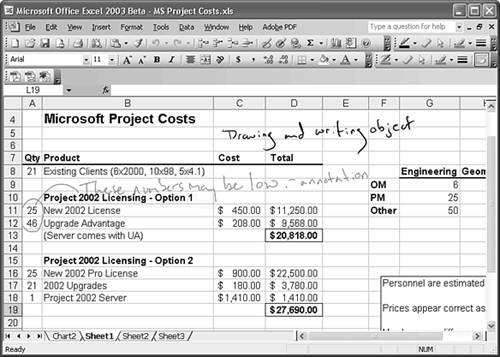
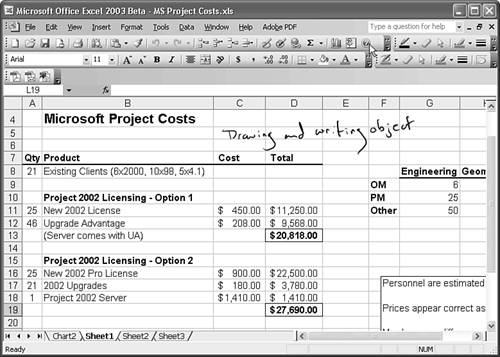
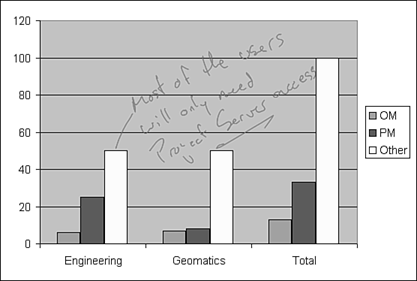
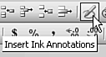
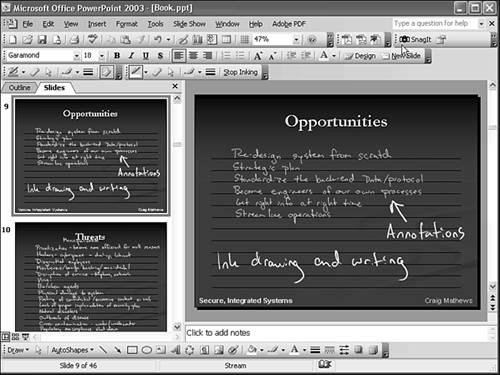
| The addition/expansion of ink and voice-input capabilities in Office 2003 make the Tablet PC more powerful. Word, Outlook, Excel, Powerpoint, and Visio added powerful inking capabilities in 2003. Access has some capability, but because I'd have to get into programming to make the discussion useful, I am not including it in this book. InfoPath is a new application that facilitates data gathering through its forms-based software. Ink in Word and Outlook 2003Word has the richest set of inking tools, including ink Annotations, ink Drawing and Writing, and ink Comments tools. And because WordMail is basically Word, Outlook has the same set of features. However, WordMail allows ink comments and ink drawing and writing boxes, but not ink annotations without the ink box. Instead, you must use the ink drawing and writing box like that in Word XP, instead of the write-anywhere annotation inking in Word 2003. Figure 15.5 shows ink comments and annotations in WordMail. Figure 15.5. WordMail offers most of the features of Word for inking, but requires an annotation box. Word will not convert handwriting to text, but it allows you to use as much ink as you want to get your point across. In fact, with Word 2003 and a Tablet PC, you can get your point across much faster because you can include ink comments and sketches, as shown in Figure 15.6. Figure 15.6. You can include handwritten notes and sketches directly in Word 2003. To use ink in Word or WordMail, either access the pen directly from one of the ink toolbars, or choose Insert, then Ink Comment or Ink Drawing and Writing. You will then be able to add either a comment or an ink box. (In Word, you can also insert an ink annotation, which allows you to ink anywhere without a box.) You can change the color and style of the pen marks by using the Pen Style tool on one of the ink toolbars. To display the ink toolbars if they aren't shown, go to View, Toolbars, then choose the ink toolbar(s) you wish to display. Figure 15.7 shows the three different toolbars available to you in Word. Figure 15.7. These are the three ink toolbars available to you in Word. I suggest using the ink Annotations toolbar if you intend to mark up the document directly. If you want space created for inking, then use the ink Drawing and Writing toolbar, which creates a graphics box that you can ink inside. Ink comments should be used only for callout-style comments in the document. Enabling Word as Your Email EditorIf you need to enable WordMail in order to use ink in Outlook, click on Tools, and then Options. You will see the dialog box shown in Figure 15.8. Check the Use Microsoft Office Word 2003 to edit e-mail messages check box to enable Word as the email editor. Figure 15.8. Check the Use Microsoft Office Word 2003 to edit e-mail messages checkbox to turn on this feature. Speech Recognition in Word and Outlook 2003Word has an incredible list of commands that you can use to manipulate the program. Use the Input Panel's What Can I Say? feature to find the complete list of available commands; Figure 15.9 shows a small list. You can dictate directly into Word, as described in Chapter 9, and you can also command Word in Voice Command mode by speaking the names of menus and commands. After writing Chapter 9, and proving the capabilities of speech recognition, I often choose to use speech recognition to dictate rather than type on a keyboard because it is sometimes faster and eliminates the artificial feel of keyboard input. Try it for at least ten hours to get the hang of it. It will open up a new world of input for you. Figure 15.9. Here is a partial listing of voice commands within Word 2003. Tablet PC Features in Excel 2003Excel has fewer ink capabilities than Word. In Excel, you can only annotate a spreadsheet. There are no ink comments. The list of voice commands is also more limited. However, using ink in Excel can highlight key data points both through ink and through ink as a highlighter, as shown in Figure 15.10. Figure 15.10. Ink annotations in Excel 2003. Notice in Figure 15.11 that when I tap the Hide Ink Annotations button, all annotations disappear, but ink drawing and writing objects stay. Figure 15.11. Ink annotations are hidden, but ink drawing and writing objects are not. In addition to annotating spreadsheets, you can also annotate charts, as shown in Figure 15.12. Figure 15.12. Ink annotations in an Excel 2003 chart. To add ink annotations to either a spreadsheet or a chart, just tap the Insert Ink Annotations button on the toolbar, as shown in Figure 15.13. Figure 15.13. Use the Insert Ink Annotations button to insert an annotation. To insert ink that won't be hidden, choose the Insert Ink Drawing and Writing button instead, which is next to the Insert Annotations button, and has a blue whirl instead of a red one. You can now use Excel 2003 to make more of an impact with handwritten notes, annotations, drawings, and highlights. Tablet PC Features in PowerPoint 2003The Tablet PC has some really cool benefits for PowerPoint. In addition to being able to draw when creating slides, you can also annotate slides during a presentation, enabling you to record feedback and get back to the same capabilities you had with overhead transparencies (but now with a single pen). Note
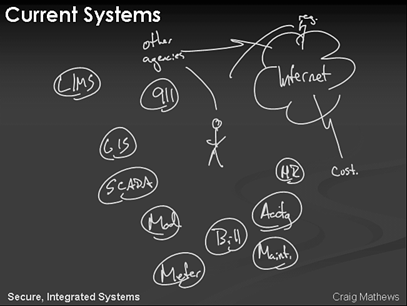
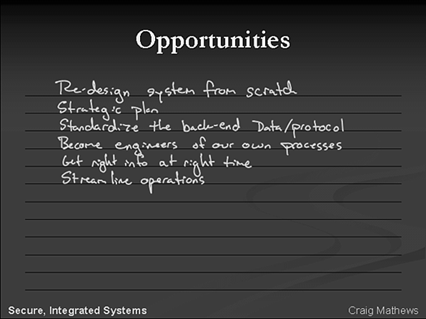
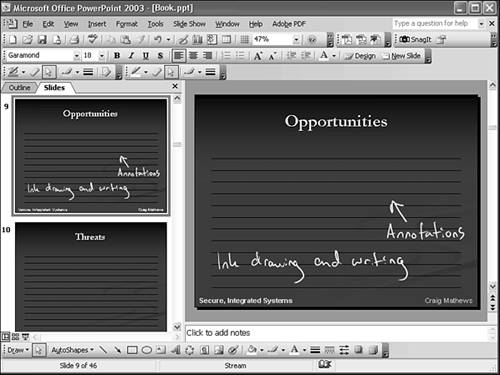
Ink in PowerPoint works just like ink in the other Office applications. Ink annotations and ink drawing and writing are both available in PowerPoint. Figure 15.14 shows a presentation I gave and a slide where I presented some information graphically based on audience feedback. Figure 15.14. You can use the Tablet PC for PowerPoint presentations and mark on the slides as you're giving the presentation. Figure 15.15 shows how you can use blank lines in your slides to use as rules for text when you know that you want to get audience feedback. Figure 15.15. Use lines as rules when you want to record feedback from the audience in your slides. Note
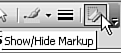
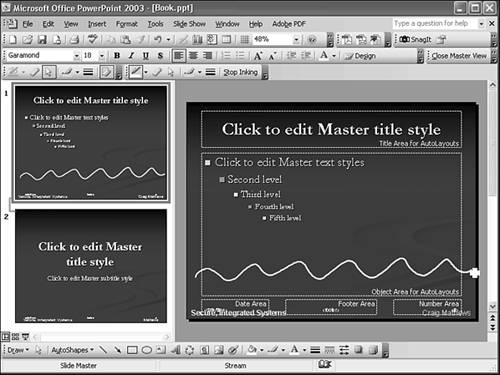
Inserting Ink in Design ModeTo add ink to your slides before a presentation, just click on the Insert Ink Annotations button or the Insert Ink Drawing and Writing button, depending on your need for ink permanence. In Figure 15.16, I have added ink drawing and writing notes in white to show you the permanence of ink in this mode. Figure 15.16. Ink drawing and writing provides a permanent ink, whereas ink annotations can be turned on and off. To hide ink annotations, just tap on the Show/Hide Markup button on the ink Annotations toolbar, as shown in Figure 15.17. Figure 15.17. Use the Show/Hide Markup button to show or hide ink annotations. Once you hide the annotations, you will then see only the ink drawing and writing marks you made, as shown in Figure 15.18. Figure 15.18. Ink drawing and writing objects still show even when ink Annotations are hidden. Note in Figure 15.19 that you can also add ink to a slide master for ink that you want to show on each slide. Figure 15.19. Ink can also be added to slide masters. Inserting Ink in Presentation ModeNow that you know how to add ink during the slide-creation phase, let's look at how to deal with ink in the Presentation mode. When you present on your Tablet PC, you'll probably want to make sure your Tablet PC is in landscape mode so that the projector can sit flat on the table, or mounted on the ceiling, depending on your arrangement. Tip
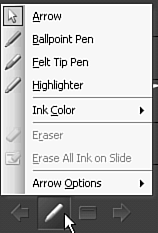
Once you have your Tablet PC in landscape mode, start your presentation by tapping the Slide Show button, or by pressing F5 to start at the beginning of your presentation, or Shift+F5 to start at the current slide. Now that you're in Presentation mode, you can add ink at any time by moving your pen a little bit around the bottom left corner of the screen (move the pen too much, and you'll open Input Panel). You will then see four buttons faintly displayed, as shown in Figure 15.20. Figure 15.20. The four buttons available to you in Presentation mode are Previous Slide, Pen Tools, Menu, and Next Slide. When you tap on the Pen Tool button, you will see a list of options like the one shown in Figure 15.21. (Note that the Eraser and Erase All Ink on Slide items are not available until there is ink on the current slide.) Figure 15.21. The Pen Tools menu. You can choose pen styles and colors from this menu for annotating your slides in Presentation mode. Figure 15.22 shows the use of all the tools on a single slide. Figure 15.22. On this slide, I used the ballpoint pen for text, the felt-tip pen for the squiggle, the highlighter, and the eraser to cut through ink. The eraser is a stroke eraser, so it eliminates all ink strokes it touches. |


EAN: 2147483647
Pages: 172