Delivering the Application to the User After installing the application, you are presented with the task of delivering it to the users. This task grants the users access to see and launch the published application or desktop. Again, you have to decide how to present this application to the user, whether you should use a published desktop or a published application. To be able to make a sound decision, you have to be familiar with each type. Full Desktops Versus Published Applications When you are deciding which method to use to present the application to the users, there is no right or wrong, but rather the most appropriate and the most secure and convenient way of delivering the application. Several factors play a role in your decision. A published desktop is ideal when the user needs to use multiple applications at the same time and those applications are all installed on the same server. Not only is it more convenient for the user to have one centralized desktop where all the applications are located, but it is also easier for the user to navigate and work within this desktop. A published desktop is also a performance enhancer for the server in that it does not launch several instances of the explore.exe process that is responsible for the GUI and is necessary for its operation. Therefore, if you are launching three applications separately, you are also launching a set of processes separately, among them an instance of explore.exe, for example, and putting strain on the server. Published desktops, however, do have their drawbacks in that they are not as secure as published applications, and an administrator would have to spend a significant amount of time locking down such desktops via Group Policy to ensure that a user cannot accidentally shut down the server, for example, or run malicious code on the server. Published desktops should be used when users needs access to numerous applications that all reside on the same server. Published applications, on the other hand, provide for tighter security and the feel of running applications as if they were being run locally on the computer. You can also deliver published applications to the users who reside on different servers. This fact is obviously seamless to the users. Publishing a Resource To publish a resource, open the Management Console, right-click the Applications node, and then select Publish Application. This triggers the Application Publishing Wizard, which guides you through the process of publishing a resource in the farm. Welcome to the Application Publishing Wizard The first wizard screen prompts you for a display name and an application description of the resource you are publishing. Fill in the necessary information. Specify What to Publish The Application Publishing Wizard then prompts you to choose the application type. You can choose Application, Desktop, or Content. Based on your selection, you will have to provide either a path to the executable if you choose Application or the link to a resource such as a web page if you select Content. If you choose Desktop, you will not be prompted for more information. For the purpose of this example, we selected Application. The configurable options are as follows : -
Command Line In this field, you specify the location of the application's executable. -
Working Directory In this field, you specify the directory where the application's executable is started from. -
Allow This Published Resource to Be Accessed Externally Through MetaFrame Secure Access Manager If checked, this option renders this application accessible to users from outside the network. Unchecking this box limits access to this application to users on the network. You can use this option as a secure measure to prevent access to certain critical applications such as a check-writing application from being accessed outside the network. Program Neighborhood Settings The Program Neighborhood Settings screen allows you to control how the application is presented to the user (see Figure 10.4). The configurable options are as follows: -
Program Neighborhood Folder In this field, you specify a folder under which this application will appear within the Program Neighborhood interface. -
Application Shortcut Placement The options in this section allow you to place this application under the Program Neighborhood folder on the Start menu. This is applicable only to users of Win32 ICA clients . If your users have the Program Neighborhood Agent version of the ICA client, you can further customize where the published resources show up by creating a custom folder under the Programs menu of the Start menu. To do this, check the box next to Place Under Programs Folder: (Program Neighborhood Agent Only). In the Start Menu Folder text box, enter a name for the folder where you want to place this published resource under the Programs menu of the Start menu. -
Change Icon This option allows you to browse and select a different icon that will appear associated with this published resource. Figure 10.4. Program Neighborhood Settings. 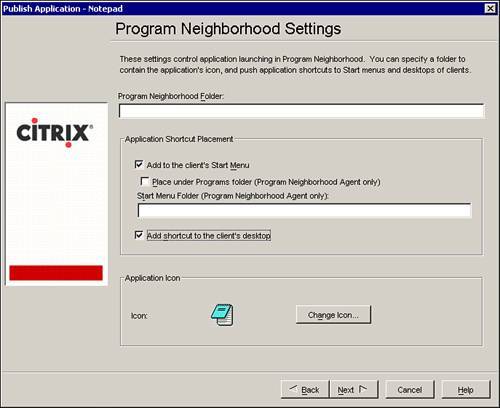
Specify Application Appearance When the Specify Application Appearance window appears, you can customize how the application will look after the user launches it. The configurable options are as follows: -
Session Window Size This option allows you to select the dimension at which the application window will open. Your options are as follows: Standard resolution, which allows you to select from as low as 640x480 all the way up to 1600x1200; Custom, which allows you to manually specify the width and height of the window to be opened; Percent of Client Desktop, which allows you to select a percentage of the client desktop that the application window will cover when launched; and Full Screen, which covers the client's full screen when the application launches. -
Colors In this section, you can choose a color depth of one of the following: 16 colors, 256 colors, High Color (16bit), and True Color (24 bit). -
Application Startup Settings In this section, you can configure how the application will behave when initially launched. You have two options to choose from: Hide Application Title Bar allows you to hide the application title, which then prevents users from closing or minimizing an application using the Xfor example, at the top-right corner. This option prevents users from using this method to exit applications and places their sessions in a Disconnect mode when they intend to exit the application altogether. The other option, Maximize Application at Startup, starts the application maximized if selected. Specify Client Requirements The Specify Client Requirements window opens next. The configurable options are as follows: -
Enable Legacy Audio This option enables audio support for applications that cannot take advantage of SpeedScreen Multimedia Acceleration. You can also choose to make this a minimum requirement whereby only clients that have audio support can launch this application. To do this, check the box next to Minimum Requirement. -
Enable SSL and TLS This option enables two security protocols: SSL (Secure Sockets Layer) and TLS (Transport Layer Security). If this option is enabled, the client and server would have to communicate over one of these two protocols. -
Encryption This option specifies the level of encryption used between the client and server. The options are as follows: Basic, which encrypts the packets with a non-RC5 algorithm; 128-Bit Login Only (RC5), which encrypt the packets exchanged between the client and server at logon time with 128-bit RC5 encryption and then uses Basic encryption for ongoing packet transfers; 40-Bit (RC5), 56-Bit (RC5), and 128-Bit (RC5), which constantly encrypt the data stream at the specified level. If you choose 40-Bit, it always encrypts the data packet at 40-bit RC5 and so on. -
Start This Application Without Waiting for Printers to Be Created Selecting this option actually improves the launch time of an application by allowing it to open and giving the user access to its graphical user interface before all the printers have had the chance to properly map within the session. The printers will continue to map; however, the idea here is that most likely the user will not launch an application and start printing immediately. Instead, the user will first input data. While he or she does this, the printers will have had ample time to be created and will be available to the user when needed. Specify Application Limits The next wizard window, Specify Application Limits, allows you to specify how many instances of this application can run and the CPU prioritization it receives. The configurable options are as follows: -
Limit Concurrent Instances in Server Farm Checking this option enables you to set a maximum number of simultaneous instances to run in the server farm. You can set the number in the Maximum Instances text box. -
Allow Only One Concurrent Instance Per User This option allows every user to launch one instance of the application. -
CPU Priority Level This option allows you to set the CPU priority for this application. It can instruct the CPU on how to treat this application in terms of importance. Your options are Low, Below Normal, Normal, Above Normal, or High; the default is Normal. Specify Servers Next up is a wizard window that allows you to specify how many servers will service this application. One of the most powerful and most sought-after features of MetaFrame is the ability to load balance an application across several servers. This feature is a great way to spread user load and, from a redundancy standpoint, it allows you to eliminate single point of failure. So, in the event that you have configured two servers for this application, not only will MetaFrame load balance between them, but if one server fails, your users can still access the published resource because another server is configured with the same application. Keep in mind that this is not fault tolerance: If one of the servers goes down, the user sessions on that server are lost, but the user retains the ability to access that application because a second server hosts it. You are presented with two lists here: the Available Servers list, which lists all the servers in the farm, and the Configured Servers list, which lists all the servers you have chosen to support this application. Obviously, the servers you select must have that application installed on them. Here, you can add and move servers back and forth between the Available Servers and Configured Servers lists. This same window presents these three buttons : -
Filter Servers By This option allows you to limit the servers in the Available Servers dialog box based on the operating system they are running. The options to filter based on operating system are Windows NT 4.0 TSE, Windows 2000, and Windows Server 2003. You also can filter by whether the server has Installation Management capabilities. -
Refresh Available Servers This option forces a refresh of the Available Servers list. -
Edit Configuration You can select this option only after you have added a server to the Configured Servers list. It is a useful option when you are publishing an application that is installed in different locations on the MPS servers. For example, say you are publishing Notepad.exe and you want server 1 and server 2 to support this application. However, you have Notepad.exe installed in C:\Windows\system32 on server 1 and in D:\Apps on server 2. Using this option allows you to specify where the application resides on the MPS servers individually without having to republish the same application (see Figure 10.5). Figure 10.5. Sever Configuration Window. 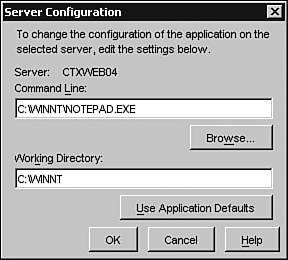 Specify Users At the next step in the Application Publishing Wizard, you can specify the users who have access to this published resource. The configurable options are as follows: -
Allow Anonymous Connections If you check this box, all users will have access to this application. They will get access to it without needing to authenticate; in other words, they will not need to provide a username, password, or domain. Note For security reasons, on domain controllers that are acting as MPS servers as well, anonymous user accounts cannot be enabled.
-
Add List of Names If you click this button, it allows you to paste or write several usernames separated by a semicolon. This capability is useful if you have the usernames in a text file. All you have to do is paste them, check the names against the directory, and the system will add them as users of this application. -
Look in This window allows you to set the scope where you will be searching for user accounts or groups. For example, it lists Active Directory domains, Windows NT domains, Novell Directory Services Trees, and local servers. You can browse any of these resources for a user account or group to add to the Configured Accounts section. -
Show Users When you are browsing account authorities, usually user accounts are not shown, just groups. To show all user accounts, you need to check this box. -
Configured Accounts This area lists the accounts that you have granted access to this published resource. It lists user accounts and groups. Note It is highly recommended that you use groups as the preferred method of granting access to an application because using them simplifies the administration process tremendously.
The Anonymous User Accounts When you install MetaFrame Presentation Server, as part of the installation, 14 anonymous user accounts are created and added to the Users container of the local machine. These accounts are in the format of anon001 through anon014. These accounts are used when you enable Allow Anonymous Connections for a published application. When you install MPS on a domain controller, these accounts are not created primarily for security reasons; therefore, if you publish an application on a domain controller, you cannot enable anonymous connections to it. |
Specify File Type Associations The next wizard screen shows off the strength and tight integration the MPS product now has with the local desktop. As you can see in Figure 10.6, you have the option of associating this application with file extensions or types. If you associate file extensions with this application, content redirection kicks in for this application, which will enable users to open files that reside locally on their computers with an application published on a MetaFrame Server. Figure 10.6. File Type Association window. 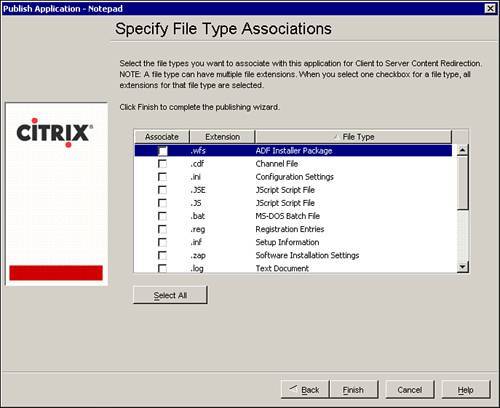
Say you have Microsoft Word published on the server. Microsoft Word is not installed on the user's local machine, but Outlook is. The user receives an email with a Word attachment. After the user double-clicks the attached file, Microsoft Word is automatically launched from the MPS server and opens the file. This capability is very useful with more specialized applications that will most likely be installed on the MPS server and not locally on the user's desktop. Note File associations will work only if the user is using the Program Neighborhood Agent as his or her ICA client.
|