Section 6.11. Creating an XDoc File Using JSL
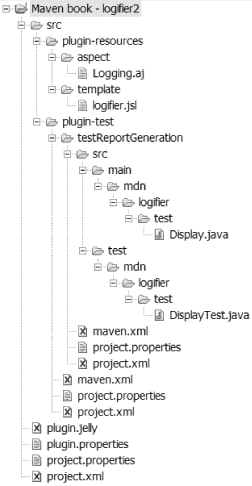
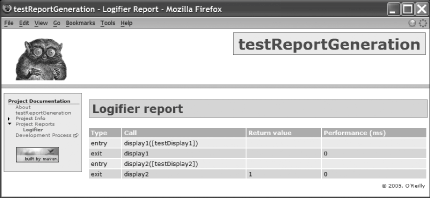
6.11. Creating an XDoc File Using JSLThis lab continues with the Logifier plug-in by adding a maven-logifier-plugin:report goal that transforms the XML debug log generated by the logifier:logify goal into XDoc format. You will use JSL and the XDoc plug-in to perform this magical feat. 6.11.1. How do I do that?The XDoc plug-in provides a jsl tag that you can use to apply a JSL transformation on an XML file. The following report generation goal uses this jsl tag to transform the Logifier log file to XDoc: <goal name="maven-logifier-plugin:report" prereqs="logifier:logify"> <doc:jsl input="${mdn.logifier.logfile}" output="logifier-report.xml" stylesheet="${plugin.resources}/template/logifier.jsl" outputMode="xml"/> </goal> The input attribute points to the XML file you wish to transformin this case the log file generated by Logifier. As an experienced plug-in writer, you've created a new mdn.logifier.logfile property which points to the location where the Logging Aspect has generated its XML logs. Logifier defines a default value for mdn.logifier.logfile in plugin.properties as follows: mdn.logifier.logfile = ${maven.build.dir}/logifier.xmlThe output attribute is the XDoc file that will be generated by the JSL transformation. Notice that you have used a filename (logifier-report.xml) that matches the link attribute used earlier in the maven-logifier-plugin:register goal: <doc:registerReport name="Logifier" pluginName="maven-logifier-plugin" description= "Report showing all debugging logs generated by the Logging Aspect" link="logifier-report"/> The stylesheet attribute points to the JSL file that you'll write in just a second, and outputMode tells the tag that we're outputting XML. What about this JSL? Isn't it just like XSLT? Why not just use XSLT? Those familiar with XSLT will find it similar to JSL. The major difference is that a JSL file can use any of the existing Jelly or Ant tags. While XSLT supports only a declarative programming model, JSL allows you to perform the same transformations using imperative programming models. In other words, while XSLT is a popular language for XML transformations, its basis in functional programming makes it difficult (if not impossible) to perform the simplest of tasks. JSL gives you the same feature set of XSLT, plus the ability to execute any Jelly tag. In addition, all Maven variables are available directly from within the JSL file. Note: Declarative XSLT purists beware. JSL is the best of both worlds. Call the JSL file logifier.jsl, and put it in the plugin-resources directory in src/plugin-resources/template/logifier.jsl: <?xml version="1.0"?> <jsl:stylesheet select="$doc" xmlns:jsl="jelly:jsl" xmlns:x="jelly:xml" xmlns="logifier" trim="false"> <jsl:template match="logs"> <document> <properties> <title>Logifier Report</title> </properties> <body> <section name="Logifier report"> <table> <tr> <th>Type</th> <th>Call</th> <th>Return value</th> <th>Performance (ms)</th> </tr> <jsl:applyTemplates/> </table> </section> </body> </document> </jsl:template> <jsl:template match="log"> <tr> <td><x:expr select="@type"/></td> <td><x:expr select="@call"/></td> <td><x:expr select="@return"/></td> <td><x:expr select="@time"/></td> </tr> </jsl:template> </jsl:stylesheet> You could consider an XDoc file to be a styleless HTML file. XDoc does encompass a few special tags, such as the main document tag (equivalent to the HTML tag) and the section tag, which will be rendered as a page section. The title tag is nested within a properties tag. You can find more information about the XDoc format in Section 2.1. JSL is going to remind you of XSLT because it fills the same role as XSLT. The JSL document is declared using the jsl:stylesheet tag. The doc variable represents the parsed XML document. The jsl:template nested content is executed whenever the XML document matches the match attribute. Thus, the jsl:template match="log" snippet is going to be called every time there is a log entry in the XML file. For example, for the following XML file it will be called four times: <logs> <log type="entry" call="display1([testDisplay1])"/> <log type="exit" call="display1 time="0"/> <log type="entry" call="display2([testDisplay2])"/> <log type="exit" call="display2 return="1" time="0"/> </logs> The x:expr tag uses an XPath expression relative to the current XML node. Thus, x:expr select="@type" selects the type attribute of the log element. Quite simply, you are creating an HTML table which contains four columns that correspond to the information contained in the Logifier log file. These four columns are printed out in the jsl:template matching the log element. The last step is to modify the testLogifierExecution test project that you created in the "Executing the Logifier Plug-in" lab earlier in this chapter. Start by renaming it to testReportGeneration and modify its project.xml file to add the Logifier report to the reports section: <?xml version="1.0"?> <project> <extend>../project.xml</extend> <artifactId>logifier-testReportGeneration</artifactId> <name>logifier-testReportGeneration</name> <reports> <report>maven-logifier-plugin</report> </reports> </project> Modify the maven.xml file to trigger report generation using the site goal: <project default="testPlugin" xmlns:assert="assert"> <goal name="testPlugin" prereqs="clean"> <attainGoal name="site"/> <assert:assertFileExists file="${maven.docs.dest}/logifier-report.html"/> </goal> </project> Now you need to create a unit test that will trigger the test application. The new Logifier's directory structure is shown in Figure 6-8. Figure 6-8. Directory structure for the new Logifier Rename the Main.java class to Display.java (you don't need a main( ) method anymore, now that you're triggering the Logifier by using unit tests instead of using an executable JAR): package mdn.logifier.test; public class Display { public void display1(String message) { System.out.println(message); } public int display2(String message) { System.out.println(message); return 1; } }And here's the associated DisplayTest containing the unit tests: package mdn.logifier.test; import junit.framework.TestCase; public class DisplayTest extends TestCase { public void testDisplay1( ) { Display display = new Display( ); display.display1("testDisplay1"); } public void testDisplay2( ) { Display display = new Display( ); assertEquals(1, display.display2("testDisplay2")); } }Now is the time to sit back and reap the fruits of your hard labor! Run the plugin:test goal and enjoy. The build should be successful, and you should be able to open the generated web site (located in logifier/src/plugin-test/testReportGeneration/target/docs/index.html). You should see a Logifier report in the reports section (see Figure 6-9). Figure 6-9. The Logifier report Nice, isn't it? 6.11.2. What just happened?You may not have realized it yet, but you just developed a complex and useful Logifier plug-in. Well done! Although this is a first version of it, you can easily modify it to be a lightweight profiling tool, to warn you when methods take too long to execute, to understand an existing project by tracing the execution flow, etc. Actually, the PatternTesting project (http://patterntesting.sourceforge.net) is built around the same ideas introduced in this chapter.
|
EAN: 2147483647
Pages: 125
