Going Further with MEL
| Although the main focus of this chapter is to show you how to use MEL scripting to create character controls, you can do many other useful things with MEL. This section introduces you to some more advanced MEL scripting concepts that you can use to enhance your character controls and use to create custom tools that will enhance your Maya working environment. Using Expressions with MELYou can create expressions in your MEL scripts by using the expression command. Expressions can prove useful if you are trying to automate some of the character setup process. The -o or -object flag is useful if you are constraining multiple attributes on an object, because this flag enables you to state the object name only once, whereas the -s or -string flag is used to specify the actual expression connections. If you have multiple lines in your expression, make sure to place double quotes and curly brackets around all of them. Use the -n or -name flag to give your expression a name, which will then show up in the Expression Editor under the By Expression Name filter. To create the average expressions used in Chapter 4, "Character Skeleton Setup," to constrain the torso to stay between the feet, for instance, you would run the following MEL code in the Script Editor: expression -object "UpBodAuto1" -name "Averages" -string {"tx = (LtLeg.tx + RtLeg.tx) / 2; tz = (LtLeg.tz + RtLeg.tz) / 2; ry = (LtLeg.ry Because MEL and expressions are evaluated in different ways, usually you want to avoid using MEL commands in your expressions. Alias Wavefront recommends not using MEL commands that connect attributes, create objects, or delete objects in expressions. Sometimes, however, it is necessary to use some MEL commands to create specific effects. For instance, there is no delay expression function in Maya, but you can use some MEL commands to create a delay effect. This can prove useful for creating a whipping tail effect. If you have a character with a tail, it is best to model the tail with no pose on it, so it comes straight out of the back of the character. It should have enough isoparms or edges on it to bend smoothly. To animate such a tail, you create several joints starting in the pelvis area, going straight back to end at the tip of the tail. The joints should be named TailRoot, Tail2, Tail3, and so on. The tail should move with the hips, so make the TailRoot joint child of the H3 joint, with two group nodes in between. Bind the tail model to the tail joints in the same way as you bound all your other skins. After you have done this, open the Expression Editor, and in the Expression Name filter, create a new tail whip expression that contains the following code: int $time = 'currentTime query'; int $delay1 = 'getAttr time ($time 10) Hips.ry'; int $delay2 = 'getAttr time ($time 20) Hips.ry'; int $delay3 = 'getAttr time ($time 30) Hips.ry'; int $delay4 = 'getAttr time ($time 40) Hips.ry'; //TailRoot is just parented to move exactly with the Hips box: Tail2.rz = 0 + Hips.rz; Tail3.rz = 0 + $delay1; Tail4.rz = 0 + $delay2; Tail5.rz = 0 + $delay3; Tail6.rz = 0 + $delay4; Click Create to connect the tail joints to the Hips box with a delay effect. Because this expression references the timeline, however, you won't see the effect until you set Y rotation keyframes on the Hips box, and play the timeline. The expression creates the whipping effect by first querying the timeline to see what is the current frame, and puts the result in a $time variable. Then it creates $delay variables that contain the value of the Hips box's rotation in Y at previous frames. It is using the -time flag on the getAttr MEL command in conjunction with the $time variable to do this. Finally, it is assigning each delay variable to the tail joint's Z rotation, starting with the second joint. Global Procedures and ScriptsSimilar to using expression functions, the useful thing about using MEL commands is that they do a lot of complex operations for you (without you having to write the explicit code). It simplifies and shortens your script writing by grouping several tasks under a single named command that is held in Maya's memory and called whenever you need it. You can do a similar thing by creating your own named commands, which are called procedures. Procedures enable you to group many MEL commands and operations into a single named command that you load into Maya's memory so that you can use them in all of your scripts. A regular procedure is a command that is declared and used in the same script, whereas global procedures are more like MEL commands, in that they go into Maya's memory and are available to use in all your MEL scripts. You declare a regular procedure with the following syntax: proc Name () { All your MEL commands go here; } You declare a global procedure with the following syntax: global proc cmName () { All your MEL commands go here; } If the procedure is something that you think you will need to access in more than one script, it should be a global procedure. Notice that the name in the example global procedure is written differently than the name of a regular procedure. The general convention is to add your initials to the beginning of the name on a global procedure. The reason for this is that a global procedure goes into Maya's memory and can overwrite one of Maya's procedures if they have the same name. If you create a global procedure named setAttr, for instance, it will overwrite Maya's setAttr command until you clear out memory by relaunching the program. To avoid this problem, your global procedure must have a unique name. When you declare a procedure, it doesn't run the code within the curly brackets. It places the code in memory to be called whenever the name of the procedure is entered on the command line or referenced in a script. A procedure can contain a single MEL command, or multiple lines of complicated MEL code. Procedures in your character window scripts enable you to make your scripts more compact and modular for example, by using procedures for the contents of each of your panels. For instance, running the following simple procedure in the Script Editor places the procedure named Test in memory: proc Test () { print "My test procedure is working!"; } If you enter the name of your Test procedure on the command line or in the Script Editor, a result in the History field will state "My test procedure is working!" The empty parenthesis after the name tells Maya that the user only needs to type in the name of the procedure to run the code. If you declare empty variables within the parenthesis, Maya expects the user to input some information that will be used in the procedure. To create a basic slider, for instance, you need to tell Maya what should be placed in the flags of the attrFieldSliderGrp command. Here is how you write a simple procedure that creates a slider with the label, limits, and attributes set by the user: proc slider1 (string $label, int $min, int $max, string $attr) { attrFieldSliderGrp -l $label -min $min -max $max -at $attr; } In this procedure, several empty variables are being declared; the user of the procedure inputs these. The procedure name and variable information can then be used in a window script that creates multiple sliders, like this: if ('window -exists SliderWin') deleteUI SliderWin; window -t "Make Sliders" SliderWin; columnLayout; slider1 "Crouch" -7 1 UpperBody.ty; slider1 "BackBend" -45 45 BackBend.rz; slider1 "Head Nod" -30 30 Head.rx; showWindow SliderWin; Procedures can certainly compact your window script by using the same process to create advanced sliders, like this: global proc cmSlider (string $label, int $min, int $max, string $attr, string $name) { floatSliderButtonGrp -l $label -f true -s 1 -min $min -max $max -cal 1 left -cw5 65 40 160 50 35 -bl "Reset" -bc ("setAttr " + $attr + " 0") -sbc ("setKeyframe " + $attr) -sbd true -i "SETKEYSMALL.xpm" $name; connectControl $name ($attr); } if ('window -exists SliderWin') deleteUI SliderWin; window -t "Make Sliders" SliderWin; columnLayout; cmSlider "Crouch" -7 1 UpperBody.ty SL1; cmSlider "BackBend" -45 45 BackBend.rz SL2; cmSlider "Head Nod" -30 30 Head.rx SL3; showWindow SliderWin; As you can see from this example, creating a global procedure for the advanced slider condenses the code for each individual slider to a single line in your window script. Notice that it is sometimes necessary to adjust the placement of double quotes so they don't contain variables, because this will cause Maya to recognize them only as a text string. Use the addition symbol to add variables to text strings. Also use spaces within the text strings to make sure the command is read correctly. A procedure must be run to place it in memory. Often, you are using multiple procedures, so they must all be put into memory to use them in your scripts. The easiest way to do this is to place the procedures in script files, which are just text files that are saved with an .mel extension. You can create a Maya script file in two ways. You can place many regular procedures in the script, making sure the last procedure is a global procedure with the same name as the script file. This file is read into memory when the global procedure name is called. The other way to create a script file is to save multiple global procedures into one script, and load all the global procedures into memory by using the source command followed by the name of the script. Either way, your script files need to be placed in the right directory for Maya to find them. To find the location of this directory, open your Script Editor and choose File, Open. A window opens in which you can choose a script file from your Scripts folder, which should be located within your user login Maya directory. To easily source all the procedures you need to reference in a character window script, for instance, you can put a source command at the beginning of your window code, like this: source SliderScript; if ('window -exists SliderWin') deleteUI SliderWin; window -t "Make Sliders" SliderWin; columnLayout; cmSlider "Crouch" -7 1 UpperBody.ty SL1; cmSlider "BackBend" -45 45 BackBend.rz SL2; cmSlider "Head Nod" -30 30 Head.rx SL3; showWindow SliderWin; It is not necessary to add the .mel extension when sourcing a script; just specify the name. In the preceding example, the source command is loading a script called SliderScript that contains the cmSlider global procedure, and any other procedures that are needed in the window code. Writing Conditional and Looping StatementsYou write conditional statements in your MEL scripts in the same way you wrote them in your expressions. The standard conditional statement uses an if command followed by an else command, and is used to do two different operations depending on whether the condition in the if command is true or false. In addition to this, you can use an else if command, which enables you to do a third operation based on the result of a second condition. Instead of just executing commands, you can have the conditional statement execute procedures to run several different MEL scripts. The general syntax for doing this is as follows: if (Condition1) Procedure1; else if (Condition2) Procedure2; else Procedure3; This kind of conditional statement results in Procedure1 running if Condition1 is true. If Condition1 evaluates as false, the second condition is evaluated, and if true, Procedure2 runs. If Condition2 evaluates as false, however, Procedure3 runs. You might use a conditional statement in a character window as a button command that queries the state of controls such as check boxes to see whether they are on or off, and run procedures based on the result. Another technique used with more advanced scripting is loop creation, often accomplished with a for command. The for command is followed by parenthesis that contain specifications for how the loop should start, end, and increment. Again, you can use procedures in the loop to run multiple operations. The general syntax should look like this: int $loop; for ($loop = 1 ;$loop <= 5; $loop++) { procedure1; procedure2; procedure3; } The variable $loop is being declared, and then is being affected by the for command to set the limits on the loop. This loop is set to start at 1, run 5 times, and increment one at a time. Each time it loops, it runs the three procedures in the curly brackets. Loops are used to perform basic tasks over and over again. The one thing you have to be careful of when writing loops is that you avoid writing an endless loop. To avoid this, you must set loop parameters that eventually give a false result. If you run a loop that doesn't have a definite stopping point, you will be forced to terminate Maya. Creating Script JobsOne of the main differences between MEL scripting and expressions is that MEL normally evaluates once, whereas expressions are continuously being evaluated. Sometimes, however, you will need your MEL commands to run more often, based on conditions occurring in your scene. Do this by using procedures in conjunction with the scriptJob command. A script job is loaded into memory and runs a procedure when a named condition or event occurs. Some conditions and events available to the command are "SelectionChanged", "SomethingSelected", "ToolChanged", "timeChanged", and "playingBack". For a complete list, type one of the following into the command line: scriptJob -listConditions; scriptJob -listEvents; Use the named condition in the -ct or -conditionTrue flag, and with the -cc or -conditionChanged flag. Use the named event with the -e or -event flag. You can also use the -ac or -attributeChanged flag to make the script job run when a named attribute changes, or use the -tc or -timeChange flag to run it whenever the current time changes. To create a script job that runs a procedure whenever you select something new, type the following: ScriptJob e "SelectionChanged" procedure1; Because a script job is constantly running, you may want to remove it from Maya's memory when you don't need it anymore. You can add a -kws or -killWithScene flag to end the job when you load a new scene. Alternatively, if you place the job in a variable, you can reference it with a -kill flag in a separate scriptJob command to end it. You can place a script job in a variable as follows: int $scriptJob1 = 'ScriptJob e "SelectionChanged" procedure1'; The single back quotes place the script job number in the variable $scriptJob1, which enables you to use the -kill flag on it by typing it on the command line, or by placing it in a button command. The kill command should look like this: scriptJob -kill $scriptJob1;
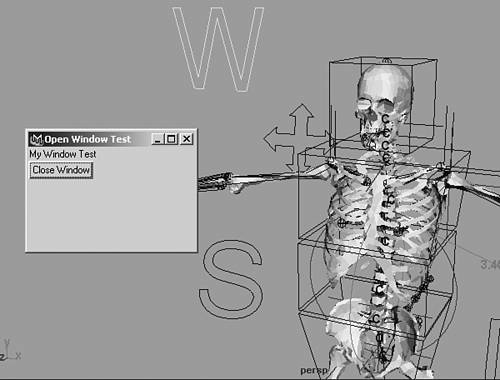
6.19. Add a window icon to your character that uses a procedure and script job to open your character window automatically when you select the icon.
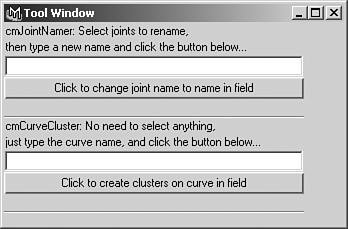
Creating MEL Custom Tool WindowsIn addition to creating character controls, you can use MEL scripting to create custom tool windows to enhance your daily work in Maya. You can create a character setup tool window that contains simple buttons that access your favorite setup commands and tools. For instance, you can create buttons that make different kinds of curve icons. This is more useful than creating a multitude of shelf buttons for each command, because it organizes and labels them in a more user-friendly manner. Then you just create a single shelf button to open your custom tool window. In addition to creating simple buttons that access tools and commands, you can create more complex procedures that are also accessed in your custom tool window. When doing character setup, for example, you may want to create some procedures that do tedious tasks such as renaming joints, or creating clusters on curve points. As an example, the following script shows how to create procedures for renaming multiple joints: //This creates a procedure for using in the cmJointNamer procedure: global proc cmNameJoints (string $newJointName2) { string $selJoint[] = 'ls -sl'; string $current; for ($current in $selJoint) { rename $current ($newJointName2 + "#"); } rename ($newJointName2 + "1") ($newJointName2 + "Root"); } //This creates a procedure for checking if a name already exists, //if the name exists, it gives a warning, or it runs the cmNameJoints procedure: global proc cmJointNamer (string $newJointName) { if('objExists ($newJointName + "Root")') warning("Name Already Used!"); else if('objExists ($newJointName + "2")') warning("Name Already Used!"); else cmNameJoints $newJointName; } After entering both procedures into memory, you can use the second procedure named cmJointNamer to rename all the joints in a skeleton. Starting with the root joint, Shift-select all the joints you want to rename in the hypergraph view. Then enter on the command line cmJointNamer followed by a new name for the joints. If the name already exists, you get a warning message, and the joints are not renamed. If no warning message occurs, the command should rename the selected joints to the new name followed by Root on the first joint, and by increasing numbers on the rest of the joints. The renaming code generates a selection list, and renames each object in the list by using a for-in loop. A variation of the for loop, the for-in loop is used to repeat actions on each object in an array variable. The next example is a procedure named cmCurveCluster that creates clusters on each point of a curve. This can prove useful for setting up spline-IK curves, as used on your character's backbone, and for setting up influence object curves on your character's face. This procedure uses a standard for loop to create each cluster based on the number of points on the curve. It is not necessary to select anything to run this procedure; just type in the name of the curve after the name of the procedure. Type in the following MEL code to create the procedure: //This procedure creates a cluster on each point of a curve: global proc cmCurveCluster (string $curveName) { //This renames the curve temporarily to fix any shape node problems: string $TempCurveName = "TempCurveName"; rename $curveName $TempCurveName; //This uses the shape node to find number of points: string $curve =($TempCurveName) + "Shape"; int $numberSpans = 'getAttr ( $curve + ".spans" )'; int $curveDegree = 'getAttr ( $curve + ".degree" )'; int $numberPoints = $numberSpans + $curveDegree; //This loop selects the points and creates the clusters: for ($i = 0; $i < $numberPoints; $i++) { select -r (($TempCurveName) + ".cv" + "[" + ($i) + "]") ; newCluster " -envelope 1"; } //This sets the curve name back to the original name: rename $TempCurveName $curveName; } Save these example procedures in a MEL script named ToolProcedures.mel, and place them in your login Maya scripts folder. Then you can create a shelf button that sources the ToolProcedures file to load all the procedures into memory. If you have a lot of procedures, it is difficult to remember how to use them all (the names and whether they require user input, for example). It is much easier to create a window interface to access your procedures. This interface can include directions for how to use each procedure, fields for user input, and buttons for running commands. The following code sources the ToolProcedures file, for instance, and creates a user interface for using the cmJointNamer and cmCurveCluster procedures: //Declare variables to use in script: string $windowName = "MyProceedures"; string $nameFieldName = "nameField"; string $curveFieldName = "curveField"; //Source your script with below procedures... source ToolProcedures; //Create window: if(`window -ex $windowName`) deleteUI $windowName; window -t "Tool Window" $windowName; columnLayout; //This creates GUI for the cmJointNamer proceedure: text "cmJointNamer: Select joints to rename,"; text "then type a new name and click the button below..."; textField -w 300 $nameFieldName; button -w 300 -l "Click to change joint name to name in field" -c ("$name = `textField -q -text " + $nameFieldName + "`; cmJointNamer $name"); text " "; separator -width 300; //This creates GUI for the cmCurveCluster proceedure: text "cmCurveCluster: No need to select anything,"; text "just type the curve name, and click the button below..."; textField -w 300 $curveFieldName; button -w 300 -l "Click to create clusters on curve in field" -c ("$curve = `textField -q -text " + $curveFieldName + "`; cmCurveCluster $curve"); text " "; separator -width 300; showWindow $windowName; You can place this code in a shelf button or hotkey for easy access. Notice that variables for names of the window and fields are being declared at the beginning of the script, where they are easy to see. This can keep you from accidentally repeating names in different variables when creating more lengthy scripts. The fields are created by a textField command. The buttons are querying the textField commands to place the user input in a variable, which is then used in your procedure variables (see Figure 6.20). 6.20. You can also use MEL scripting to create a tool window that makes it easier for you to run your custom procedures.
|
EAN: 2147483647
Pages: 75