Advanced MEL Controls
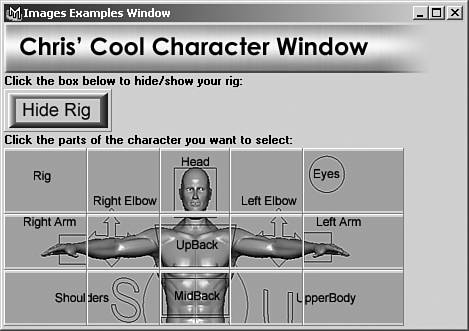
| In this section, you learn how to create more advanced MEL controls and layouts that maximize efficiency and conserve space. Techniques such as naming and referencing MEL controls, using variables, and creating multipanel layouts are covered in detail. Naming and Referencing ControlsSo far in this chapter, you have not been naming any of your MEL controls. A name for a control differs from a label or title. All controls are assigned unique names when you create them so that Maya can keep track of them. If you don't specify a name, Maya names the control for you, and you may not be aware of what that name is. In many cases when using MEL for character controls, this is fine. If you need to reference a control with another command in your script, however, you must know its name. In this case, it is best to assign a name by specifying it at the end of the command that creates the control. Just write a name after all the flags, right before the semicolon. To name your window, for instance, write it like this: window -t "Character Controls" -wh 450 800 CharacterWin; By placing the name CharacterWin after the last flag, Maya knows this is the name of your window. When the window is named, you can reference it in other commands. One good application of this is to write a conditional statement at the beginning of your script that updates your window whenever you launch it. Type the following command directly before the window command in your script like this: if ('window -exists CharacterWin') deleteUI CharacterWin; window -t "Character Controls" -wh 450 800 CharacterWin; This conditional statement runs whenever the window is launched. It checks to see whether the window named CharacterWin already exists, and if so, it deletes the window and launches a new one with the same name. If the condition is false, and the window doesn't already exist, it skips the deleteUI command and just opens your window. One thing to note is the single back quotes (`) around the conditional statement are not the same as the single quote found on the double quotes key. You must use the single back quote on the tilde key, or you will get an error message. By placing MEL code in single back quotes, you use the results of running the code, rather than the code itself; you use this technique again later in this chapter when creating variables. If you are still adding controls to your window, a conditional statement at the beginning of your script keeps you from having to close your current window to update the window with the new controls. Clicking the Test Script button just deletes the old one and launches the new one so quickly that it appears the same window was updated. Keep in mind that you shouldn't name your window if you are not going to use this conditional statement, because it may cause an error message if you try to launch multiple windows with the same name. In addition, if you are going to name your window, specify the name in your showWindow command in this manner: showWindow CharacterWin; One important use of naming controls is that you can query and edit them. This is done by using a -query or -edit flag in the command, followed by the flag you want to affect and the name of the control. These flags are used in examples later in this chapter. Creating More Advanced ControlsOne way to further enhance your MEL character window is to add your own custom images as part of the interface. The image command enables you to assign a static image to your window. The main flag that calls the image is a -i or -image flag. The -image flag should specify a text string that points to a custom bitmap image that you created in a paint program such as Photoshop. A good place to put your images is in the Icons folder where Maya stores all its UI and shelf icons. To find this folder, open the Shelf Editor and click the Change Image button. Images used in MEL windows, however, do not have to be a specific size like shelf button images. There are commands not only for placing static images in your window, but also for assigning images to buttons and check boxes. These commands are the symbolButton and symbolCheckbox commands. Both of these commands have -image flags that can be pointed at an image file. Otherwise, they function in the same way as regular buttons and check boxes, except that they display images rather than text labels. Use your imagination to create custom-looking buttons and check boxes in a paint program such as Photoshop, saving the images as bitmap files. For instance, an image can be used to create a HideRig check box that hides all the NURBS curves, skeletons, IK handles, and locators in your scene. Another application would be to take a screen shot of your character in its default pose, and cut the image into a grid of squares. Then use the symbolButton and rowColumnLayout commands to place the buttons in columns that reconstruct the image of your character. Finally, assign each button to select the controls on your character displayed on each button. Here is an example of placing images, symbol check boxes, and symbol buttons in a window: if ('window -exists ImagesWin') deleteUI ImagesWin; window -t "Images Examples Window" ImagesWin; columnLayout; image -width 450 -height 50 -image "C:/\ProgramFiles/\AliasWavefront/\Maya4.5/\extras/\icons/\USERWINDOWIMAGE. In this example, the first thing to notice is the way the paths to images are being written. As previously mentioned, using two forward slashes in front of a line comments out the code. Placing a single forward slash comments out the next character, rather than the entire line. This is necessary to make Maya read the path as a text string, and not run the backward slashes in the path as part of the command. The second thing to notice about this script is that the check box commands are using the -ofi or -offImage flag to show one image when the check box is off, and using the -oni or -onImage flag to show another image when the check box is turned on. Also notice that the commands used to hide and show the rig elements are not controlling the visibility attributes of objects. Instead, they are toggling what each window in your Maya interface is showing. This command is using the modelEditor command with the -e or -edit flag to control the settings of the Show menu for each window. To make it work correctly, make sure you specify the name of each window, such as modelPanel4 for the perspective view. The three orthographic windows are named modelPanel1, modelPanel2, and modelPanel3. Finally, this window places symbol buttons in columns to reconstruct an image of the character that can be clicked to select your icons (see Figure 6.11). It is important to set the width of each column to the exact size of each image, so that there is no space between them. Set the -c flags as you normally would to select an icon. There is also one more new command after the buttons, and before the showWindow command. Notice the window command, which is in edit mode to set the size and placement of the window. Placing this at the end of your window script forces the window to open at the correct size and place in your interface. To find out what numbers to use in the -tlc or -topLeftCorner flag, open a window and place it where you want it to be, and then run the window command on the command line with the same flag preceded by a -q or -query flag. 6.11. Use bitmap images on buttons and check boxes to customize the look of your character window.
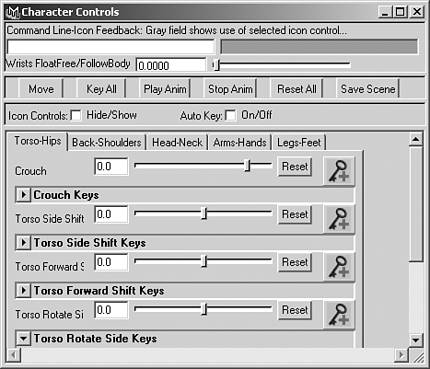
You can use a more advanced slider for your MEL controls, which is created by using the floatSliderButtonGrp command. This command is similar in many ways to the attrFieldSliderGrp command, except that it has two buttons associated with it. Here is an example of the code used to create this slider, which should be inserted in your window script to replace the basic sliders: floatSliderButtonGrp -label "Crouch" -field true -fieldMinValue -11 -fieldMaxValue 4 -s 1 -minValue -7 -maxValue 1 -buttonLabel "Reset" -buttonCommand "setAttr UpperBody.ty 0" -symbolButtonCommand "setKeyframe UpperBody.ty" -symbolButtonDisplay true -image In this slider the -fmn or -fieldMinValue flag and -fmx or -fieldMaxValue flag are being used to enable the Slider field to be set beyond the regular slider limits by typing values into the field. The two buttons being created with the slider are a regular reset button, and a symbol key button (see Figure 6.12). The reset button's -bc or -buttonCommand flag is using a setAttr command to set the attribute controlled by the slider back to its default value. Make sure you check the object's channels to get the correct value, because the default value may not always be 0. The -sbc or -symbolButtonCommand flag is using the setKeyframe command to set a key on the same attribute. The -i or -image flag is displaying Maya's small keyframe image on the symbol button. When you use any of the native Maya images in the Icons folder, which are special .xpm files, it is not necessary to specify the explicit path to the image. Use the -cal or -columnAlign flag to align the slider flush left, and then set the -cw5 or -columnWidth5 flag so that each piece of the control has a specific width. This makes sure there are no large gaps of space in your slider. 6.12. If you use the floatSlider Button Grp command to create your sliders, you can add reset and keyframe buttons as part of the slider control.
Finally, it is important that you give this slider control a name. Notice that the floatSliderButtonGrp command doesn't have an -at or -attribute flag. If you test the command, you will find that the slider doesn't actually control anything. The reason you have to specify a name for this slider control is that you must use the slider's name in a separate command to make it work. The command is the connectControl command, and should be written directly after the floatSliderButtonGrp command, like this: connectControl NewCrouchSlider ("UpperBody.ty"); The slider should work fine after you add the connectControl command. Other controls you can make are Key All and Reset All buttons for particular sections of sliders. These can be placed at the beginning or end of each section, and are used to affect multiple attributes. To make the Reset All button work, copy the setAttr commands from each advanced slider reset button to the -c flag of the Reset All button, making sure to separate them by semicolons, and surround them with double quotes and curly brackets. Your MEL code for resetting all the head controls should be similar to this: button -l "Reset Head All" -c {"setAttr Head.rx 0; setAttr Head.ry 0; setAttr Head.rz 0;\ setAttr Head.neckTilt 0; setAttr Head.neckBend 0; setAttr Head.jawOpen 0;"}; To create a Key All button, use the setKeyFrame command in the -c flag of the button, followed by listing all the attributes you want to set a key on. For instance, the MEL code for your Key All button for the head controls should resemble the following: button -l "Key Head All" -c "setKeyframe\ Head.rotate\ Head.neckTilt\ Head.neckBend\ Head.jawOpen"; Another control you can use involves creating a list of keyframes set on an attribute that is controlled by a slider, so you can edit them without having to select the object. The controls include a keyFrameOutliner command, followed by buttons for removing the current keyframe on the timeline, or for removing all keyframes from that attribute. These are not controls that you would use all the time, so it is best to place them in a collapsible section after each slider. To create such controls for the Crouch slider, for instance, your code should look like this: floatSliderButtonGrp -l "Crouch" -f true -fmn -11 -fmx 4 -s 1 -min -7 -max 1 -cal 1 left -cw5 60 40 160 50 35 -bl "Reset" -bc "setAttr UpperBody.ty 0" -sbc "setKeyframe UpperBody.ty" -sbd true -i "SETKEYSMALL.xpm" NewCrouchSlider; connectControl NewCrouchSlider ("UpperBody.ty"); //this section contains a collapsible keyframes list: frameLayout -w 350 -l "Crouch Keys" -cll true -cl true -bs "in"; columnLayout -h 100 -adj true; //This sets a keyframe at 0 to initialize the control: currentTime -edit 0sec; setAttr UpperBody.ty 0; setKeyframe -time 0sec UpperBody.ty; //this creates a list of keys: text -l "UpperBody TranslationY Keys"; keyframeOutliner -display narrow -animCurve UpperBody_translateY; //buttons for selecting and removing keys... button -l "Remove Current Key" -c {"select -r UpperBody; timeSliderClearKey; select -cl;"}; button -l "Remove All Keys" -c {"currentTime -e 0sec; cutKey -clear -time \".05:1000\" -attribute ty UpperBody"}; checkBox -l "Open/Close Graph Editor" -onc {"select -r UpperBody; GraphEditor;"} -ofc {"select -cl; deleteUI -window graphEditor1Window"}; setParent..; setParent..; In this code, notice that the first command after the frameLayout and columnLayout commands is a currentTime command that sets the current frame to 0. Then the next two lines sets the UpperBody icon to its default Y translation value, and uses the setKeyframe command to automatically set a keyframe. Doing this in the code ensures that the key will be there whenever the window is opened. This is necessary to initialize the keyframeOutliner command, which requires at least one keyframe on the object to update the list of keys. The narrow display on this command shows the frame number the key is located on, as well as the attribute's value, and how the interpolation of the animation curve is set. You use this list of keyframes as a guide when using the next two buttons. Each of the buttons removes keyframes in specific ways, and contains multiple commands in the -c flags (see Figure 6.13). The first button selects the UpperBody icon, clears any key on the current timeline frame using the timeSliderClearKey command, and then unselects the icon. This is all done in the code, so you never notice that the UpperBody icon is even selected. The next button removes all the keys from the object except the default position key at frame 0. The commands being executed set the timeline to 0, and then use a cutKey command to clear the keys from .05 to 1000 on the timeline for the UpperBody icon. You want to cut the keys slightly above 0, so that the default key on 0 remains. This keeps the keyframeOutliner control working without you having to relaunch the window. The last control is a check box that opens and closes a Graph Editor that enables you to adjust the animation curves on the object the slider is controlling. This involves selecting the object, opening the Graph Editor, unselecting the object, and deleting the Graph Editor. 6.13. Add a collapsible section to each slider that contains a list of keys set on the slider's attribute, and keyframe editing controls.
Declaring VariablesOne technique that is common for programmers to use in their scripts is the declaring and referencing of variables. A variable is a name with a dollar sign at the beginning of it that is used in a script to stand for something else. It can stand for a length of MEL code, the name of an object, a complete list of objects, or the result of running some MEL code. In most MEL scripts, variables are used to make the script more compact, easier to modify, and dynamic because they can contain the results of evaluating the code. To use a variable, you must first declare it. You declare it at the beginning of your script, being careful to use a unique name for each variable. You can declare several kinds of variables, but the main ones you use in this chapter are a float, integer, and string variable. A float variable contains whole numbers or decimal numbers, an integer variable contains only whole numbers, and a string variable contains any kind of characters on the keyboard. Here are some examples of declaring these three kinds of variables: float $variable1 = 'getAttr UpperBody.ty'; int $variable2 = 'currentTime -q'; string $variable3 = "setAttr UpperBody.ty 0"; The first two variables differ from the third in that they represent the result of running the code on the right of the equals sign, as opposed to representing a string of code itself. The single back quotes symbol on the tilde key tells Maya to run the code and store the result in the variable. This causes $variable1 to contain the translation Y value of the UpperBody icon, rather than the command string "getAttr UpperBody.ty". The second variable contains the result of running a query to find out the current setting of the timeline, which will be a frame number. The third variable, however, contains the text string "setAttr UpperBody.ty 0". By inserting $variable3 in a MEL script, you place this entire command in the script, to be run when the rest of the script runs. You will use one other kind of variable when you want to run commands on many things simultaneously. To do this, you must create a list of all the things you want to affect. You do so by declaring a special variable called an array. To create an array, add brackets after the variable name, as follows: string $variable4[] = 'ls -select'; By using the result of running an ls or list command with a -select _flag, you make the variable contain a list of whatever is selected when the array variable is declared. In an array, each member of the list is assigned a number, starting with 0, so it can be referenced. Select in order a sphere, cube, and locator before declaring this variable, for example, and then type the following on the command line: print $variable4[1]; The result of this command is "cube", because that is the second object in the $variable4 array. Throughout the rest of this chapter, you frequently use variables to create more complicated MEL controls and tools. Using Tab LayoutOver the next couple of sections, you finalize the placement of your character controls into two more advanced layouts. First you use the tabLayout command to place groups of sliders into tabs. This helps to maximize your screen space by condensing the attribute slider controls into a reasonably small area. Because this layout is more complicated than the previous ones, the best way to begin using it is to copy the simple example from the MEL Command Reference page on tabLayout to your Script Editor. The following code is the same as the example, except comments have been added to show you what is creating the various parts of the tab controls: window -widthHeight 200 150; //This section places the layout parameters in variables to use later: string $form = 'formLayout'; string $tabs = 'tabLayout -innerMarginWidth 5 -innerMarginHeight 5'; formLayout -edit -attachForm $tabs "top" 0 -attachForm $tabs "left" 0 -attachForm $tabs "bottom" 0 -attachForm $tabs "right" 0 $form; //This creates the contents of the first tab: string $child1 = 'rowColumnLayout -numberOfColumns 2'; button; button; button; setParent ..; //This creates the contents of the second tab: string $child2 = 'rowColumnLayout -numberOfColumns 2'; button; button; button; setParent ..; //This edits the tabLayout command to label each tab: tabLayout -edit -tabLabel $child1 "One" -tabLabel $child2 "Two" $tabs; showWindow; Highlighting and running the example code creates a window with two tabs that contain some horizontally placed buttons. Notice that the code uses variables to create and label the tabs. Also notice that multiple layout commands are used, so the setParent command is required. The important things for you to understand are where the contents of each tab should be placed, where the labels for each tab are being assigned, and how to add more tabs. To add another tab, copy and paste the contents of a tab, starting at the declaring of the $child variable to the setParent command, and change the name of the new variable to $child3. Then you copy and paste a new -tabLabel flag that labels $child3 to "three". When you understand this process, you can copy your own contents from the scripts you created in previous exercises into the new tab layout to replace the button commands, and give the tabs character control labels. For instance, you can place some advanced slider controls into a tab layout as follows: if ('window -exists TabsWin') deleteUI TabsWin; window t "Tab Character Window" TabsWin; //This section places the layout parameters in variables to use later: string $form = 'formLayout'; string $tabs = 'tabLayout -innerMarginWidth 5 -innerMarginHeight 5'; formLayout -edit -attachForm $tabs "top" 0 -attachForm $tabs "left" 0 -attachForm $tabs "bottom" 0 -attachForm $tabs "right" 0 $form; //This creates the contents of the first tab: string $tabContent1 = 'columnLayout'; floatSliderButtonGrp -l "Crouch" -f true -fmn -8 -fmx 4 -s 1 -min -5 -max 1 -cal 1 left -cw5 65 40 160 50 35 -bl "Reset" -bc "setAttr UpperBody.ty 0" -sbc "setKeyframe UpperBody.ty" -sbd true -i "SETKEYSMALL.xpm" CrouchSlider; connectControl CrouchSlider ("UpperBody.ty"); setParent ..; //This creates the contents of the second tab: string $tabContent2 = 'columnLayout'; floatSliderButtonGrp -l "Bend Back" -f true -fmn -50 -fmx 50 -s 1 -min -30 -max 30 -cal 1 left -cw5 65 40 160 50 35 -bl "Reset" -bc "setAttr BackBend.rz 0" -sbc "setKeyframe BackBend.rz " -sbd true -i "SETKEYSMALL.xpm" BendBackSlider; connectControl BendBackSlider ("BackBend.rz"); setParent ..; //This creates the contents of the third tab: string $tabContent3 = 'columnLayout'; floatSliderButtonGrp -l "Hip Swing" -f true -fmn -60 -fmx 60 -s 1 -min -45 -max 45 -cal 1 left -cw5 65 40 160 50 35 -bl "Reset" -bc "setAttr Hips.rz 0" -sbc "setKeyframe Hips.rz" -sbd true -i "SETKEYSMALL.xpm" HipSwingSlider; connectControl HipSwingSlider ("Hips.rz"); setParent ..; //This edits the tabLayout command to label each tab: tabLayout -edit -tabLabel $tabContent1 "Torso" -tabLabel $tabContent2 "Back" -tabLabel $tabContent3 "Hips" $tabs; window -e -wh 450 300 -topLeftCorner 50 50 TabsWin; showWindow TabsWin; This code creates a window with three tabs: Torso, Back, and Hips (see Figure 6.14). When you click each tab, an advanced slider displays, enabling you to control each of these areas. It is then just a simple matter to add more sliders to each tab. 6.14. Begin placing your advanced slider controls in a tab layout to conserve space in your window.
Creating a Multipanel WindowOne of the most powerful layout commands you can use is paneLayout. This layout creates multiple panels in a floating window. The panels can contain anything you can create in MEL, such as custom controls or even view windows. Actually, the four-panel layout you use when working in the Maya interface is a "quad" pane layout. Each panel is completely separate from the others, and can contain a variety of controls and sublayouts. The advantage of using the paneLayout command is that you don't have to worry about layout commands in separate panels clashing with each other. Within the command, there are flags for specifying the number of panels, how the panels are arranged, and the size of each panel. Other than the "quad" configuration, you can specify many other arrangements for the panels when using paneLayout. This parameter is set using the -cn or -configuration flag, and includes "single", "horizontal2", "vertical2", "horizontal3", "vertical3", "top3", "left3", "bottom3", "right3", "horizontal4", "vertical4", "top4", "left4", "bottom4", and "right4". The horizontal configurations stack a specific number of panel rows, whereas the vertical configurations create a specific number of panel columns. The top, bottom, left, and right configurations create three panels with the placement of the largest one being opposite the name. For instance, the "top" configuration creates one large panel on the bottom half of the window, and two small panels on the top half of the window. As with the tabLayout command, the best way to understand the paneLayout command is to copy the MEL Command Reference example into your Script Editor and test different configurations. Here is the example code with some comments and setParent command additions: window; paneLayout -configuration "quad" MyPanels; //This is the first panel: button; setParent MyPanels; //This is the second panel: textScrollList -append "one" -append "two" -append "three"; setParent MyPanels; //This is the third panel: scrollField; setParent MyPanels; //This is the fourth panel: scrollLayout; columnLayout; button; button; button; setParent MyPanels; showWindow; Notice that this command doesn't have any flags that specify the controls that come up in each of the panels. Instead, which controls come up in each of the panels is determined by the order in which the controls come up in the code. Be aware that in a "quad" configuration, the order goes clockwise from the top-left panel. Therefore, the example code creates a button in the top-left panel, a text list in the top-right panel, a Scroll field in the bottom-right panel, and three buttons in a scroll layout in the bottom-left panel (see Figure 6.15). Other configurations, such as "right3", also go clockwise, whereas a horizontal configuration goes from top to bottom, and a vertical goes from left to right. If you set a configuration that specifies fewer panels than controls for instance, you change the example code to an "right3" configuration the last control listed in the script will not display in the resulting window. In the example script, this would result in the three buttons not appearing in any of the three windows. 6.15. Copy from the MEL Command Reference to the Script Editor the paneLayout example to use as a template for creating your own multipanel windows. This example places controls in a "quad" configuration of panels.
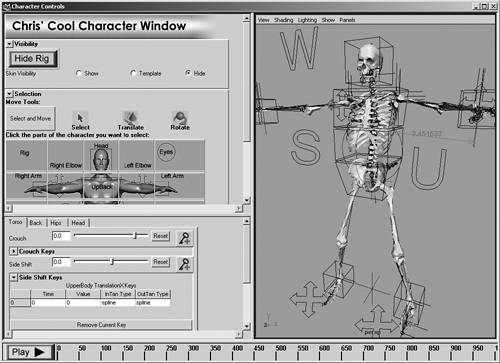
When you start putting your character controls within a pane layout in the next exercise, make sure the right controls come up in the correct window by using setParent commands to signal the end of each panel. Notice that a setParent command has been added after each control in the preceding example code, and that the command specifies the name of the paneLayout control. This is not necessary in this simple example, but is useful when adding additional sublayouts later. You then need to use setParent.. commands to use multiple sublayouts within each panel, and the setParent MyPanels; command to set the contents for each panel into the overall pane layout. Kinds of Interface DesignAs mentioned previously, the goal of a character setup artist is to make character controls that are easy and intuitive for an animator to use. On advantage of MEL controls is that each control can contain clear labels. In addition, there can be automatic limits on how far a control can be animated. Keep this in mind as you develop your character window. In most animation facilities, animators are considered talent, and do not necessarily have a deep technical understanding of Maya. Their main job is to make the character come to life through their acting abilities. It is the role of the character setup artist to create character controls that may be extremely complex "under the hood," but are much easier for the animator to use than more primitive controls. You can set up your pane layout window in two main ways. The most basic way is to create a multipanel window that contains only character controls, which are then used in conjunction with the regular Maya interface. An example is a "horizontal4" pane layout that consists of selection, visibility, and some interface controls in several small panels, with a larger panel at the bottom of the window that contains sliders in a tab layout (see Figure 6.16). This kind of window is usually pretty small, and is just used as a floating window on top of the regular Maya views. 6.16. This "horizontal4" configuration stacks four differently sized panels that contain only character controls. This kind of window would be used in conjunction with the regular Maya interface and views.
The other way to set up your pane layout is to create a multipanel window that contains all the controls and view windows that the animator will use to pose the character. Such a layout should be designed so that it can replace the regular Maya interface. For instance, such a layout could have a large panel of controls, and also contain panels that display perspective and hypergraph views. The controls should also include access to the timeline, Graph Editor, and other animation tools. There is a procedure you can go through to make your custom control window replace the regular Maya interface when your character scene is opened. Do this by setting the script node Execute On option in the Expression Editor from Demand to Open/Close. Make sure Before is checked on for the Script option. Then add a couple of commands to your window script. First, add an -mw or -mainWindow flag to your window command. Then add a deleteUI command after the showWindow command in your script. Set this command to delete Maya's main window. To find the name of Maya's main window, run an lsUI command with a -wnd or -windows flag. This shows you that the name for the main window containing the Maya interface is MayaWindow. The code for doing this should look like the following example: window mainWindow MyInterface; columnLayout; text l "Your multi-panel character controls go here..."; showWindow MyInterface; deleteUI window MayaWindow; Click Edit in the Script Editor and save your scene with a name such as WindowOpenTest. Then when you next open that file, your custom window will automatically open, and the regular Maya interface will be deleted. Be careful to use this technique only if you have added all the controls to your custom window that the animator will need to work, such as ways to animate, save the scene, open views, and so on. Ultimately, how you decide to set up your character controls is really just a matter of personal preference. Keep in mind, however, that the controls-only method gives the animator full access to the rest of the Maya interface, whereas the all-inclusive method limits the animator to using only what you include in the window.
|

EAN: 2147483647
Pages: 75