Deforming the Skin with Bones, Wrinkles, and Fat
| A third level of detail that you can add to your character's skin is making it appear to stretch, wrinkle, and jiggle when the skeletal and muscular controls move. There are a variety of ways to do this in Maya. This section shows you some of the most common ways to add such details to your character's skin. Skin Sliding Over BonesTo make it appear that muscles are moving under the skin, you can add sculpt deformers to your rig. A sculpt deformer is a spherical deformer that pushes the points of a surface around, based on where a sculpt locator is placed. The locator is created with the sculpt deformer, and is like a base object that the deformer uses as the center of the effect. By parenting the sculpt deformer and locator under joints in your rig, you can make it appear that bones or cartilage are pushing the character's skin from the inside. You assign a sculpt deformer by selecting the skin and choosing Deform, Create Sculpt Deformer 4.30. Set the Sculpt Mode option to Stretch, Even, and a Linear drop-off to push the skin from the inside.
You can use sculpt deformers in many areas of your character. For instance, you can use one to simulate an Adam's apple in your character's neck. Or use them to make your scapulas look like they are moving under the skin of your character's back. You could even use one to make an eyelid deform slightly as it slides over the cornea of an eye.
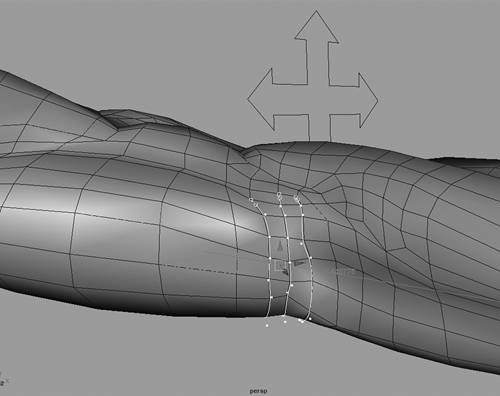
Creating Wrinkles On the SkinOne way to create geometry wrinkles is to assign curves as influence objects to the skin where you want to create the wrinkles. Do this in the same way as adding muscle influence objects, making the influence curves child to the appropriate skeletal joints. The advantage to creating wrinkles with an influence curve over a wire or wrinkle deformer is that the curve is added to the skinCluster node, and you can adjust its weighting with all the other skin weights. Drive the components of the curve to animate the wrinkles when the joints rotate, and make sure the useComponents channel is activated on the skin. Keep in mind that you must have surface details in the right place to create a geometry-based wrinkle. Each wrinkle requires one row of points to create the crease, and two rows on either side to keep the edges from collapsing. The influence curves should be drawn in the same way as the point rows, with a separate curve for each row. The best way to do this is by holding the V key down to snap the curve to the surface points as you draw (see Figure 4.32). Obviously, it is not practical to do geometry-based wrinkles for every place that might wrinkle on the skin. You will want to use this technique only in areas where large wrinkles occur, or where there will be a close-up shot of the skin bending. Large wrinkles can occur on the torso, elbows, knees, wrists, and face. 4.32. Create a wrinkle influence curve by snapping the curve points to points on the skin.
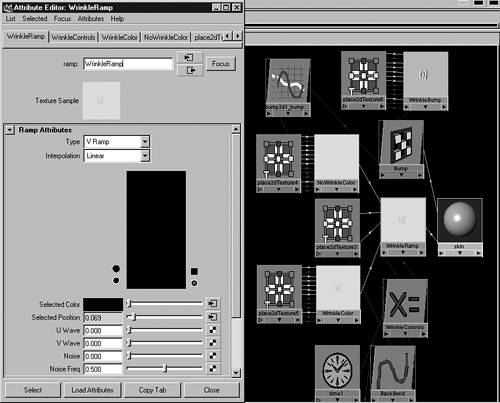
Another way to create wrinkles is to use skeletons to drive the channels of color and bump texture maps on a skin shader. This does not require that the surface geometry be as detailed as when using wrinkle influences. Such a technique is good for small wrinkles in the skin, such as in the fingers. You can also use it in conjunction with larger geometry-based wrinkles to enhance the skin deformations. This technique involves assigning textures to the color and bump channels of the skin shader. The two image file textures are assigned through a ramp, so that you can transition from one to the other. One texture is the default skin appearance without any wrinkles, whereas the other isthe skin with wrinkles drawn on it. Use the 3D Paint tool to initially create the wrinkle image (see Figure 4.33). Animating the transition from one image to the other is done using an expression that connects the position channels of the ramp to custom channels. In addition, you should assign a grayscale bump version of the wrinkled texture to the bump channel of the skin shader. Both the custom channels that control the color transition, and the depth channel of the bump map, can be then driven by the rotation of skeletal joints. 4.33. Draw wrinkles on the skin using the 3D Paint tool, and then open the image in Photoshop to create the finished wrinkle texture.
Keep in mind that you don't necessarily have to choose one or the other of these methods. In some cases, you may want to combine both methods to get the best result. This is most determined by how noticeable the wrinkles will be in a particular scene and the level of realism required by the character design.
Making the Skin JiggleCreating a jiggle deformer is one easy way to make the components of an influence object jiggle your character's skin. Do this on muscle influences to give them weight and volume or add specific fat influence objects for jiggling when your character moves around. First, you must assign a jiggle influence object that is either a surface or curve and then make sure the useComponents channel on the skinCluster node is turned on. A jiggle deformer can be used on a previously assigned muscle influence object. This causes the muscle to jiggle as it moves and flexes. You can also separate the jiggle and muscle-flexing controls by creating a separate jiggle influence object assigned to the same area of the skin. Separating the jiggle from the muscular controls enables you to weight the skin points to both as needed, so you can control how much each affects the skin. The easiest way to do this is to just duplicate the appropriate muscle influence object and assign the copy as the jiggle influence object for the same skin. For instance, you can duplicate a triceps-muscle sphere and assign the copy as a jiggle influence object for the triceps muscle. Then assign the points on the skin near the triceps area a partial weighting to the triceps-muscle influence and a partial weighting to the triceps jiggle influence. Finally, create a jiggle deformer on the jiggle influence, and adjust the influence weighting to make your character have flabby triceps. Assigning a jiggle deformer is relatively easy. Just select the jiggle influence object and choose Deform, Create Jiggle Deformer 4.35. The stiffness and damping channels on the jiggle deformer can be adjusted in the Channel box to increase or decrease the jiggle effect.
The jiggle effect is based on movement, so in the example of a flabby triceps muscle, the arm box should be animated to see any jiggling. When the arm is moving around, you must run a simulation to see the influence object jiggle the skin. Do this by choosing Deform, Create Jiggle Disk Cache Another way to create some jiggle on the skin is to switch to the Dynamics module, and assign a soft body to an influence object. It is best to create this jiggle effect directly on a muscle influence. To make a biceps muscle jiggle, for instance, first select the muscle influence, and choose Soft/Rigid Bodies, Create Soft Body Creating a copy of the biceps muscle as a soft body creates a CopyOf Bicep sphere that is connected to a particle node. Turning on the Make Non-Soft a Goal option makes the soft body copy follow the flexing of the original muscle influence, while still jiggling. A goal object is a target that the soft body always tries to reach. Set some keys on the rig controls to move the arm around, and play the timeline to see the soft body biceps jiggle. To adjust the amount of jiggle, increase or decrease the goal weight channel on the particle node, which is child of the CopyOfBicep node (see Figure 4.36). Increasing the weight reduces the amount of jiggle. Keep in mind that you will not see the jiggle effect on the skin until you assign the soft body copy as a new muscle influence object. Assign it as you would any other influence, and make sure you set the skin weights appropriately. The original muscle object can have its weighting reduced, or you can remove the weighting entirely by setting it to 0. 4.36. The particle node for your soft body influence is the child of the soft body copy and contains the goal weight channel.
To have even more control over the muscle jiggle, you can add springs to the soft body influence. First add springs directly to the soft body by selecting it, and choose Soft/Rigid Bodies, Create Springs Then add some springs to anchor the muscle to the arm. To do this, you need to create two curve-based objects that will be child to the arm joints. Draw a two-point linear curve, or create a small curve box to use as an anchor object. Name it BicepAnchor1, duplicate it, and place one anchor on each side of the soft body biceps muscle. One anchor should be close to and the child of the lower-arm joint, and the other should be close to and the child of the upper-arm joint. Then switch to component mode to select points on one side of the biceps muscle, and Shift-select a couple of points on the closest anchor object. Create another spring named BicepAnchorSpring, and this time use the MinMax creation method with values from 1 to 100. Click Create to create springs that connect one end of the muscle to the closest anchor. Repeat this process for the other side of the muscle, but Shift-select the new BicepAnchorSpring after selecting points on the soft body and anchor, and turn on the Add to Existing Spring option to add the springs on the other side of the muscle to the BicepAnchorSpring node (see Figure 4.37). Play the timeline to see the soft body and springs move. Adjust the stiffness and damping channels on the spring nodes as needed to improve the muscle jiggle. 4.37. Adding springs can anchor your soft body jiggle influence to the skeleton joints through a couple of curve objects. This causes the movement of the joints to influence the jiggle effect even more on the soft body.
|


EAN: 2147483647
Pages: 75