The Perfect Maze
| You are probably very familiar with mazes surprisingly fun puzzles that can keep you interested for a long time. In this section we talk about the AI involved in creating random but perfect mazes. But first you should know what a perfect maze is, as opposed to an imperfect one. A perfect maze is one in which exactly one path exists between every two cells. In a perfect maze, you can choose any two cells and there will always exist a path between the two but only one. In a perfect maze, a looped path is not possible, and there are no closed-off areas.
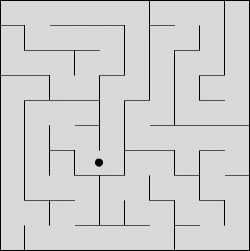
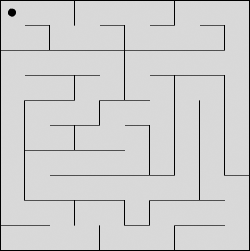
In the figure above, you can see both perfect and imperfect mazes. The imperfect one has both a closed-off cell and multiple paths between some cells. The perfect maze has no closed-off areas, and only one path exists between any two cells. Here is a larger, more interesting perfect maze.
Rules for the Perfect MazeThis is a pretty simple application that makes use of two-dimensional arrays to store information about each tile. The maze is tile-based, and each tile has four walls. Now let's look at the rules for creating a perfect maze.
The images below show an example of how a 3X3 maze would be created.
Using ActionScript to Create the Perfect MazeNow that you have a good understanding of the algorithm, let's take a look at how it can be written in ActionScript. If you truly understand this algorithm (which you can probably do without too much trouble), and if you have a firm grasp of ActionScript, you should be able to write the ActionScript for this algorithm on your own. But just in case you don't want to try, we have done it for you.
In maze.fla there are three layers: Object Definition, Implementation, and Assets. The Object Definition layer contains the algorithm that creates the maze in memory. The Implementation layer contains the ActionScript needed to create a visual representation of the maze that we created in memory. The Assets layer contains the movie clips needed to display the maze. We are most concerned with the ActionScript in the Object Definition layer, since that contains the AI algorithm for maze creation. There are 75 lines of code in this frame, all for one long function. 1 maze = {}; 2 maze.createMaze = function(horizontal, vertical) { 3 this.rows = horizontal; 4 this.columns = vertical; 5 this.totalCells = this.rows*this.columns; 6 this.startRow = random(this.rows)+1; 7 this.startColumn = random(this.columns)+1; 8 this.cellsVisited = 0; 9 this.currentCell = "cell"+this.startRow+"_" We begin by creating an object called maze. Next, we add a method to this object, called createMaze(), which accepts two parameters that specify the number of columns and the number of rows to be calculated for the maze. They are stored as columns and rows. The total number of cells in this maze is calculated by multiplying rows by columns. This value is stored as totalCells. We then randomly select a cell to start from and store this as currentCell (lines 7 9). In line 10 we create an object that represents this starting cell, and give it four properties: name, x, y, and exists. The exists property gives us an easy way to check to see if a cell has been visited. If exists is true, then the cell has been visited. Next, we create an array called visitedList and insert the object that represents the current cell into it. We have now given the AI a starting place. One cell exists; it is in the visited array. Now we can perform a while loop until the cellsVisited variable is equivalent to totalCells (line 13). When cellsVisited is equivalent to totalCells, then the maze has been completed. In line 14 we create a reference to the object that represents the current cell. Lines 15 51 perform step 5 from above: The neighbors array is created. Then we check to the west, north, east, and south of the current cell for cells that have not yet been visited. If we find one, then we add it to the neighbors array. When it is added to the neighbors array, we store string names of the wall in each cell that would be knocked down if we chose to visit this cell. For instance, for the neighbor to the east we store the string values "east" and "west". That means if we choose to visit this cell, then we will knock down the east wall in the current cell and the west wall in the neighbor cell. Visually, these are the same wall, but in code each cell keeps track of its own walls. In line 53 we start step 6. If the neighbors array is not empty, then we randomly choose a neighbor (line 54); otherwise, we step back in the visitedList array (lines 70 73). Once a random neighbor is chosen, we perform steps 7 and 8 from above, and must also do the following:
This is all done in lines 54 69. As mentioned above, if there were no elements in the neighbors array, then we move on to lines 70 73, where we step back to the previous cell. I hope you'll agree that while this script was long, it wasn't all that complicated, right? Visual Implementation of the Perfect MazeWe are not going to dissect the ActionScript found in the Implementation layer. However, I will briefly describe what it does. First, it calls the maze.createMaze() method. When that has finished, the maze object contains many other objects that are named in this fashion: cell1_1, cell1_2, cell1_3, and so on. This naming scheme is the same as in all of the tile-based worlds you have seen or will see in this book. The ActionScript then performs a nested loop to add all of the tiles to the stage. During each iteration, the ActionScript looks up the corresponding cell object in the maze object and looks at its east and south properties. If east is not true then the east wall should be visible and is made visible. If south is not true, the south wall should be visible and is made visible. The script only cares about the east and south walls of each cell because we can build the maze with only those pieces of information. The east wall of cell1_1 is the same as the west wall of cell2_1, so we only need to display this wall one time. Likewise, the south wall of cell1_1 is the same as the north wall of cell1_2. The rest of the ActionScript in that frame handles the movie clip that the user moves through the maze. |


 +this.startColumn;
 EAN: N/A
Pages: 163