Section 3.3. Compiling Zaptel
Figure 3-1 shows the layers of interaction between Asterisk and the Linux kernel with respect to hardware control. On the Asterisk side is the Zapata channel module, chan_zap . Asterisk uses this interface to communicate with the Linux kernel, where the drivers for the hardware are loaded.
Figure 3-1. Layers of device interaction with Asterisk
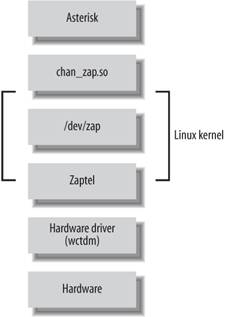
The Zaptel interface is a kernel loadable module that presents an abstraction layer between the hardware drivers and the Zapata module in Asterisk. It is this concept that allows the device drivers to be modified without any changes being made to the Asterisk source itself. The device drivers are used to communicate with the hardware directly and to pass the information between Zaptel and the hardware.
|

We will discuss the Zaptel compile-time options momentarily, in "The zconfig.h File." First, let's take a look at compiling and installing the drivers. (The configuration of Zaptel drivers will be discussed in the next chapter.)
|
3.3.1. The ztdummy Driver
In Asterisk, certain applications and features require a timing device in order to operate (Asterisk won't even compile them if no timing device is found). All Digium PCI hardware provides a 1-kHz timing interface. If you lack the PCI hardware required to provide timing, the ztdummy driver can be used as a timing device. On Linux 2.4 kernel-based distributions, ztdummy must use the clocking provided by the UHCI USB controller . The driver looks to see that the usb-uhci module is loaded and that the kernel version is at least 2.4.5. Older kernel versions are incompatible with ztdummy .
On a 2.6 kernel-based distribution, ztdummy does not require the use of the USB controller. (As of v2.6.0, the kernel now provides 1-kHz timing with which the driver can interface; thus, the USB controller hardware requirement is no longer necessary.)
The default Makefile configuration does not create ztdummy . To compile ztdummy , you must remove a comment marker from the Makefile . Open it in your favorite text editor and look for the following line:
MODULES=zaptel tor2 torisa wcusb wcfxo wctdm \ ztdynamic ztd-eth wct1xxp wct4xxp wcte11xp # ztdummy
Remove the hash [*] ( # ) symbol from in front of "ztdummy," save the file, and compile Zaptel as usual.
[*] The # symbol is most widely known as "hash," so that is what we have chosen to call it. North Americans tend to call it a " pound sign," the ITU uses the term "square," and yet others call it a "crosshatch" or "number sign." Another term , made up by Don Macpherson to describe the # symbol during initial training on an early PBX system, is "octothorpe." This term eventually found its way into memos and letters at Bell Labs, then into other official documents, and from there leaked to the Internet.
3.3.2. The Zapata Telephony Drivers
Compiling the Zapata telephony drivers for use with your Digium hardware is straightforwardsimply run make for either the 2.4 or 2.6 Linux kernels (the Makefile will determine the kernel version for you). Use these commands to compile Zaptel (replace version with your version of zaptel ):
# cd /usr/src/zaptel- version # make clean # make # make install
|
If you're using a system that makes use of the /etc/rc.d/init.d/ or /etc/init.d/ directories, you may wish to run the make config command as well. This will install the startup scripts and configure the system, using the chkconfig command to load the zaptel module automatically at startup.
|
3.3.3. Using ztcfg and zttool
Two programs installed along with Zaptel are ztcfg and zttool . The ztcfg program is used to read the configuration in /etc/zaptel.conf to configure the hardware. The zttool program can be used to check the status of your installed hardware. For instance, if you are using a T1 card and there is no communication between the endpoints, you will see a red alarm. If everything is configured correctly and communication is possible, you should see an "OK." The zttool application is also useful for analog cards, because it tells you their current state (configured, off-hook, etc.). The use of these programs will be explored further in the next chapter.
|
3.3.4. The zconfig.h File
The zconfig.h file is where many of the Zaptel compile-time options lie. For the most part, you should not need to edit this file, but below are some of the options that may be of interest. To enable the options, remove the comment tags ( /* */ ). If you decide to enable any of these options, be sure to do a make clean before recompiling and reinstalling Zaptel.
3.3.4.1. Boost ringer
By enabling the BOOST_RINGER option, you increase the amount of voltage supplied to a telephone during ringing from ~70V to ~89V. Some devices may not detect ringing below certain voltages, so this setting may be necessary. Note that upping the voltage requires more power, and that it will probably only be necessary on a telephone connected to a long loop. Basically, you should leave this alone unless the far end isn't detecting ringing properly. To enable this option, uncomment the following line:
/* #define BOOST_RINGER */
The BOOST_RINGER option can also be declared when loading the driver via modprobe , so it does not need to be compiled into the driver (recommended).
3.3.4.2. Disable m -law/A-law precomputation
Defining CONFIG_CALC_XLAW tells Zaptel to not precompute m -law/A-law into tables and to recalculate it for each sample. We haven't timed it, but the original coder felt that if you have a small number of channels and/or a small level-2 cache, it may be quicker to execute the calculation code than to actually do a lookup on the table loaded into memory.
To enable this option, uncomment the following line within zconfig.h :
/* #define CONFIG_CALC_XLAW */
3.3.4.3. Enable MMX optimization
You can enable MMX optimization (if your processor supports it) by removing the comment tags around the following line:
/* #define CONFIG_ZAPTEL_MMX */
Be aware that CONFIG_ZAPTEL_MMX is considered to be incompatible with AMD processors and can cause system instability.
3.3.4.4. Choose echo cancellation method
All the echo cancellers in Asterisk use a Finite Impulse Response (FIR) algorithm. The differences between themmostly in code implementation and slight algorithm tweaksare minimal. By default, the MARK2 echo canceller is used, and it is generally considered the most robust. To change the default, add comment tags around the #define ECHO_CAN_MARK2 line and uncomment another line:
/* #define ECHO_CAN_STEVE */ /* #define ECHO_CAN_STEVE2 */ /* #define ECHO_CAN_MARK */ #define ECHO_CAN_MARK2 /* #define ECHO_CAN_MARK3 */
3.3.4.5. Enable aggressive suppression
Aggressive residual echo suppression with the MARK2 echo canceller can be enabled by removing the comment tags around the following line:
/* #define AGGRESSIVE_SUPPRESSOR */
The aggressive suppressor makes the nonlinear processor (NLP) stronger. What the NLP essentially does is say, "If the sample is that quiet anyway, make the volume level about 0."
3.3.4.6. Disable echo cancellation
When echo cancellation is enabled in Asterisk, it is possible to disable it by sending a 2100-Hz tone at the beginning of a call. If you do not want Asterisk to disable echo cancellation even when it detects the echo cancel disable tone, uncomment the following line:
/* #define NO_ECHOCAN_DISABLE */
Fax machines and modems use the 2100-Hz tone during negotiation , and Asterisk monitors for this tone during call setup.
3.3.4.7. Enable HDLC
When using the Zaptel driver with T1 or E1 hardware, you can configure Zaptel to use TDM channels for data instead of voice. To enable HDLC functionality in the drivers, uncomment the following line:
/* #define CONFIG_ZAPATA_NET */
For this change to be meaningful, you must also use the sethdlc utility and perform some configuration in zapata.conf .
3.3.4.8. Enable ZapRAS
You can also make use of the ZapRAS program to turn Asterisk into a Remote Access Server (RAS) for use with your ISDN connections. To enable this functionality, you must uncomment the following line from within the zconfig.h file:
/* #define CONFIG_ZAPATA_PPP */
You must also patch Asterisk and configure a PPP daemon, so be aware that this task is nontrivial.
3.3.4.9. Enable Zaptel's watchdog
You can tell Zaptel to monitor the status of interfaces via its built-in "watchdog." It will check if the interfaces stop taking interrupts or otherwise misbehave. If this happens, the hardware will automatically be restarted. To enable the watchdog, uncomment this line:
/* #define CONFIG_ZAPTEL_WATCHDOG */
3.3.4.10. Set default tone zone
The tone zone info option is used to select which set of tones (e.g., dial tone, busy indication, ring tone, stutter, etc.), as defined in the zonedata.c file, should be used as the default. The zonedata.c file contains the frequencies and patterns that Asterisk uses to communicate on the PSTN networks in various countries and to signal connected telephones. The default tone zone (0) is used to indicate North American signaling frequencies. Other tone zones include Australia (1), France (2), Japan (7), Taiwan (14), and many others. You can change the default on the following line:
#define DEFAULT_TONE_ZONE 0
3.3.4.11. Enable CAC ground start signaling
Some devices, such as the FXO ports on a Carrier Access Corporation (CAC) channel bank, have nonstandard FXS ground start signaling start states (A=low, B=low). You can configure the drivers to use this state by removing the comment tags around the following line:
/* #define CONFIG_CAC_GROUNDSTART */
3.3.4.12. TDM400P Revision H PCI ID workaround
If you happen to be using an older TDM400P Revision H card, you may find that it sometimes forgets its PCI ID. To make the wctdm driver essentially match all subvendor IDs, uncomment the following line:
/* #define TDM_REVH_MATCHALL */
This may be required when using older revisions of TDM400P cards with newer versions of Asterisk, due to a change in the subvendor ID code. This has been known to cause the following type of error when loading the wctdm module:
# ZT_CHANCONFIG failed on channel 12: No such device or address (6)
Uncommenting the #define line above should resolve this problem.
3.3.5. Passing Module Parameters to Configure Zaptel
Some of the Zaptel options can also be enabled when loading the module, by passing module parameters to the wctdm driver. You can list these parameters at load time (as opposed to statically changing them in the zconfig.h file) with the modinfo command:
# modinfo -p wctdm debug int loopcurrent int robust int _opermode int opermode string timingonly int lowpower int boostringer int fxshonormode int
You then pass the module parameters to the modprobe command. For example, you can use the following command to activate the boostringer parameter when the module is loaded, instead of statically defining its use with #define BOOST_RINGER in the zconfig.h file:
# modprobe wctdm boostringer=1
Another common parameter to pass to a module is opermode . By passing opermode to the wctdm driver, you can configure the TDM400P to better deal with line impedances for your country. opermode accepts a two-letter country code as its argument.
EAN: N/A
Pages: 380
- Integration Strategies and Tactics for Information Technology Governance
- An Emerging Strategy for E-Business IT Governance
- Measuring and Managing E-Business Initiatives Through the Balanced Scorecard
- A View on Knowledge Management: Utilizing a Balanced Scorecard Methodology for Analyzing Knowledge Metrics
- Measuring ROI in E-Commerce Applications: Analysis to Action