Section 3.2. Add Any Control to a ToolStrip
3.2. Add Any Control to a ToolStripThe ToolStrip supports a wide range of ToolStripItem classes, allowing you to add everything from buttons and drop-down menus to text-boxes and labels. However, in some situations you might want to go beyond the standard options and use other .NET controls, or even place your own custom controls in the ToolStrip. In order to make this work, you need to use the ToolStripControlHost. Note: Want to outfit a ToolStrip with a custom control? Thanks to the ToolStripControlHost, you can add just about anything. 3.2.1. How do I do that?There's no way to add standard .NET controls directly to the ToolStrip, because the ToolStrip only supports classes that derive from ToolStripItem. You could create a class that derives from ToolStripItem to implement a custom ToolStrip element, but this approach is fairly complex and tedious. A much simpler approach is to use the ToolStripControlHost, which can wrap just about any .NET control. To use the ToolStripControlHost with a non-ToolStripItem control, just pass the control object as a constructor argument when you create the ToolStripControlHost. Then, add the ToolStripControlHost object to the ToolStrip. You can use the code in Example 3-1 to add a CheckBox control to the ToolStrip.Items collection. Figure 3-4 shows the result. Example 3-1. Adding a Checkbox control to a ToolStrip.Items collection' Create a CheckBox. Dim CheckStrip As New CheckBox( ) ' Set the CheckBox so it takes the size of its text. CheckStrip.AutoSize = True CheckStrip.Text = "Sample CheckBox in ToolStrip" ' Make sure the CheckbBox is transparent (so the ' ToolStrip gradient background shows through). CheckStrip.BackColor = Color.FromArgb(0, 255, 0, 0) ' Create the ToolStripControlHost that wraps the CheckBox. Dim CheckStripHost As New ToolStripControlHost(CheckStrip) ' Set the ToolStripControlHost to take the full width ' of the control it wraps. CheckStripHost.AutoSize = True ' Add the wrapped CheckBox. ToolStrip1.Items.Add(CheckStripHost) Figure 3-4. A ToolStrip with a CheckBox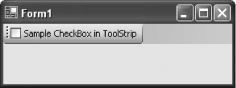 3.2.2. What about......customizing the ToolStripControlHost? If you're using a ToolStripControlHost to host another control, you might want to add properties to the ToolStripControlHost to expose data from the hosted control. For example, you could add a Checked property to the ToolStripControlHost used in this example so that you could easily set or retrieve the checked state of the wrapped CheckBox control. In order to use this technique, you need to create a custom class that derives from ToolStripControlHost. 3.2.3. Where can I learn more?The MSDN help reference includes an example with a ToolStripControlHost that hosts a date control. For more information, look up the index entry "ToolStrip |
 wrapping controls in. "
EAN: 2147483647
Pages: 123