24.1. Excel and Databases Databases provide the best way to store massive amounts of data, like a product catalog for an online store or a customer list for a mail order company. Databases break this data into separate tables and let you search it with unrivaled flexibility. Databases are particularly adept at answering questions like "What products did this customer order last week?" and "How many employees have completed sensitivity training?" The world has two basic types of databases: -
End- user databases are designed for small-scale or single-person use. These databases store data and provide people-friendly tools for searching and managing the information they contain. Microsoft Access, which comes with some versions of Office, is the best-known end-user database.
Note: For the full scoop on Microsoft Access, check out Access 2007: The Missing Manual .
-
Server-side databases work on a larger scale by storing data and feeding it to other programs and Web sites. Ordinary mortals don't use server-side databases directly. Instead, they use applications that, in turn , rely on databases. For example, when you browse Amazon.com, the Amazon Web page code is hard at work getting product information and customer reviews from some of the most high- powered databases on the planet. Microsoft SQL Server is one well-known server-side database. In Excel, you can just as easily extract information from a small-scale database like Access as you can get data from a full-fledged database server running SQL Server. You'll find a few minor differencesfor example, if you want to use Access data, you need to supply only the file name, whereas you need to know the server name , user ID, and password to get into a typical SQL Server database. However, the process of searching and importing the information is the same in both cases.
Note: Data querying is a one-way street. You can extract the data and analyze it, save a copy on your PC, and even modify the information in your worksheet. However, Excel doesn't provide any tools to let you route your changes back to the original source.
24.1.1. Connecting to an Access Database Before you can get information out of a database, you need to create what's known as a data connection . The connection tells Excel how to connect to your database server (or database file) so that it can extract the information it needs. You need to perform this step only once for each data source you want to use. (If you don't have a database handy, use the Northwind.accdb Access database file, which you can find on the "Missing CD" page at www.missingmanuals.com.) The following steps walk you through the process of creating a new connection for an Access database: -
Choose Data  Get External Data From Access . Get External Data From Access . The Select Data Source dialog box appears, which lets you browse through the files on your computer. -
Find the Access file you want to use, select it, and then click Open . Access database files have the file extension .mdb or .accdb (for newer files created with Access 2007).
Tip: Keep in mind that this connection remains valid as long as you don't move the file. If you move the file, you'll need to modify the connection, as explained in Section 24.1.5.
Once you pick a database file, the Select Table dialog box appears (Figure 24-1). 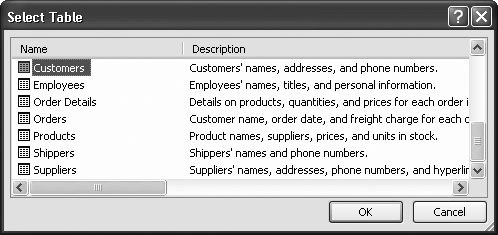 | Figure 24-1. A typical database includes several tables. Each table contains a set of records that are structured in a particular way. For example, the Northwind database (which you can find on the "Missing CD" page at www.missingmanuals.com) includes a Customers table (selected here), an Employees table, and several more tables. | |
Note: Along with the list of tables, you may also see Access queries . Queries present a customized view of a table, which can apply sorting, hide columns , or filter out unimportant records.
-
Choose a table from the list, and then click OK . Once you choose a table, the Import Data dialog box appears (Figure 24-2). 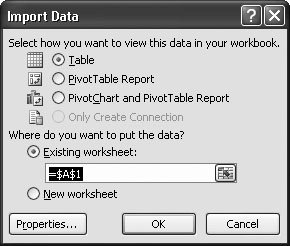 | Figure 24-2. After you've picked a database and a table, use this dialog box to tell Excel where in your workbook it should put the data. | | -
Choose whether you want to see the data as an ordinary table or a pivot table . Usually, you'll choose to insert the data as a table. That choice gives you all the features you learned about in Chapter 14 for working with the data, including sorting, filtering, and more. If you're dealing with extremely large amounts of information that you want to summarize, a pivot table is more practical. That way, your worksheet doesn't actually store the raw data (which would bloat your workbook file, and slow down Excel). Instead, it uses the information to create the pivot table. This method's only disadvantage is that if you decide to rearrange your pivot table later, Excel needs to contact the database again and fetch all the data, which can be a bit slow. To learn more about pivot tables, see Chapter 21.
Tip: If you decide to use a pivot table with a slow database, you should consider using the Defer Layout Update option, which is discussed in Section 21.4.1.
-
Choose whether you want to place the data in a new worksheet . You can choose "Existing worksheet" to place your table somewhere in the existing workbook. Then, switch to the worksheet you want to use (using the worksheet tabs), and then click in the top-left corner where your data should appear. Be sure to leave plenty of space for all your data. You'll find it easier to choose "New worksheet", which keeps your imported data separate from the data that's already in your workbook. If you opt for this choice, you'll probably want to move and rename the worksheet after Excel creates it, as described in Chapter 4. -
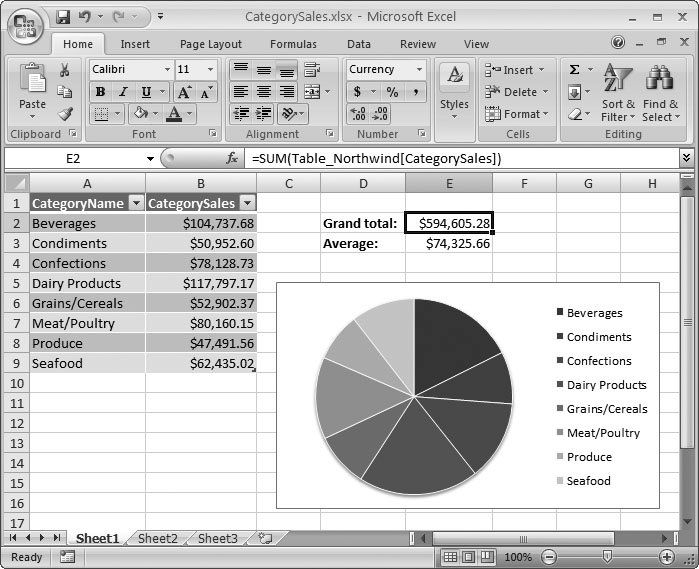
Click OK . Excel pulls the information out of the database and inserts it into your workbook, as shown in Figure 24-3. 24.1.2. Refreshing Data Once you've pulled some information out of a database, you can work with it in the same way you work with ordinary Excel data. You can edit cells , apply conditional formatting, cut and paste chunks of data, and so on. Assuming you've placed your data into an Excel table, you can also use sorting, filtering, and all the other handy table features described in Chapter 14. One of Excel's database support's nicest aspects is that it can refresh the data at any time. If you suspect that the data's changed in the database, just move somewhere in the list, and then choose Table Tools Design External Table Data Refresh Refresh. Excel wipes out your current table and replaces it with the up-to-the-minute information taken from the database, without disturbing any other content that might be in your worksheet. You can use this technique to build a "window that can analyze the most recent information in your database, as shown in Figure 24-4. 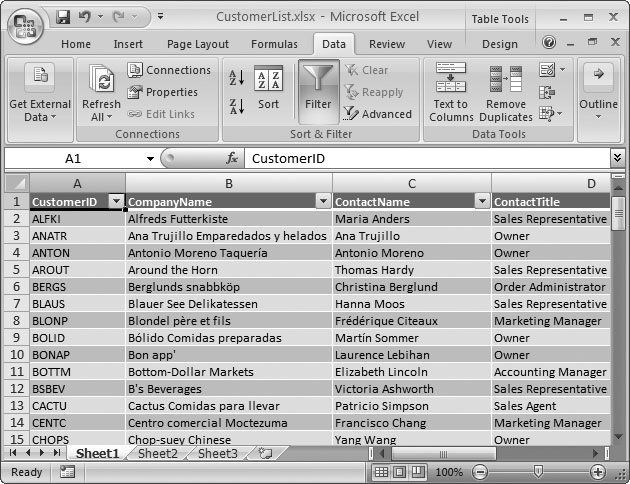 | Figure 24-3. This worksheet shows a portion of the results extracted from the Northwind database and placed in a table. Next you can apply formulas, create charts , and start analyzing. You can also use the Table Tools Design tab to format the table by applying a different table style (Section 14.1.2). | |
Tip: A workbook can have as many connections as you want. To refresh them all at once, choose Table Tools Design External Table Data Refresh Refresh All.
Note: Remember, Excel's database features are designed to let you analyze information, not change it. If you need to modify a database, you need a different tool. If you want to modify the information in an Access database, you need to use the Access software.
If you ever get tired of your database and decide to break free, just click somewhere in your table and choose Table Tools Design External Table Data Unlink command. This action changes your database-linked table into an ordinary table. In other words, you cant use the Refresh command any longer. Before you take this step, be certain that you don't want to connect to the database any longer. Once you use the Unlink command, all the database information disappears from your workbook, and there's no going back. (If you do want to get the most recent data from the database, you have to create the connection all over again.) POWER USERS' CLINIC
Controlling the Refresh Process | | You can change a few details about the refresh process using the External Data Properties dialog box (Figure 24-5). To get there, move into your table, and then choose Table Tools Design External Table Data Properties. You can use this dialog box to control whether or not Excel keeps your formatting, sorting, filtering, and row width settings when it gets new data. (Ordinarily, it does.) You can also use this dialog box to tell Excel what to do if it finds that records have been removed or added when it performs a refresh. Ordinarily, it inserts the new data and removes anything that's been deleted (the first option in the list), which is by far the simplest choice. Alternatively, you can choose one of two much more complex options that insert the new information in new rows, so you can take stock of what's changed. |
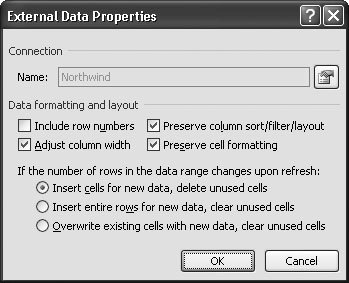 | Figure 24-5. Use "Include row numbers" to add an extra column that numbers each row, which helps you keep track of them when you perform refreshes. Clear the other checkboxes if you don't want to keep your custom formatting when you refresh your data. Finally, choose one of the three options at the bottom to control what happens if Excel finds out that records have been deleted or added when it performs a refresh. | |
24.1.3. Data Source Security In order to provide the database update feature, Excel stores the information about your data connection in your Excel file. You can save your workbook, open it later, and perform a refresh to get the most recent information. Unfortunately, Excel is also relentlessly paranoid . When you open a workbook that has a data connection in it, Excel automatically disables your data connection and shows you a message (Figure 24-6). Excel takes this step because it knows there's an incredibly slim chance that you're opening a workbook created by a devious computer hacker. This workbook could contain a database connection that doesn't just read data, but somehow executes a command that changes or even deletes it. To guard against this possibility, Excel stops you, temporarily, from using the connection. 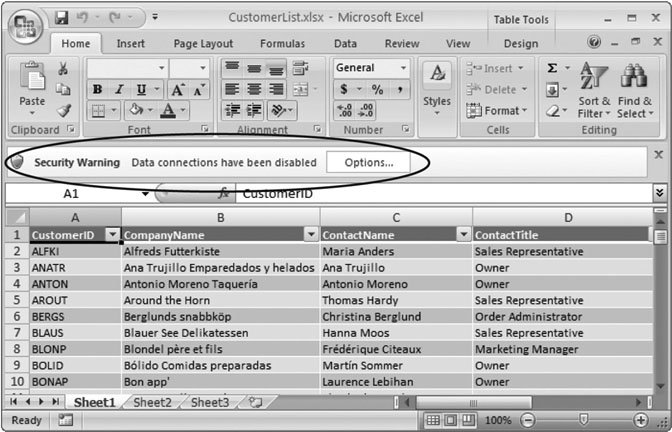 | Figure 24-6. This warning message tells you your workbook contains one or more data connections, and that Excel's disabled them just to be safe. You can switch them back on by clicking the Options button, and then choosing "Enable this content". | |
Of course, if you've created the workbook yourself (and you know that you aren't a devious computer hacker), there's no way your workbook could contain any devious trickery . Therefore, your connections are completely safe, and there's no reason you shouldn't turn them on. To do so, in the message bar (where the security alert appears), click the Options button. When the security dialog box appears, choose "Enable this content", and then click OK. If you frequently open and close your workbook, you may find this message a little annoying. You can tell Excel to automatically allow all connections, but that tactic's a dangerous one that's best avoided in case someone slips you a genuinely evil spreadsheet file. You're better off telling Excel to trust specific workbooks that you know are decent. You can tell Excel to automatically allow data connections in files that are stored in a specific folder. As long as you don't put suspicious content there, you get convenience for your own workbook files without giving up security for all others. To learn how to configure a trusted location, see Section 27.3.2. 24.1.4. Connecting to a SQL Server Database The process for connecting to a full-fledged SQL Server database is similar to the process for connecting to an Access databaseyou just need to supply more information. To get the process going, follow these steps: -
-
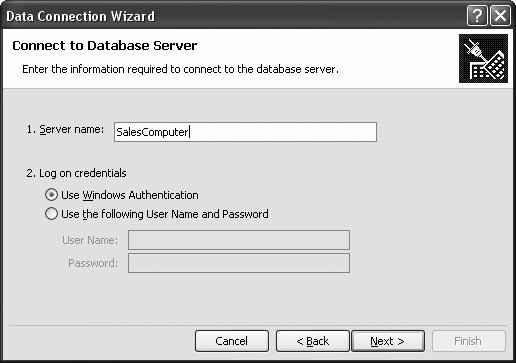
Enter the database server's name . The server is the computer that's running the database software, which must be accessible on your network. (Check with the nearest network administrator for help.) If the SQL Server database software happens to be on your computer, just enter the word localhost , which is code for "this computer right here." If you've installed the slightly scaled-down, but absolutely free, version of SQL Server that's known as SQL Server 2005 Express Edition (and it's on your computer), you should use the server name .\SQLEXPRESS . Reminder: Don't forget the initial period. -
Supply your login information . Usually, you'll choose Use Windows Authentication, which tells Excel to log onto the database using your current Windows account. Depending on the setup of your network and database, that option may not work, and you may need to choose "Use the following Name and Password" instead. If so, supply the correct user name and password in the appropriate boxes. -
Click Next to move to the next step . Now you need to pick your data (Figure 24-8). -
Choose the database you want from the "Select the database" list . A SQL Server computer can hold hundreds (or more) databases. Every database is a collection of tables. You need to pick the database that has the table you need. -
Make sure the checkbox next to the "Connect to a specific table" setting is not turned on . When you choose a database, Excel shows you a list of all the tables that are in the database (see Figure 24-8). However, don't pick the table you want just yet. You may want to reuse the same connection to connect to different tables in the same database. In order to do this, you need to wait just a few more seconds before you pick your table. -
Click Next . This move gets you to the last step (Figure 24-9). 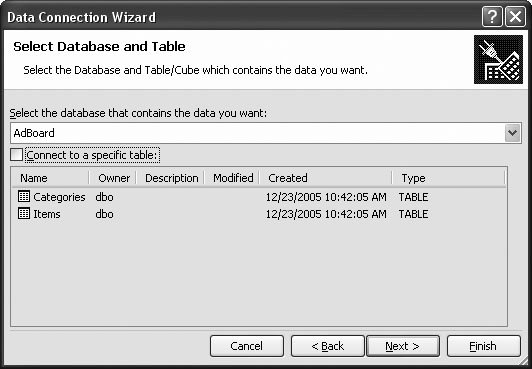 | Figure 24-8. A database is chock-full of information. You need to pick the database you want to use (using the drop-down list at the top). In this example, a connection is being created to the AdBoard database, which contains two tables (Categories and Items). | | 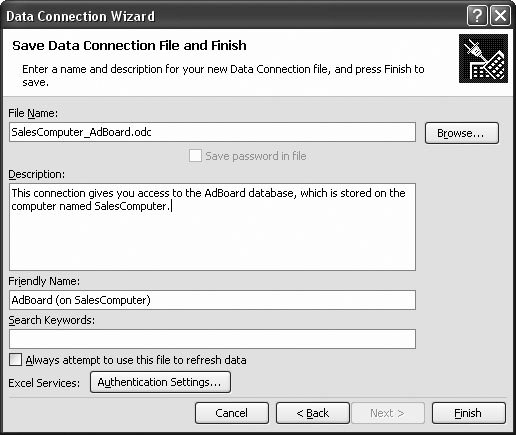 | Figure 24-9. In the final step, you set some descriptive information about your connection. | | -
Fill in the Description and Friendly Name information . When you create a new connection, Excel saves it in a special location on your computer called My Data Sources. That way, if you want to use the same connection again, you don't need to go through the Data Connection wizard. (See Section 24.1.5 for the full details.) To make the connection easier to identify, you should fill in the Description and Friendly Name boxes. (The "friendly name" is a name that makes sense to ordinary humans . The actual file name that's used to store the data connection on your computer may be considerably more cryptic, although you're free to change that, too.) -
Click Finish to end the wizard . Now, Excel shows you all the tables in your database and asks which one you want to use (Figure 24-10). 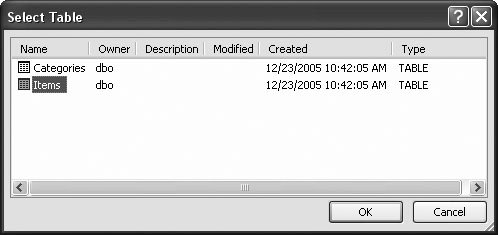 | Figure 24-10. The AdBoard database has two tables. In this example, Excel will insert the contents of the Items table into the worksheet. | | -
Pick a table and click OK . Excel shows the Import Data dialog box that you saw earlier (Figure 24-2), which allows you to choose where you want the new data. Once you make your selection, Excel contacts the database server, fetches the contents of the table you selected in the previous step, and then inserts it into your workbook. From this point on, you can refresh the data and modify the connection using the techniques you learned earlier in this chapter. POWER USERS' CLINIC
Creating a Data Source That Updates Automatically | | Excel leaves a few of its advanced database connection options off the Data Connection wizard, including a nifty timesaving tool: the ability to have Excel automatically suck in a fresh load of data at regular intervals. To make Excel do this updating, follow these steps: -
Choose Data Connections Connections. The Workbook Connections dialog box appears, with a list of all of the connections in your workbook. -
Click the Properties button to open the Connection Properties dialog box, which has every setting you can change (Figure 24-11). If you want to tell Excel to refresh the data in your workbook periodically, add a checkmark in the "Refresh every" box and enter your preferred number of minutes. Excel performs these updates automatically, without bugging you, so you can keep working on other tasks . Of course, if you've changed imported data in your spreadsheet, your changes will be lost when Excel performs its refresh. So use the "Refresh every" section with caution. Don't use it with an extremely slow database, or the performance of your workbook may suffer. And don't make the refresh interval too small, or you'll create an unnecessary amount of extra work for your database server. (Remember, there's always the Data Connections Refresh All button to trigger an immediate refresh.) |
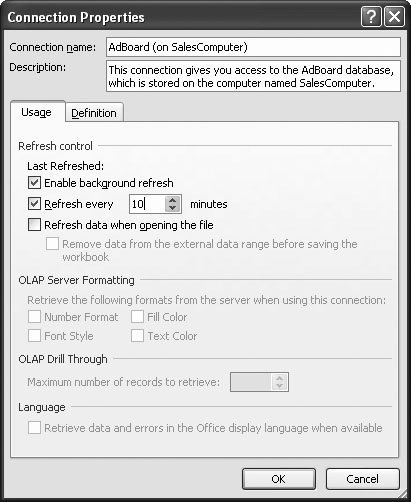 | Figure 24-11. The Connection Properties window has several advanced database connection options. You can choose to have Excel retrieve the latest information from the database whenever you open the workbook using the "Refresh data when opening the file" setting. This works only if you open your workbook from a trusted location (Section 27.3.2). You can also tell Excel to automatically refresh your data every few minutes using the "Refresh every" setting. | |
24.1.5. Reusing Your Database Connection Once you've created a connection, Excel stores the connection in your workbook so that you can reuse ita real timesaver if you want to grab another table from the same database. To do so, just choose Data Get External Data Existing Connections. The Existing Connections dialog box appears (Figure 24-12). Youll find your existing connection(s) in the "Connections in this Workbook" section at the top of the list. Click Open to use it again, without being forced to re-enter all the same settings. This technique works for all connections, whether they point to Access databases or more powerful server-side database like SQL Server. However, if you're using a server-side database, there's one more trick you can use. You can tell Excel to make your connection information available to other workbooks on your computer. So you have yet another way to cut down on the amount of time you spend creating (or recreating ) database connections. Here's what you need to do: -
Choose Data Connections Connections . The Workbook Connections dialog box appears, with a list of all of the connections in your workbook. -
Select the connection you want to reuse, and then click the Properties button . This action shows the Connection Properties dialog box (Figure 24-11), where you can tweak all the connection details you supplied in the Data Connection wizard (plus a few more). 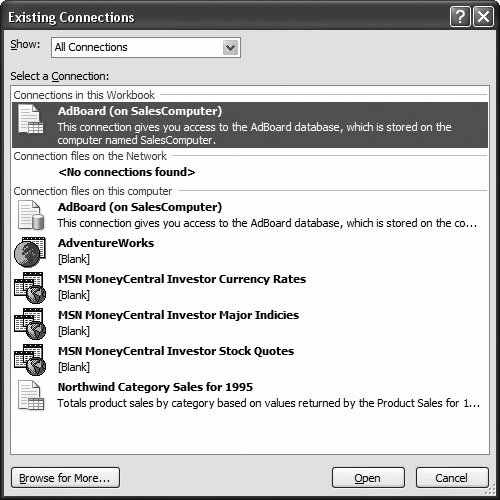 | Figure 24-12. The Existing Connections dialog box gives you a head start for connecting to the AdBoard database that you created previously. If you go ahead and click Open, Excel asks you which table you want to use. If you want, now's the time to import a different table in a different place in your workbook. | | -
Choose the Definition tab, and then place a checkmark in the "Always use connection file" checkbox . -
Click OK to save your changes . Excel warns you that you'll now actually have two connections (one in your workbook and one stored on your computer). There's a possibility for confusion here because if you modify the connection in your workbook, it doesn't affect the copy that's stored on your computer. Click Yes to go ahead. -
Click Close to return to Excel . Now, you can use the Data Get External Data Existing Connections command from any workbook. In the Existing Connections dialog box, youll see your connection in the "Connection files on this computer" section.
Note: Behind the scenes, Excel stores your database connections in a special My Data Sources folder deep within the My Documents folder on your computer. For example, you might find the database connection created in the previous example stored in the file C:\Documents and Settings\Matt\My Documents\My Data Sources\SalesComputer_AdBoard.odc .
To delete a connection, you need to remove the connection file from the My Data Source folder. The easiest way to do this is to open the Existing Connections dialog box (choose Data Get External Data Existing Connections). Then, click the "Browse for More button to open a dialog box that shows all the files in the My Data Sources folder. When you spot the file for your data connection, rightclick it, and then choose Delete. |