14.3. Linking to Related Data The switchboard's the secret to providing a bird's-eye view of your database. However, your work doesn't end here. A well-designed navigation system lets you move easily from one form to the next , so you can move efficiently through your entire database. The secret to form-to-form navigation is thinking about your workflow (that is, the order in which you move between tasks when working on your database). Suppose you're a furniture company selling hand- painted coffee tables. What happens when you receive a new order? Probably, you start by creating or selecting the customer (in one form), and then you add the order information for that customer (in another form). The switchboard doesn't need to go directly to the order form. Instead, you should start with a customer form. That form should provide a button (or some other control) that lets you move on to the order form. You need to go through a similar thought process to create forms for, say, the customer service department. In their case, they need a way to pick a customer and see, at a glance, the billing and payment details, the order information, and the shipping records. The best solution in this scenario could be to create a compound form that pulls everything together. Getting from one form to another is easy. All you need's the right button. The following two sections walk you through two common examples. 14.3.1. Showing Linked Records in Separate Forms In Chapter 13, you learned how a subform control can show linked records in one place (Section 13.3.1). However, subforms don't always give you enough room to work. Depending on the way you work and the sheer volume of information you're facing , you may prefer to show the related records in a different place. You could add a button to your form that pops open another form with the linked records. The trick to making this work is using filtering in the second form so that it shows only the related records. Figures 14-19 and 14-20 show an example with the Cacophon Studios database. You can create the two forms that appear in Figures 14-19 and 14-20 without much effort. The tricky bit's creating the "See Students in this Class" button. Here's what you need to do to wire up a button that opens another form to show related records: -
Open the parent form . Here, you start with the Classes form. -
In the Design tab, click the Button icon. Draw the button onto your form . The Button wizard springs into action. 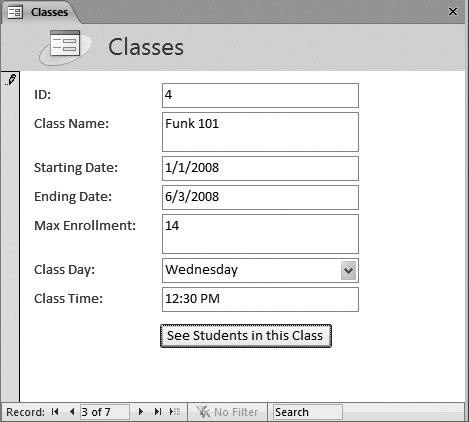 | Figure 14-19. The Classes form shows a list of classes. Click "See Students in this Class" to open a second form (Figure 14-20). | | 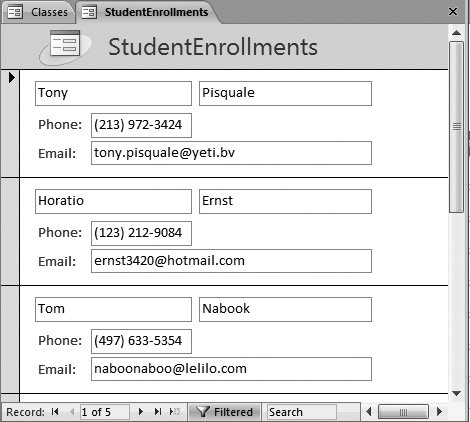 | Figure 14-20. The StudentEnrollments form homes in on the students in just one class. | | -
Choose the Form Operations category, choose Open Form, and then click Next . The next step in the wizard shows all the forms in your database. -
Choose the child form that has the related records, and then click Next . In this case, choose the StudentEnrollments form. -
Choose "Open the form and show all the records", and then click Next . This part seems a bit oddafter all, don't you want to show just the related records in the StudentEnrollments table? Of course you do. But unfortunately , the Button wizard can't help youit has a nasty bug in this area that prevents it from creating the right filter condition. So you need to do a bit more work to define the filter condition yourself. -
Enter some text, and then choose a picture . From this point on, the Button wizard shows the standard steps you learned about earlier (Section 13.2.7). -
Supply a name for the button, and then click Finish . Now you have a button that opens the form you want, but doesn't filter it down. To add that part, you need to change the macro that the button uses.
Note: A macro's a list of actions that you want Access to perform. In the next chapter, you'll explore macros in depth. For now, you'll learn just enough to create the button you need.
-
If the Property Sheet isn't visible, then choose Form Design Tools Design  Tools Property Sheet . Tools Property Sheet . -
In the Property Sheet, choose the Event tab, and then click the On Click box . You see the text [Embedded Macro] there, which indicates that there's a macro attached to this event. -
Click the ellipsis button to open your macro for editing . A new tab appears, which lists all the actions your macro performs , in order. You'll learn your way around this window in Chapter 15. For now, you have just two simple changes to make. -
At the top of the list, you see an action named OpenForm. (This action opens your child form when the button's clicked.) Click to select it (Figure 14-21) . When you select an action in a macro, a bunch of information about it appears in the Action Arguments section at the bottom of the window. -
Click the Where Condition box (in the Action Arguments section at the bottom of the window), and then type in your filter expression . This filter expression needs to select the linked records. In the current example, that means you're interested in records that have the current class ID. Here's the expression you need: [ClassID]=[Forms]![Classes]![ID] 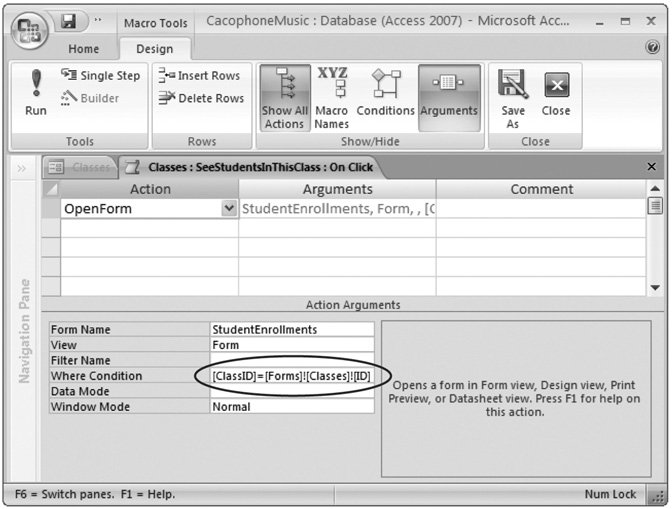 | Figure 14-21. The Where Condition box is the place where you need to put your filter expression. | | This expression tells Access to show an enrollment record only if the ClassID value in the StudentEnrollments form matches the ID value in the Classes form. In other words, you're getting the student enrollments for the current class.
Note: The strange exclamations in this filter expression let you link two forms. The filter expression's being set on the form you're opening (the StudentEnrollments form), which has the ClassID field. However, you need to narrow down the records it shows based on the ID field in another form (Classes). The syntax [Forms]![Classes]![ID] is just a fancy way to tell Access to go looking for the ID value it needs on a currently open form named Classes.
-
The change you made in the previous step almost completes your macro. However, it's a good idea to add one more action. Click the box underneath OpenForm, and then type Requery (Figure 14-22) . This instruction tells Access to refresh the current form (which is the StudentEnrollments form you just opened). This step's necessary because the StudentEnrollments form might already be open when you click the "See Students in this Class" button. If it is, your macro changes its filter, but the filter doesn't spring into action. To update the record display, you need to use Requery to force the form to refresh itself. -
Now you're finished. Close the macro tab, and then click Yes when Access prompts you to save it . Now you have a perfect navigation button that shows a related form and cuts it down to just those records that you're interested in. You'll learn much more about fine-tuning macros in the next chapter.  | Figure 14-22. The Requery action refreshes the current form. It doesn't need any extra information. | |
To try out your button, switch to Form view, and then give it a click. When you click the "See Students in this Class" button and the StudentEnrollments form appears, your filtering takes effect.
Tip: There's nothing to stop someone from removing your filtering using the ribbon's Home Sort & Filter section (or by clicking the Filtered button that appears at the bottom of the form, next to the navigation buttons ). If you dont want to allow this flexibility, you can configure the StudentEnrollments form so it doesn't let anyone change its filtering settings. To do so, open the form in Design view, select the Form item in the Property Sheet list, and then change the Allow Filters property from Yes to No.
14.3.2. Showing More Detailed Reports with Links You can use a similar technique to allow navigation in reports. If you want, you can create a way to jump from one report to another, related report. In fact, the macro you need to create's almost identical to the one in the previous example. Usually, Access experts use this technique to start with a general report, and let people click their way to a more detailed report that highlights part of the data. Figures 14-23 and 14-24 show an example.
Note: Reports are designed to be printed. For that reason, big gray buttons look a little out of place. Your other optionlinkingas shown in this example, is much more common because it shows the data you need to print, and adds interactivity at the same time.
To create this navigation, you need to begin by creating a text box that looks like a hyperlink. (You can't use the bona fide hyperlink control, because it displays only fixed, unchanging text. Instead, you need a way to display a field's content as a linkin this example, the customer ID.) You can then create a macro that springs into action when the text field's clicked, to move you to the new report. This macro's job is to open the detailed report that you want, and then apply filtering so that only the related records appear. 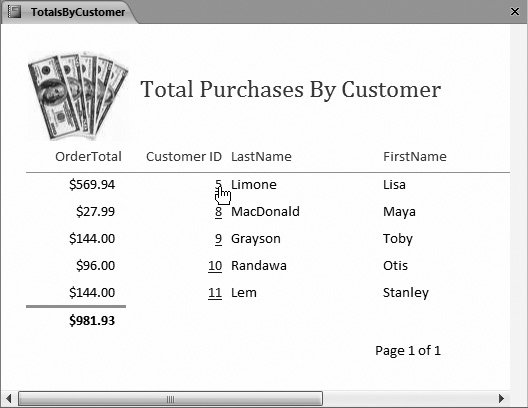 | Figure 14-23. The first report (TotalsByCustomer) shows all the customers and their total orders. Click a single customer, and then Access launches the more detailed report shown in Figure 14-24. | |
 | Figure 14-24. Here's the CustomerPurchases report that profiles the selected individual's spending habits. A string-building expression (="Products Purchased By " & [FirstName] & " " & [LastName]) puts the current customer's name into the title. | |
You can easily format the text box. You can select any control, and then change its color , font, and so on, using the commands in the ribbon. However, you don't even need to perform this work. That's because every text box has an odd property named Is Hyperlinkset this to Yes, and the text box morphs into a blue underlined piece of text, which is just what you want. Once that's out of the way, it's time to add the macro you need. You can use the following steps with the Boutique Fudge database (included with the downloadable content for this chapter) to add a link that opens the CustomerPurchases report to the TotalsByCustomer report. -
Open the report you want to use in Design view . In this example, everything starts at the TotalsByCustomer form. -
If the Property Sheet isn't visible, then choose Report Design Tools Design Tools Property Sheet . -
In the Property Sheet, switch to the Event tab, and then click the On Click box. Click the ellipsis ( ) button . The Choose Builder dialog box appears, and asks you how you want to create the code that runs when the link's clicked. -
Choose Macro Builder, and then click OK . The macro editing window appears. -
In the first row, in the Action column, click the drop-down arrow. Choose OpenReport . You could also use OpenForm to launch a form (for editing) when the report link's clicked. -
In the Action Arguments section, change the Report Name property to the report you want to use . In this example, that's CustomerPurchases. -
Now you need to set the Where Condition property to apply your filter. Your filter needs to select customers that match the ID value in the current record . The expression you need's very similar to the one you used in the form example. You need to pick the right field in the report you're opening (the CustomerID field in the CustomerPurchases report), and then match it to the field where you clicked the link (the ID field in the TotalsByCustomers report). Here's what you need: [CustomerID]=[Reports]![TotalsByCustomer]![ID] As in the form example, this expression uses some wonky syntax with exclamation marks to tell Access how to find the TotalsByCustomers report. -
Underneath the OpenReport action, type in Requery . As in the form example, you need to refresh your report so that the filtering takes effect even if the form's already open. -
Close the macro window, and then choose Yes to save your changes when prompted . You return to the report design window. -
Switch to report view, and then try out your link . Now you can click the link to drill down to the more detailed report. As always, you can try this example out for yourself using the sample databases for this chapter. |